Install Backstage Local
- O projeto não publica binários, somente o código fonte.
- Não existe uma imagem de container que você possa utilizar.
- Não existe um Helm Chart para instalá-lo no Kubernetes.
O projeto está ai e faça com ele o que você quiser. Mergulhe a fundo na documentação até conseguir alguma coisa.
- Não é o tipo de produto que simplesmente configuramos e rodamos.
- Pode ser estendido por plug-ins e podemos escolher aqueles desenvolvidos por outros ou escreva você mesmo.
- Possui componentes que representam algumas entidades lógicas como aplicativos e infraestrutura.
- Possui templates que podem ser usados para criar vários itens na interface gráfica.
Toda vez que você decidir colocar um plugin novo será necessário recriar uma imagem se estiver rodando em containers.
Caso queira utilizar o Backstage as a Service é possível, mas como a gente gosta de sofrer pra aprender, vamos criar o nosso Backstage.
O que temos aqui é um código fonte que é a base para construímos o que precisamos. Entendendo isso faz todo sentido que comecemos rodando o projeto na nossa própria máquina, pois precisaremos customizar muita coisa.
Vamos instalar direto na nossa máquina e ver o que acontece.
Requisitos:
- curl ou wget instalado
- node lts/iron instalado (recomendo a instalação usando o nvm).
- yarn instalado na versão 4.4.1
- docker (no lab já foi requisitado antes). Alguns processamentos internos do plugin techdocs precisam do docker se for usar a configuração default. É possível contornar.
sudo apt-get install curl wget -y
# Veja a documentação antes, para versões mais novas.
curl -o- https://raw.githubusercontent.com/nvm-sh/nvm/v0.39.5/install.sh | bash
nvm install lts/iron
npm install --global yarn
corepack enable
yarn set version 4.4.1
npx --version
10.9.0

node --version
v20.18.1

yarn --version
4.4.1

# Esse comando irá criar a pasta com o nome do projeto e puxar o código fonte.
npx @backstage/create-app@latest
(node:1513718) ExperimentalWarning: CommonJS module /home/david/.nvm/versions/node/v23.2.0/lib/node_modules/npm/node_modules/debug/src/node.js is loading ES Module /home/david/.nvm/versions/node/v23.2.0/lib/node_modules/npm/node_modules/supports-color/index.js using require().
Support for loading ES Module in require() is an experimental feature and might change at any time
(Use `node --trace-warnings ...` to show where the warning was created)
Need to install the following packages:
@backstage/[email protected]
Ok to proceed? (y) y

(node:1514313) [DEP0040] DeprecationWarning: The `punycode` module is deprecated. Please use a userland alternative instead.
(Use `node --trace-deprecation ...` to show where the warning was created)
? Enter a name for the app [required] backstage
Creating the app...

 Checking if the directory is available:
  checking      backstage ✔

 Creating a temporary app directory:

 Preparing files:
  copying       .dockerignore ✔
  copying       .eslintignore ✔
  templating    .eslintrc.js.hbs ✔
  templating    .gitignore.hbs ✔
  copying       .prettierignore ✔
  templating    .yarnrc.yml.hbs ✔
  copying       README.md ✔
  copying       app-config.local.yaml ✔
  copying       app-config.production.yaml ✔
  templating    app-config.yaml.hbs ✔
  templating    backstage.json.hbs ✔
  templating    catalog-info.yaml.hbs ✔
  templating    package.json.hbs ✔
  copying       playwright.config.ts ✔
  copying       tsconfig.json ✔
  copying       yarn.lock ✔
  copying       README.md ✔
  copying       yarn-4.4.1.cjs ✔
  copying       entities.yaml ✔
  copying       org.yaml ✔
  copying       template.yaml ✔
  copying       catalog-info.yaml ✔
  copying       index.js ✔
  copying       package.json ✔
  copying       README.md ✔
  templating    .eslintrc.js.hbs ✔
  copying       Dockerfile ✔
  copying       README.md ✔
  templating    package.json.hbs ✔
  copying       index.ts ✔
  copying       .eslintignore ✔
  templating    .eslintrc.js.hbs ✔
  templating    package.json.hbs ✔
  copying       app.test.ts ✔
  copying       android-chrome-192x192.png ✔
  copying       apple-touch-icon.png ✔
  copying       favicon-16x16.png ✔
  copying       favicon-32x32.png ✔
  copying       favicon.ico ✔
  copying       index.html ✔
  copying       manifest.json ✔
  copying       robots.txt ✔
  copying       safari-pinned-tab.svg ✔
  copying       App.test.tsx ✔
  copying       App.tsx ✔
  copying       apis.ts ✔
  copying       index.tsx ✔
  copying       setupTests.ts ✔
  copying       LogoFull.tsx ✔
  copying       LogoIcon.tsx ✔
  copying       Root.tsx ✔
  copying       index.ts ✔
  copying       EntityPage.tsx ✔
  copying       SearchPage.tsx ✔

 Moving to final location:
  moving        backstage ✔
  fetching      yarn.lock seed ✔
  init          git repository ◜
 Installing dependencies:
  init          git repository ✔
  executing     yarn install ✔
  executing     yarn tsc ✔

🥇  Successfully created backstage


 All set! Now you might want to:
  Run the app: cd backstage && yarn dev
  Set up the software catalog: https://backstage.io/docs/features/software-catalog/configuration
  Add authentication: https://backstage.io/docs/auth/
Com tudo instalado podendo entrar na pasta e rodar o comando abaixo.
Não vou disponibilizar um repositório do Backstage pronto inicialmente, pois acredito que iremos pular etapas.
export LOG_LEVEL=debug
# O Backstage nas versões mais novas precisam dessa opção exportada para o node.
export NODE_OPTIONS="--no-node-snapshot"
# Sobe o frontend e o backend utilizando as configurações em app-config.yaml
yarn dev
E temos o nosso disponível em localhost:3000.
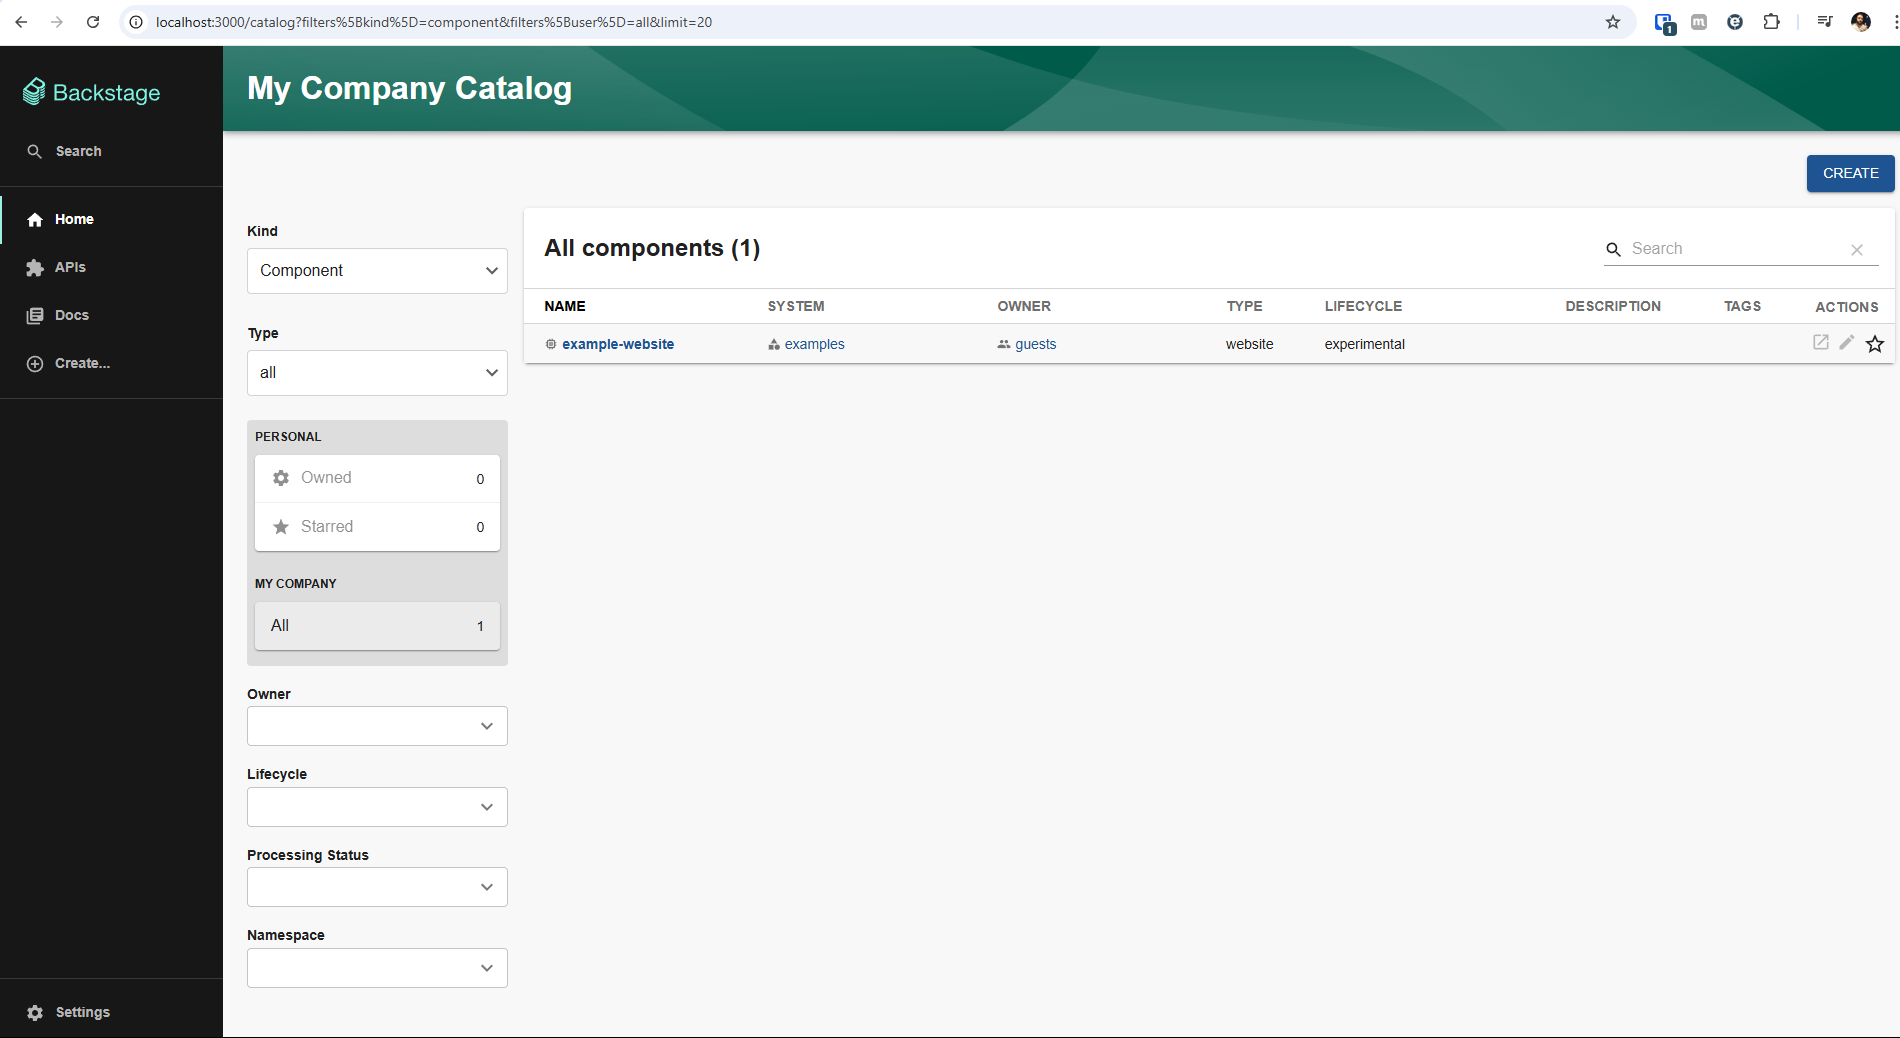
Podemos ver que já temos um website de exemplo que vamos conferir jájá.
No diretório raiz temos o arquivo app-config.yaml que é o principal arquivo de configuração, mas não único. Nem todos arquivos de configuração são yaml, às vezes é necessário editar os arquivos typescript.
app:
  title: `Scaffolded Backstage App`
  baseUrl: http://localhost:3000

organization:
  name: My Company

backend:
  # Used for enabling authentication, secret is shared by all backend plugins
  # See https://backstage.io/docs/auth/service-to-service-auth for
  # information on the format
  # auth:
  #   keys:
  #     - secret: ${BACKEND_SECRET}
  baseUrl: http://localhost:7007
  listen:
    port: 7007
    # Uncomment the following host directive to bind to specific interfaces
    # host: 127.0.0.1
  csp:
    connect-src: ["'self'", 'http:', 'https:']
    # Content-Security-Policy directives follow the Helmet format: https://helmetjs.github.io/#reference
    # Default Helmet Content-Security-Policy values can be removed by setting the key to false
  cors:
    origin: http://localhost:3000
    methods: [GET, HEAD, PATCH, POST, PUT, DELETE]
    credentials: true
  # This is for local development only, it is not recommended to use this in production
  # The production database configuration is stored in app-config.production.yaml
  database:
    client: better-sqlite3
    connection: ':memory:'
  # workingDirectory: /tmp # Use this to configure a working directory for the scaffolder, defaults to the OS temp-dir

integrations:
  github:
    - host: github.com
      # This is a Personal Access Token or PAT from GitHub. You can find out how to generate this token, and more information
      # about setting up the GitHub integration here: https://backstage.io/docs/integrations/github/locations#configuration
      token: ${GITHUB_TOKEN}
    ### Example for how to add your GitHub Enterprise instance using the API:
    # - host: ghe.example.net
    #   apiBaseUrl: https://ghe.example.net/api/v3
    #   token: ${GHE_TOKEN}

proxy:
  ### Example for how to add a proxy endpoint for the frontend.
  ### A typical reason to do this is to handle HTTPS and CORS for internal services.
  # endpoints:
  #   '/test':
  #     target: 'https://example.com'
  #     changeOrigin: true

# Reference documentation http://backstage.io/docs/features/techdocs/configuration
# Note: After experimenting with basic setup, use CI/CD to generate docs
# and an external cloud storage when deploying TechDocs for production use-case.
# https://backstage.io/docs/features/techdocs/how-to-guides#how-to-migrate-from-techdocs-basic-to-recommended-deployment-approach
techdocs:
  builder: 'local' # Alternatives - 'external'
  generator:
    runIn: 'docker' # Alternatives - 'local'
  publisher:
    type: 'local' # Alternatives - 'googleGcs' or 'awsS3'. Read documentation for using alternatives.

auth:
  # see https://backstage.io/docs/auth/ to learn about auth providers
  providers:
    # See https://backstage.io/docs/auth/guest/provider
    guest: {}

scaffolder:
  # see https://backstage.io/docs/features/software-templates/configuration for software template options

catalog:
  import:
    entityFilename: catalog-info.yaml
    pullRequestBranchName: backstage-integration
  rules:
    - allow: [Component, System, API, Resource, Location]
  locations:
    # Local example data, file locations are relative to the backend process, typically `packages/backend`
    - type: file
      target: ../../examples/entities.yaml

    # Local example template
    - type: file
      target: ../../examples/template/template.yaml
      rules:
        - allow: [Template]

    # Local example organizational data
    - type: file
      target: ../../examples/org.yaml
      rules:
        - allow: [User, Group]

    ## Uncomment these lines to add more example data
    # - type: url
    #   target: https://github.com/backstage/backstage/blob/master/packages/catalog-model/examples/all.yaml

    ## Uncomment these lines to add an example org
    # - type: url
    #   target: https://github.com/backstage/backstage/blob/master/packages/catalog-model/examples/acme-corp.yaml
    #   rules:
    #     - allow: [User, Group]

kubernetes:
  # see https://backstage.io/docs/features/kubernetes/configuration for kubernetes configuration options

# see https://backstage.io/docs/permissions/getting-started for more on the permission framework
permission:
  # setting this to `false` will disable permissions
  enabled: true
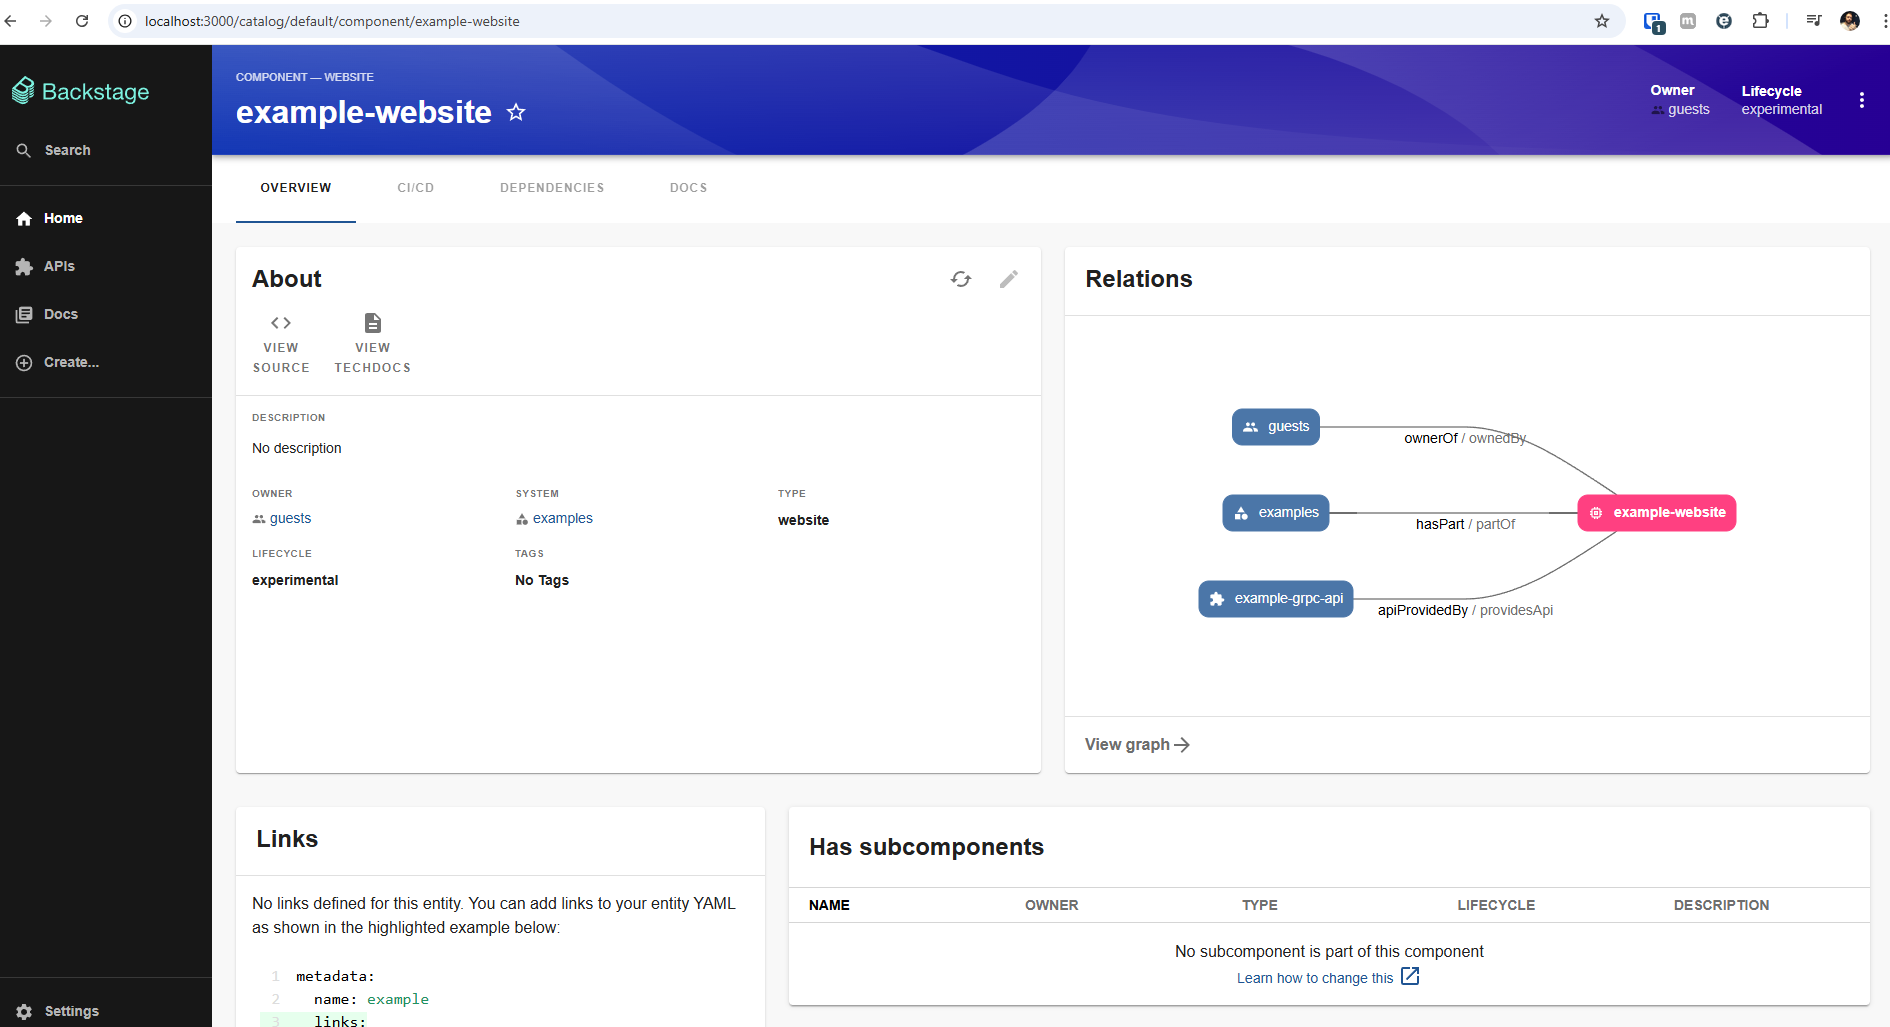
Dentro do exemplo-website, podemos conferir que temos toda a informação sobre esse website.
- Overview: Nos dando a visão geral
- Documentação em uma Aba dedicada.
- Relação com outros componentes.
- Links úteis
- Etc.
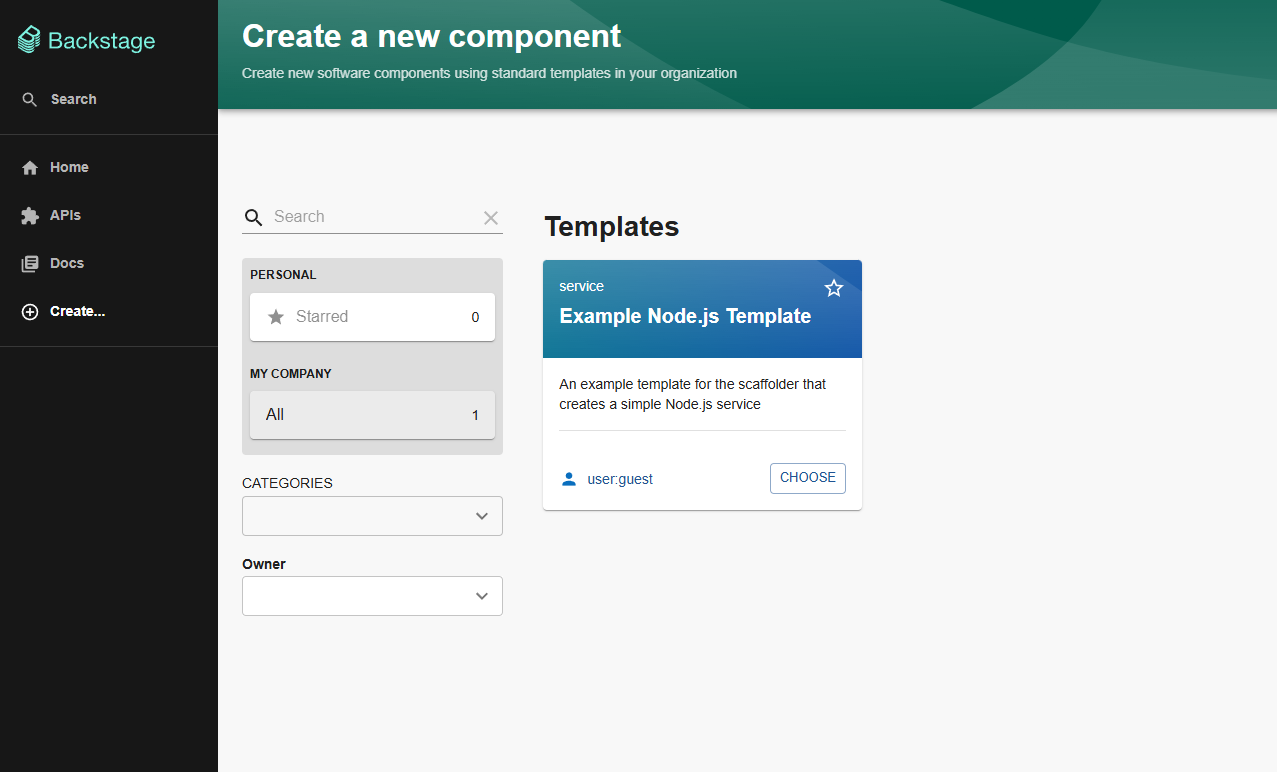
Na tela principal podemos criar novo componente onde os templates estão localizados. Aqui deveria ter uma lista de formulários que poderiam ser preenchidos com dados que podem ser transcritos para ações, mas nesse momento só temos o exemplo que se quiser testar conseguirá fazer muita coisa.
Avançando Um Pouco Mais
Se você seguiu o lab já deve ter um cluster localhost com o argocd instalado, postgres instalado e uma service account para o Backstage com um token válido. Algumas variáveis de ambiente precisam estar exportadas no terminal para utilizar o config abaixo.
# É necessário que você crie esses tokens na sua conta do github ou gitlab ou em ambas se quiser usar.
export GITHUB_TOKEN=ghp_XXXXXXXXXXXXXXXXXXXXXXXXXXXXX
export GITLAB_TOKEN=glpat-xxxxxxxxxxxxxxxxxx
# Um arquivo foi gerado no lab com o valor desta variável
export KUBERNETES_BACKSTAGE_SA_TOKEN=xxxxxxxxxxxxxxxxxxxxxxxxxxxxxxxxxxxxxxxxxxxxxxxxxxxxxxxxxxxxxxxxxxxxxxxxxxxxxxxxxxxxxxxxxxxxxxxxxxxxxxxxxxxxxxxxxxxxxxxxxxxxxxxxxxxxxxxxxxxxxxxxxxxxxxxxxxxxxxxxxxxxxxxxxxxxxxxxxxxxxxxxxxxxxxxxxxxxxxxxxxxxxxxxxxxxxxxxxxxxxxxx
O banco de dados foi deployado dentro do kubernetes. O ingress não trabalha com redirecionamento TCP. É necessário fazer um port-forward para que o banco fique exposto em localhost:5432. O banco já esta no kubernetes. No futuro iremos deployar o Backstage dentro do cluster e este forward não será mais necessário, mas por enquanto estamos rodando o Backstage fora do cluster, pois ainda não criamos uma imagem para ele. Como vamos subir e parar varias vezes criar uma imagem a cada coisa que fizermos iria demorar demais.
# Mantenha um terminal aberto com o forward executando para acessar o banco
kubectl port-forward --namespace backstage svc/backstage-postgres-postgresql 5432:5432 &
Vamos utilizar essas coisas no nosso app-config.yaml
app:
  title: Scaffolded Backstage App
  baseUrl: http://localhost:3000

organization:
  name: DevSecOps # Ajustado

backend:
  baseUrl: http://localhost:7007
  listen:
    port: 7007

  csp:
    connect-src: ["'self'", 'http:', 'https:']

  cors:
    origin: http://localhost:3000
    methods: [GET, HEAD, PATCH, POST, PUT, DELETE]
    credentials: true

  database:
  # Removemos o banco local sqlite e já configuramos o banco postgres (não é necessário, mas caso queira testar já)
    client: pg
    connection:
      host: localhost
      port: 5432
      user: admin
      password: devsecops
      database: backstage

integrations:
  github:
    - host: github.com
      token: ${GITHUB_TOKEN} # no terminal essa variavel tem que estar exportada
  gitlab:
    - host: gitlab.com
      token: ${GITLAB_TOKEN} # no terminal essa variavel tem que estar exportada

proxy:

techdocs:
  builder: 'local'
  generator:
    runIn: 'docker' # Por isso precisamos do docker.
  publisher:
    type: 'local'

auth:
  providers:
    guest: {}

scaffolder:
catalog:
  import:
    entityFilename: catalog-info.yaml
    pullRequestBranchName: backstage-integration
  rules:
    - allow: [Component, System, API, Resource, Location]
  locations:
    - type: file
      target: ../../examples/entities.yaml
    - type: file
      target: ../../examples/template/template.yaml
      rules:
        - allow: [Template]
    - type: file
      target: ../../examples/org.yaml
      rules:
        - allow: [User, Group]

kubernetes: # Ajustado
  serviceLocatorMethod:
    type: 'multiTenant'
  clusterLocatorMethods:
    - type: 'config'
      clusters:
        - name: 'kind-study'
          url: 'https://localhost:6443'
          authProvider: 'serviceAccount'
          skipTLSVerify: true
          skipMetricsLookup: true
          serviceAccountToken: ${KUBERNETES_BACKSTAGE_SA_TOKEN} # no terminal essa variavel tem que estar exportada
permission:
  enabled: true
Para o Backstage ganhar utilidade precisamos preencher suas funcionalidades com plugins e componentes.
Inicialmente o que já podemos fazer é subir um kubernetes localmente para utilizar os plugins pré instalados.
Uma das coisas que podemos resolver já se foi montado o lab é mudar o banco de dados local para um banco de dados postgres
yarn --cwd packages/backend add pg