Mutual TLS (mTLS)
mTLS (Mutual TLS) is a version of TLS where not only does the server authenticate the client, but the client also authenticates the server. This is done through mutual exchange of digital certificates during the TLS handshake.
How mTLS works:
Standard TLS connection: Server authentication: In traditional TLS, the client verifies the server's identity based on the digital certificate presented by the server. This ensures that the client is connecting to the correct server and that the communication is encrypted.
Mutual authentication (mTLS): In addition to server verification, the client also presents a certificate to the server. The server, in turn, verifies the authenticity of this certificate. It's a bilateral authentication.
During the handshake, both sides (client and server) exchange certificates and verify each other's validity. If both certificates are valid and trusted, the connection is established.
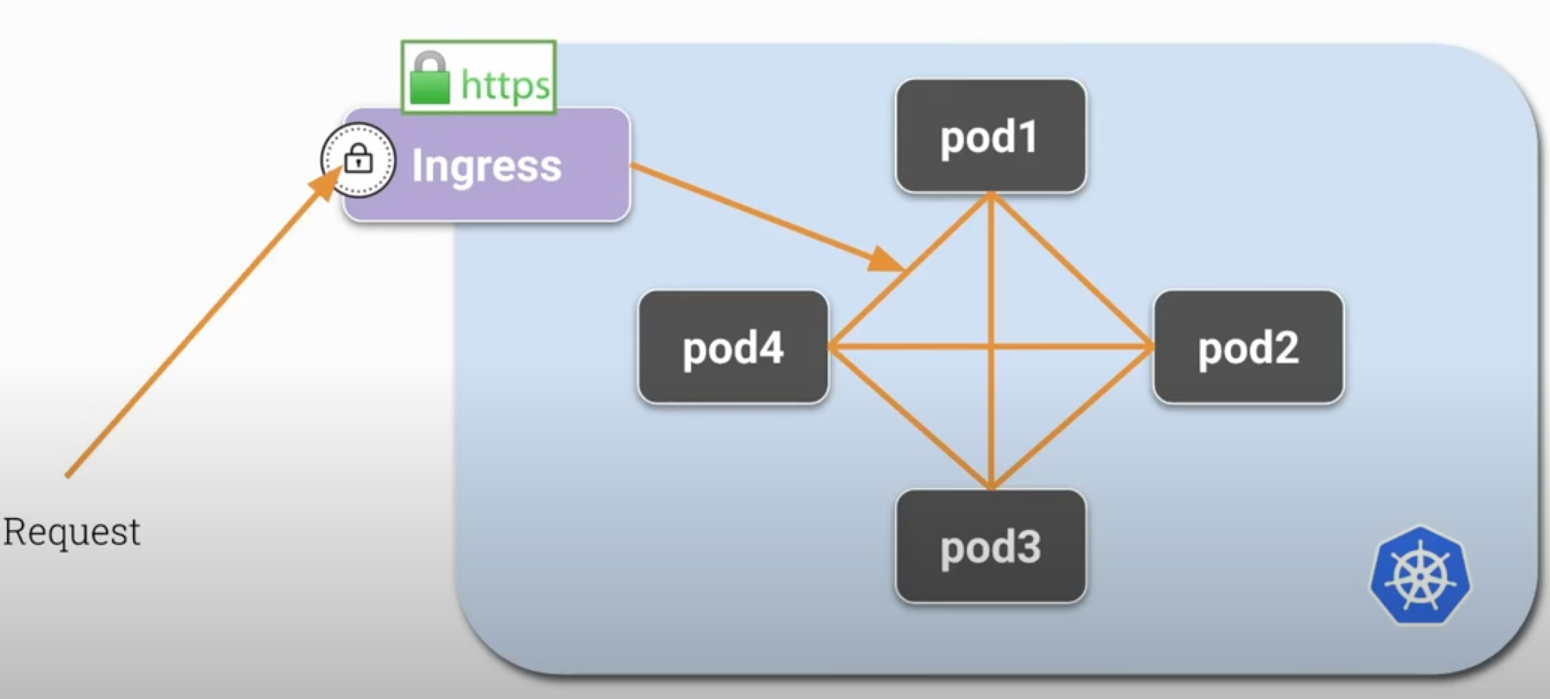
In Kubernetes, in a normal situation, any pod can communicate with other pods without encryption. This is guaranteed by the CNI. An Ingress that is probably protected by HTTPS receives a request and will forward it to the pods inside the cluster. Usually TLS terminates at the ingress, which decrypts the request and forwards it to the pods without any encryption.
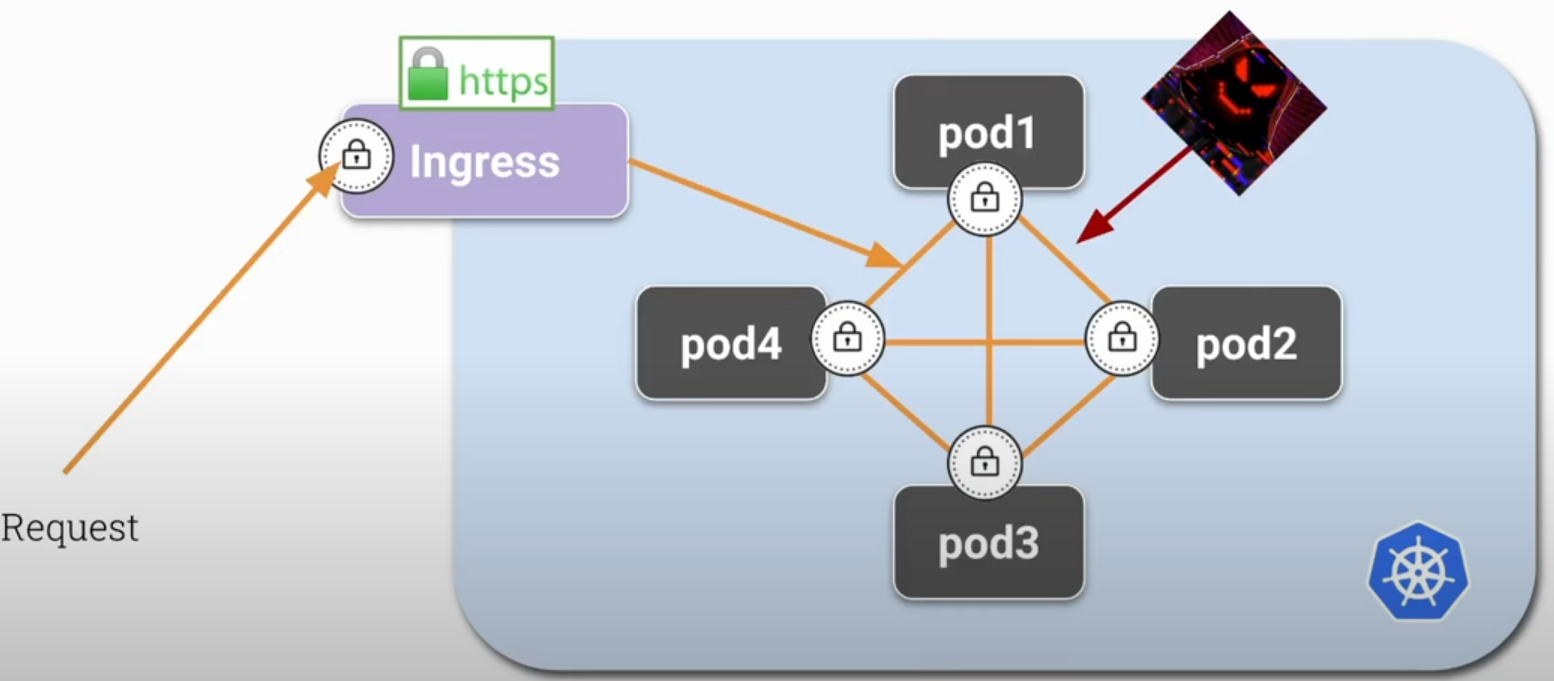
If an attacker inside our cluster manages to gain some privilege inside a pod, they may be able to listen to the communication port of this pod or some other one, and the unencrypted data can be read.
Using mTLS, we can encrypt communication between pods, and each pod will be able to encrypt and decrypt traffic.
Why use mTLS
To ensure that both the client and server are who they say they are, guaranteeing robust security and avoiding man-in-the-middle (MITM) attacks.
In addition to encryption, mTLS can be used for authentication and access control (authorization) in distributed networks and systems, such as APIs, microservices, and zero trust environments.
Common Applications
-
In microservices architectures, mTLS can be used to ensure that only authenticated services can communicate with each other.
-
To protect APIs and ensure that only legitimate clients can access them.
-
In a zero trust security model, where every communication within the network needs to be authenticated and verified, mTLS is a natural choice.
Implementation
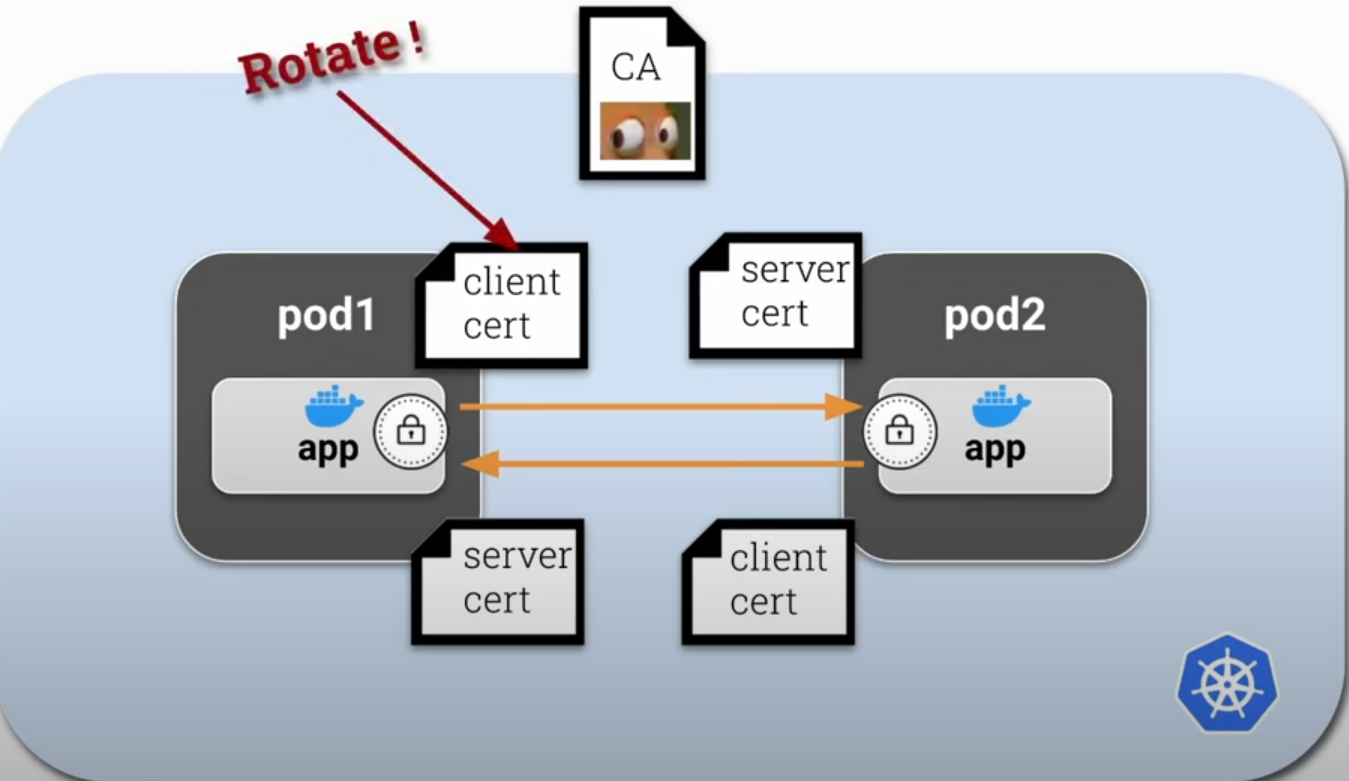
mTLS requires infrastructure configuration, such as generating and managing certificates for clients and servers, configuring servers to require and verify client certificates, and using a Certificate Authority (CA) to issue and revoke certificates. For security reasons, we should not create long-term certificates (10 years), requiring rotation, which causes a lot of management work. Ideally, create short-lived certificates with high rotation but done automatically.
This would be the theory.
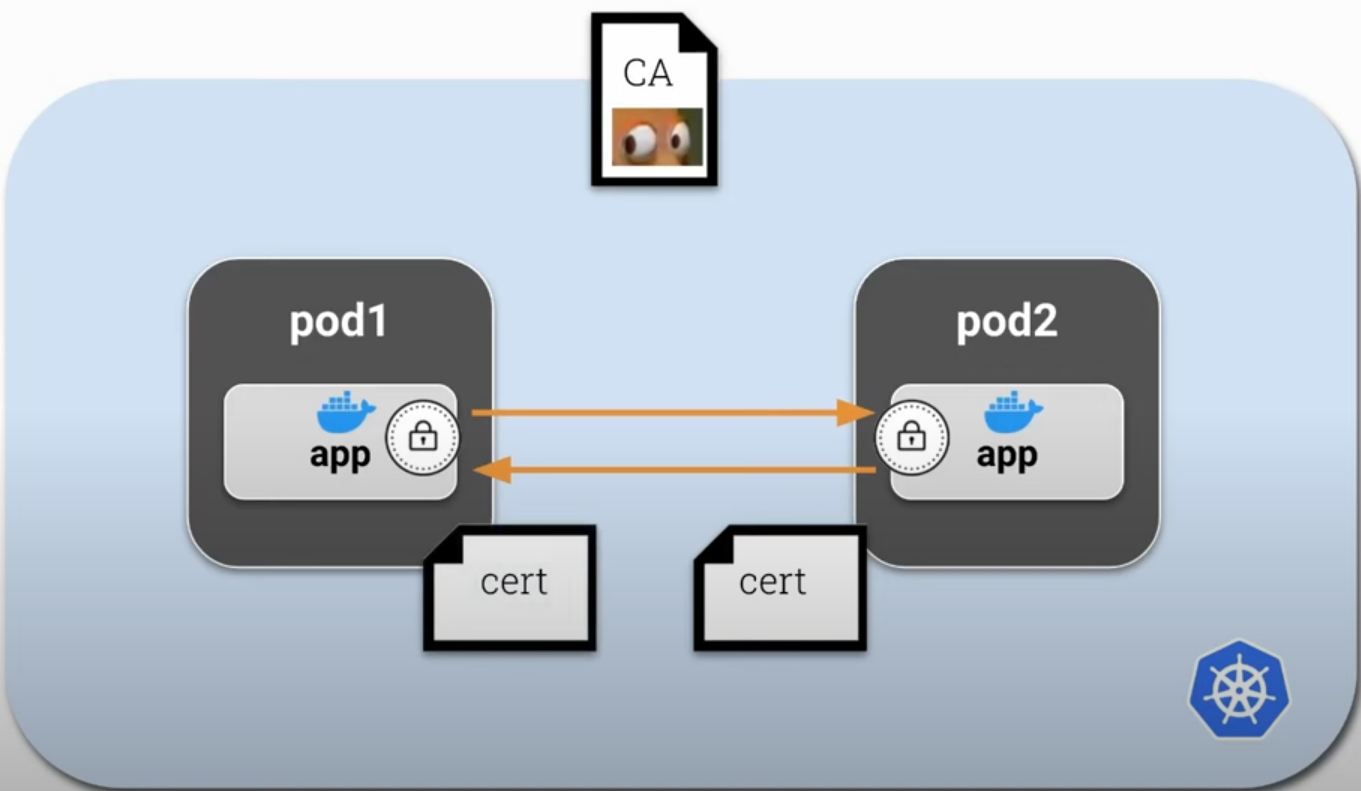
But we could also create just one certificate for each container in the pod to make the process simpler initially. This certificate could act as both client and server.
To do this with less effort, we can use a sidecar inside each pod acting as a proxy, and this will be responsible for mTLS certificates and inbound/outbound network traffic. This way we isolate the application logic so it can focus on what it has to do without needing to know anything about certificates and can use HTTP normally. This sidecar/proxy will encrypt and decrypt application traffic automatically.
This proxy/sidecar container should be automatically injected into the container every time it's created and managed externally by another application. This application would be responsible for managing the CA and certificates as well as rotating them.
This external application could be Istio, linkerd, or any other. This is exactly how Istio works.
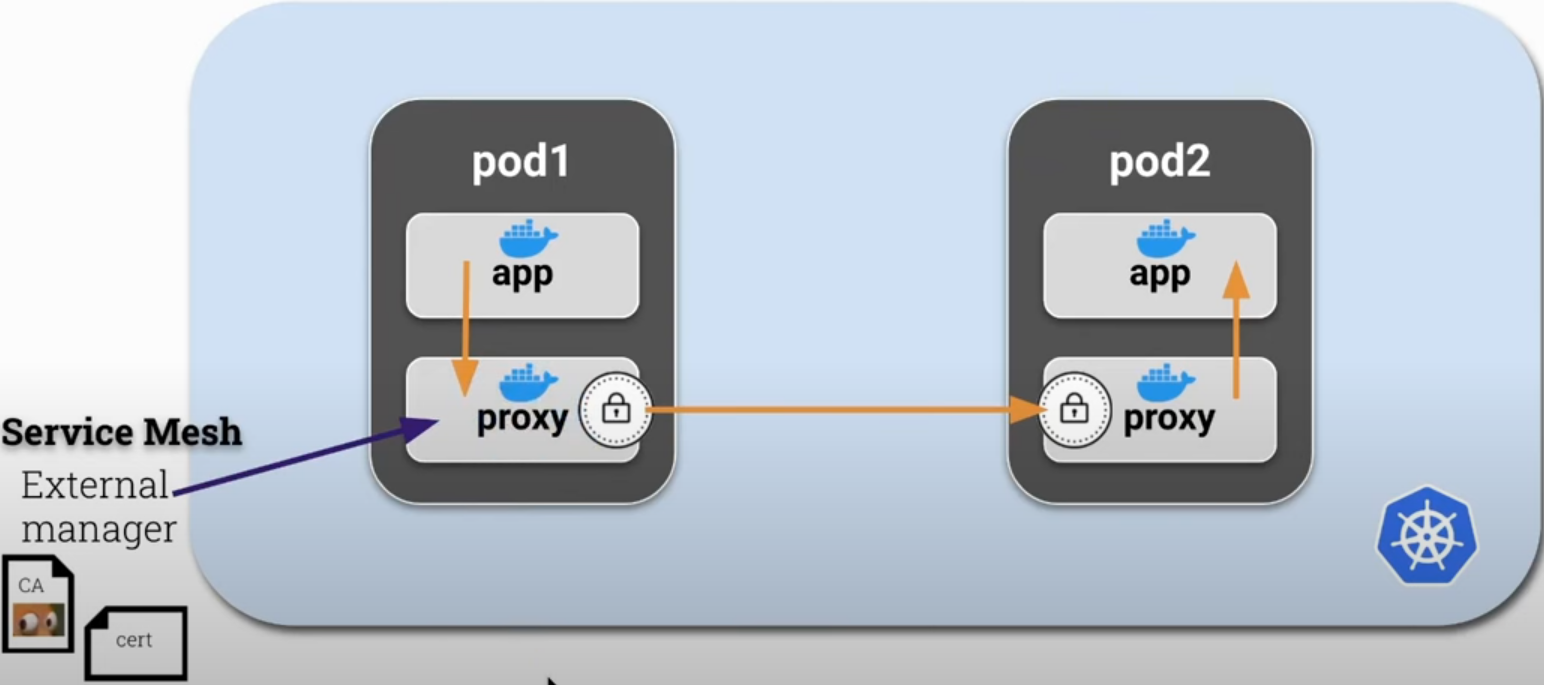
If we observe the application container, it doesn't communicate directly with other pods, going straight to the proxy. This way prevents MITM attacks.
How to execute this?
- Create an iptables rule to route all traffic to the proxy during pod creation using the init container. Only after this configuration is applied should the pod containers start.
- This init container will need the NET_ADMIN capability to have permission to do this.
- Start the sidecar
- Start the application
Let's try to show this manually without Istio's help as far as it's easy. Let's create an application that pings Google and then add the necessary steps for a proxy to handle the traffic.
root@cks-master:~# k run app --image=bash --command -oyaml --dry-run=client -- sh -c 'ping google.com' > app.yaml

root@cks-master:~# cat app.yaml
apiVersion: v1
kind: Pod
metadata:
  creationTimestamp: null
  labels:
    run: app
  name: app
spec:
  containers:
  - command:
    - sh
    - -c
    - ping google.com
    image: bash
    name: app
    resources: {}
  dnsPolicy: ClusterFirst
  restartPolicy: Always
status: {}

root@cks-master:~# k apply -f app.yaml
pod/app created
root@cks-master:~# k logs app
PING google.com (74.125.126.100): 56 data bytes
64 bytes from 74.125.126.100: seq=0 ttl=117 time=2.892 ms
64 bytes from 74.125.126.100: seq=1 ttl=117 time=0.881 ms
64 bytes from 74.125.126.100: seq=2 ttl=117 time=0.934 ms
64 bytes from 74.125.126.100: seq=3 ttl=117 time=0.612 ms
64 bytes from 74.125.126.100: seq=4 ttl=117 time=0.695 ms
If we were to add a proxy, we need another container that needs to have iptables installed. The right thing would be to build an image with all the necessary items, but we'll do this at runtime to make it easier to see the steps. Let's add another container with iptables installed and run a command to see if it's working.
root@cks-master:~# vim app.yaml

root@cks-master:~# cat app.yaml
apiVersion: v1
kind: Pod
metadata:
  creationTimestamp: null
  labels:
    run: app
  name: app
spec:
  containers:
  - command:
    - sh
    - -c
    - ping google.com
    image: bash
    name: app
    resources: {}
  - command:
    - sh
    - -c
    - 'apt update && apt install iptables -y && iptables -L && sleep 1d'
    image: ubuntu
    name: proxy
    resources: {}

  dnsPolicy: ClusterFirst
  restartPolicy: Always
status: {}


root@cks-master:~# k apply -f app.yaml
pod/app created

root@cks-master:~# k get pod app
NAME   READY   STATUS   RESTARTS      AGE
app    1/2     Error    1 (21s ago)   30s

# Content removed for easier reading
root@cks-master:~# k describe pod app
Name:             app
Namespace:        default
...
Containers:
  app:
    Container ID:  containerd://7197c63caa13f83e570b31efdbf0adf66bcfc843b061a1b481167e804c202f49
    Image:         bash
    Image ID:      docker.io/library/bash@sha256:05de6634ac35e4ac2edcb1af21889cec8afcc3798b11a9d538a6f0c315608c48
    Port:          <none>
    Host Port:     <none>
    Command:
      sh
      -c
      ping google.com
    State:          Running
      Started:      Fri, 30 Aug 2024 00:16:24 +0000
    Ready:          True
    Restart Count:  0
    Environment:    <none>
    Mounts:
      /var/run/secrets/kubernetes.io/serviceaccount from kube-api-access-k9c6f (ro)
  proxy:
    Container ID:  containerd://d364ccd908db1fc5b827e3613110b22b83b918081a67bcec0e0b46f9e5e6b922
    Image:         ubuntu
    Image ID:      docker.io/library/ubuntu@sha256:8a37d68f4f73ebf3d4efafbcf66379bf3728902a8038616808f04e34a9ab63ee
    Port:          <none>
    Host Port:     <none>
    Command:
      sh
      -c
      apt update && apt install iptables -y && iptables -L && sleep 1d
    State:          Running
      Started:      Fri, 30 Aug 2024 00:16:57 +0000
    Last State:     Terminated
      Reason:       Error # <<<< Why?
      Exit Code:    4
      Started:      Fri, 30 Aug 2024 00:16:33 +0000
      Finished:     Fri, 30 Aug 2024 00:16:42 +0000
    Ready:          True
    Restart Count:  2
    Environment:    <none>
    Mounts:
      /var/run/secrets/kubernetes.io/serviceaccount from kube-api-access-k9c6f (ro)
...

# Content removed for easier reading
root@cks-master:~# k logs app -c proxy
...
Processing triggers for libc-bin (2.39-0ubuntu8.2) ...
 iptables v1.8.10 (nf_tables): Could not fetch rule set generation id: Permission denied (you must be root)
We saw that we need to be root, but actually root needs permission to work with networks. Let's add this capability.
root@cks-master:~# k delete pod app --force --grace-period 0
Warning: Immediate deletion does not wait for confirmation that the running resource has been terminated. The resource may continue to run on the cluster indefinitely.
pod "app" force deleted

root@cks-master:~# vim app.yaml

root@cks-master:~# cat app.yaml
apiVersion: v1
kind: Pod
metadata:
  creationTimestamp: null
  labels:
    run: app
  name: app
spec:
  containers:
  - command:
    - sh
    - -c
    - ping google.com
    image: bash
    name: app
    resources: {}
  - command:
    - sh
    - -c
    - 'apt update && apt install iptables -y && iptables -L && sleep 1d'
    image: ubuntu
    name: proxy
    securityContext:
      capabilities:
        add: ["NET_ADMIN"]
    resources: {}
  dnsPolicy: ClusterFirst
  restartPolicy: Always
status: {}

root@cks-master:~# k apply -f app.yaml
pod/app created

root@cks-master:~# k get pods
NAME   READY   STATUS    RESTARTS   AGE
app    2/2     Running   0          6s

# Here the iptables -L command
root@cks-master:~# k logs app -c proxy --tail=10
update-alternatives: using /usr/sbin/ebtables-nft to provide /usr/sbin/ebtables (ebtables) in auto mode
Processing triggers for libc-bin (2.39-0ubuntu8.2) ...
Chain INPUT (policy ACCEPT)
target     prot opt source               destination

Chain FORWARD (policy ACCEPT)
target     prot opt source               destination

Chain OUTPUT (policy ACCEPT)
Now we can implement iptables to add new rules. This works because all containers inside the pod use the same kernel network namespace.
Now it would just be implementing the iptables rules in the proxy container.