What is Docker?
2.1. Where does Docker fit into this story?
It all started in 2008, when Solomon Hykes founded dotCloud, a company specialized in PaaS with a major differentiator: its Platform-as-a-Service was not tied to any specific programming language, unlike, for example, Heroku, which only supported applications developed in Ruby.
The big turning point in dotCloud's history occurred in March 2013, when they decided to make the core of their platform open source -- thus Docker was born!
The first versions of Docker were nothing more than an LXC wrapper integrated with Union Filesystem, but its growth was fantastic and very fast, so much so that in six months its GitHub already had more than six thousand stars and more than 170 people contributing to the project around the world.
With this, dotCloud became known as Docker and version 1.0 was released just 15 months after its version 0.1. Docker's version 1.0 brought much more stability and was considered "production ready", in addition to introducing Docker Hub, a public repository for containers.
Being an open source project, anyone can view the code and contribute improvements to Docker. This brings greater transparency and makes bug fixes and improvements happen much faster than it would in proprietary software with a much smaller team and fewer test scenarios.
When Docker 1.0 was launched and announced as production-ready, companies like Spotify were already using it at scale; soon AWS and Google began to offer Docker support in their clouds. Another giant to make moves was Red Hat, which became one of Docker's main partners, even incorporating it into OpenShift.
Currently, Docker is officially supported only on Linux machines with 64 bits. This means that your containers will also have to be 64-bit Linux, because remember that the container uses the same kernel as the host machine. ;)
Today Docker can run smoothly on other platforms like Windows and macOS, but still not with the same performance and stability as Docker running on Linux. Ahhh, Linux!
2.2. What about this layering thing?
2.2.1. Copy-On-Write (COW) and Docker
Before understanding the layers themselves, we need to understand how one of the main requirements for this thing to happen, the Copy-On-Write (or COW for short), works. In the words of Jérome Petazzoni himself:
It's a little bit like having a book. You can make notes in that book if you want, but each time you approach the pen to the page, suddenly someone shows up and takes the page and makes a xerox copy and hand it back to you, that's exactly how copy on write works.
In free translation, it would be like you having a book where you're allowed to make notes in it if you wanted, but every time you were about to touch the page with the pen, suddenly someone showed up, made a xerox of that page and handed the copy to you. That's exactly how Copy-On-Write works.
Basically, it means that a new resource, whether it's a disk block or a memory area, is only allocated when it's modified.
Okay, but what does all this have to do with Docker? Well, as you know, Docker uses a layering scheme, or layers, and to mount these layers Copy-On-Write techniques are used. A container is basically a stack of layers composed of N read-only layers and one, the top one, read-write.
2.3. Storage drivers
Although a container has a writable layer, most of the time you don't want to write data directly to it, for several reasons, including its volatile nature. In situations where your application generates data, you'll prefer to use volumes "attached" to the container and write to them (we'll see how to do this later). However, in some situations local writing to the container is indeed necessary, and that's where the storage driver comes into play. Storage driver is the mechanism used by Docker's engine to dictate the way this data will be manipulated in the container's filesystem. Below are the main storage drivers and their peculiarities.
2.3.1. AUFS (Another Union File System)
The first filesystem available for Docker was AUFS, one of the oldest Copy-On-Write filesystems, and initially had to go through some modifications to improve stability.
AUFS works at the file level (not at the block level), and the idea is to have multiple directories (layers) that it presents to the OS as a single mount point.
When you try to read a file, the search starts from the top layer, until it finds the file or concludes that it doesn't exist. To write to a file, it first needs to be copied to the top layer (writable) -- and yes, you guessed it: writing to large files can cause some performance degradation, since the file would need to be copied completely to the first layer, even when only a very small part will be modified.
Since we're talking about annoying things, another thing that can degrade your performance using AUFS is the fact that it searches each directory of a path in each layer of the filesystem every time you try to execute a command. For example, if you have a path with five layers, 25 searches will be performed (stat(), a system call). This can be quite complicated in applications that do dynamic load, like Python apps that import .py files.
Another peculiarity is when a file is deleted. When this happens a whiteout is created for that file. In other words, it's renamed to ".wh.filename" and becomes unavailable to the container, since, well, you can't really delete it, because the other layers are read-only.
2.3.2. Device Mapper
Device Mapper is a Red Hat kernel-based framework used for some abstractions, such as mapping "physical blocks" to "logical blocks", enabling techniques like LVM and RAID. In the context of Docker, however, it comes down to the "thin provisioning target" or the storage driver "devicemapper". As soon as this Docker thing started to take off, the folks at Red Hat (and all the people using some Red Hat -related distro) became quite interested, but there was a problem: they didn't want to use AUFS. To solve this, they assembled a team of very skilled engineers who added Device Mapper support to Docker.
When it comes to Docker, Device Mapper and AUFS are quite similar: the big difference between them is that in Device Mapper, when you need to write to the file, the copy is made at the block level, which was a problem with AUFS, and with that you get much better granularity. In theory, the problem you had when writing a large file disappears. By default, Device Mapper writes to loopback files, which makes things slower, but now in version 1.17+ you can configure it in direct-lvm mode, which writes to blocks and, in theory, would solve this problem. It's a bit more tedious to configure, but it's a more elegant solution for production environments.
In addition to AUFS and Device Mapper, you can also use BRTFS and OverlayFS as a storage driver. Since they're relatively young technologies, use with moderation.
2.3.3. OverlayFS and OverlayFS2
The latest trend. An improved version of AUFS, OverlayFS and its following version officially recommended by Docker, Overlay2, are both other union filesystems, but this time much more efficient, fast and with a much simpler implementation.
Being union file systems, they also share the idea of combining multiple directories into a single mount point like our friend AUFS, however, in the case of OverlayFS, only two directories are supported, which doesn't happen with Overlay2, which has multi-layer support. Both support page caching sharing, that is, multiple containers accessing the same file share the same entry in the paging file, which is more efficient memory usage.
That old AUFS problem of having to copy the entire file to the top layer to write to it still persists, but in OverlayFS it's only copied once and stays there so that other writes to the same file can happen faster, so there's a small advantage.
Excessive inode consumption is noted when using OverlayFS. This is a problem solved in Overlay2, so whenever possible try to use it -- also because, in general, it has superior performance. Remember that kernel 4.0+ is a prerequisite to use OverlayFS2.
2.3.4. BTRFS
BTRFS is the next generation of union filesystem. It's much more space-efficient, supports many advanced storage technologies and is already included in the kernel mainline. BTRFS, unlike AUFS, performs operations at the block level and uses a thin provision scheme similar to Device Mapper and supports copy-on-write snapshots. You can even combine multiple physical devices into a single BTRFS filesystem, something like an LVM.
BTRFS is currently supported in the CE version only on debian-like distributions and in the EE version only on SLES (Suse Linux Enterprise Server).
IMPORTANT: changing the storage driver will make any already created container inaccessible to the local system. Be careful!
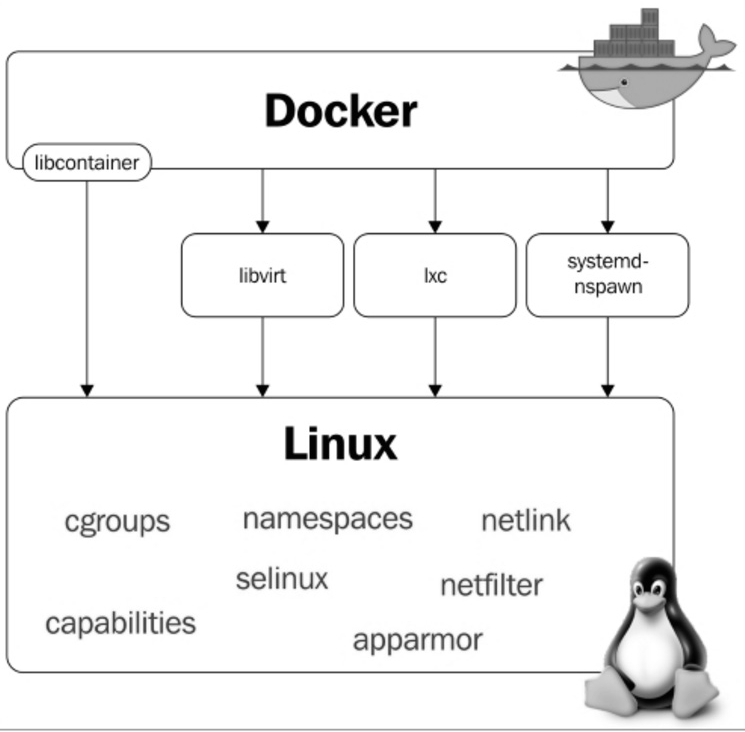
2.4. Docker Internals
Docker uses some basic Linux kernel features for its operation. Below we have a diagram in which it's possible to visualize the modules and features of the kernel that Docker uses:
2.5. Namespaces
Namespaces were added to the Linux kernel in version 2.6.24 and they're what allow process isolation when we're using Docker. They're responsible for making each container have its own environment, that is, each container will have its own process tree, mount points, etc., making one container not interfere with the execution of another. Let's learn a bit more about some namespaces used by Docker.
2.5.1. PID namespace
The PID namespace allows each container to have its own process identifiers. This makes the container have a PID for a running process -- and when you look for that process on the host machine you'll find it; however, with a different identification, that is, with a different PID.
Below we have the "testando.sh" process being executed in the container.
Notice the PID of this process in its process tree:
root@c774fa1d6083:/# bash testando.sh &
[1] 7

root@c774fa1d6083:/# ps -ef
UID  PID PPID C STIME TTY TIME     CMD
root 1   0    0 18:06 ?   00:00:00 /bin/bash
root 7   1    0 18:07 ?   00:00:00 bash testando.sh
root 8   7    0 18:07 ?   00:00:00 sleep 60
root 9   1    0 18:07 ?   00:00:00 ps -ef

root@c774fa1d6083:/#
Now, notice the PID of the same process displayed through the host:
root@linuxtips:~# ps -ef | grep testando.sh

root 2958 2593 0 18:12 pts/2 00:00:00 bash testando.sh
root 2969 2533 0 18:12 pts/0 00:00:00 grep --color=auto testando.sh

root@linuxtips:~#
Different, right? However, they're the same process. :)
2.5.2. Net namespace
The Net Namespace allows each container to have its own network interface and ports. For communication between containers to be possible, it's necessary to create two different Net Namespaces, one responsible for the container's interface (normally we use the same name as conventional Linux interfaces, for example, eth0) and another responsible for a host interface, normally called veth* (veth + a random identifier). These two interfaces are linked through the Docker0 bridge on the host, which allows communication between containers through packet routing.
As we mentioned, see the interfaces. Host interfaces:
root@linuxtips:~# ip addr

1: lo: <LOOPBACK,UP,LOWER_UP> mtu 65536 qdisc noqueue state UNKNOWN group default
       link/loopback 00:00:00:00:00:00 brd 00:00:00:00:00:00
       inet 127.0.0.1/8 scope host lo
           valid_lft forever preferred_lft forever
       inet6 ::1/128 scope host
           valid_lft forever preferred_lft forever
2: eth1: <BROADCAST,MULTICAST,UP,LOWER_UP> mtu 1500 qdisc pfifo_fast state UP group default qlen 1000
        link/ether 00:1c:42:c7:bd:d8 brd ff:ff:ff:ff:ff:ff
        inet 10.211.55.35/24 brd 10.211.55.255 scope global eth1
            valid_lft forever preferred_lft forever
        inet6 fdb2:2c26:f4e4:0:21c:42ff:fec7:bdd8/64 scope global dynamic
            valid_lft 2591419sec preferred_lft 604219sec
        inet6 fe80::21c:42ff:fec7:bdd8/64 scope link
            valid_lft forever preferred_lft forever
3: docker0: <BROADCAST,MULTICAST,UP,LOWER_UP> mtu 1500 qdisc noqueue state UP group default
        link/ether 02:42:c7:c1:37:14 brd ff:ff:ff:ff:ff:ff
        inet 172.17.0.1/16 scope global docker0
            valid_lft forever preferred_lft forever
        inet6 fe80::42:c7ff:fec1:3714/64 scope link
            valid_lft forever preferred_lft forever
5: vetha2e1681: <BROADCAST,MULTICAST,UP,LOWER_UP> mtu 1500 qdisc noqueue master docker0 state UP group default
        link/ether 52:99:bc:ab:62:5e brd ff:ff:ff:ff:ff:ff
        inet6 fe80::5099:bcff:feab:625e/64 scope link
             valid_lft forever preferred_lft forever
root@linuxtips:~#
Container interfaces:
root@6ec75484a5df:/# ip addr

1: lo: <LOOPBACK,UP,LOWER_UP> mtu 65536 qdisc noqueue state UNKNOWN group default
        link/loopback 00:00:00:00:00:00 brd 00:00:00:00:00:00
        inet 127.0.0.1/8 scope host lo
            valid_lft forever preferred_lft forever
        inet6 ::1/128 scope host
            valid_lft forever preferred_lft forever
6: eth0: <BROADCAST,MULTICAST,UP,LOWER_UP> mtu 1500 qdisc noqueue state UP group default
        link/ether 02:42:ac:11:00:03 brd ff:ff:ff:ff:ff:ff
        inet 172.17.0.3/16 scope global eth0
            valid_lft forever preferred_lft forever
        inet6 fe80::42:acff:fe11:3/64 scope link
            valid_lft forever preferred_lft forever

root@6ec75484a5df:/#
Can you see the Docker0 and veth* interfaces on the host? And the eth0 on the container? Yes? Awesome! :D
2.5.3. Mnt namespace
It's the evolution of chroot. With Mnt Namespace each container can be the owner of its mount point, as well as its root file system. It ensures that a process running on one file system cannot access another file system mounted by another Mnt Namespace.
2.5.4. IPC namespace
It provides an isolated SystemV IPC, in addition to its own POSIX message queue.
2.5.5. UTS namespace
Responsible for providing isolation of hostname, domain name, OS version, etc.
2.5.6. User namespace
The most recent namespace added to the Linux kernel, available since version 3.8. It's responsible for maintaining the identification map of users in each container.
2.6. Cgroups
Cgroups are responsible for allowing the limitation of host resource usage by containers. With cgroups you can manage CPU, memory, devices, I/O usage, etc.
2.7. Netfilter
The well-known iptables tool is part of a module called netfilter. For containers to communicate, Docker builds several routing rules through iptables; it even uses NAT, which we'll see later in the book.
root@linuxtips:~# iptables -t nat -L
Chain PREROUTING (policy ACCEPT)
target prot opt source destination
DOCKER all -- anywhere anywhere ADDRTYPE match dst-type LOCAL

Chain INPUT (policy ACCEPT)
target prot opt source destination

Chain OUTPUT (policy ACCEPT)
target prot opt source destination
DOCKER all -- anywhere !127.0.0.0/8 ADDRTYPE match dst-type LOCAL

Chain POSTROUTING (policy ACCEPT)
target prot opt source destination
MASQUERADE all -- 172.17.0.0/16 anywhere

Chain DOCKER (2 references)
target prot opt source destination
RETURN all -- anywhere anywhere

root@linuxtips:~#
2.8. Who is it good for?
Docker is very good for developers, because with it you have the freedom to choose your programming language, your database and your favorite distribution. For sysadmins it's even better, because, in addition to the freedom to choose the distribution, we don't need to prepare the server with all the application dependencies. We also don't need to worry about whether the machine is physical or virtual, as Docker supports both.
The company as a whole benefits, with the use of Docker, from greater agility in the application development process, shortening the transition process between QA, STAGING and PROD environments, as the same image is used. It brings lower hardware costs due to better resource management and utilization, plus the overhead, which is much smaller compared to other solutions, such as virtualization.
With Docker, creating microservices becomes much more viable (microservices, the idea of a large application being broken into several small parts and these executing specific tasks), a subject that has gained more and more space in the technology world and that we'll cover in more detail at the end of this book.
We still have several other reasons to use containers and we'll discover them as we evolve with the use of Docker. :D