Baremetal AWS Terraform
The idea of the project is to provision the entire Kubernetes cluster with a single click.
Requirements
Terraform
You need the Terraform binary. The installation is simply moving the binary to a system path where you have permission, or add the repository and install it.
wget -O- https://apt.releases.hashicorp.com/gpg | gpg --dearmor | sudo tee /usr/share/keyrings/hashicorp-archive-keyring.gpg
echo "deb [signed-by=/usr/share/keyrings/hashicorp-archive-keyring.gpg] https://apt.releases.hashicorp.com $(lsb_release -cs) main" | sudo tee /etc/apt/sources.list.d/hashicorp.list
sudo apt update && sudo apt install terraform
AWS Account
The Terraform project will create AWS resources on your behalf, it needs access to the Access Key ID and Secret Access Key of an IAM user in your AWS account. You need this environment variable loaded in your system when running terraform commands.
export AWS_ACCESS_KEY_ID=<AccessKeyID>
export AWS_SECRET_ACCESS_KEY=<SecretAccessKey>
In the AWS IAM Console, you can also generate a new Access Key ID and Secret Access Key for any IAM user if you can't retrieve the existing one. This user needs to have the following policies applied if they are not the account administrator:
AmazonEC2FullAccess, AmazonVPCFullAccess.
SSH Access Keys
To access the cluster nodes after creation, you need to install an openssh key pair inside each machine.
~/.ssh/id_rsa (private key)
~/.ssh/id_rsa.pub (public key)
If you don't have one, you can generate it
ssh-keygen
Project Architecture
Could a single project be created that with a single click would provision the entire infrastructure and cluster? Yes
But, since I wanted to deliver production-grade code, I preferred to separate the projects according to what each one does. If you're starting from scratch, you can actually leverage these modules for production use.
An important detail for those who understand is that if I use profiles in the code to load the keys, some might not be able to use it, so we'll use the access keys and secrets provided by AWS.
Load the environment variables and let's begin...
export AWS_ACCESS_KEY_ID=<AccessKeyID>
export AWS_SECRET_ACCESS_KEY=<SecretAccessKey>
State Backend
The first project is to create a backend for Terraform to store the state files generated for each of the other projects. This is the only project where the state will actually remain inside the project folder. It creates an S3 bucket and a DynamoDB to lock the project if more than one person is changing the infrastructure.
If you already have a state backend in your cloud, skip this project and replace your backend in the other projects. If you don't have one, leverage the code and move forward.
If you want to store the tfstate locally you can, but it's not a good idea.
Enter the project folder in the terminal and execute.
terraform init
terraform apply
Done, go to your account and verify that the bucket was created. Also note that a .tfstate was created and it should be kept.
Warning: comment out the lines below in your .gitignore for this project, otherwise you'll lose the file if you use it in your repo. In this case, since I'm uploading publicly, I didn't keep it in the repo.
#*.tfstate
#*.tfstate.*
Network
The Kubernetes module needs a provisioned infrastructure to know where to deploy the cluster, in which subnets, etc. The network project does exactly that. This project calls a community-maintained module that's very good, so we'll leverage it.
If you already have all this provisioned in your infrastructure, you can go directly to the Kubernetes module, but
some mandatory tagsare required on the public and private subnets for the Kubernetes module to recognize these subnets as its own, so pay attention to this. Below are the required tags:
    "kubernetes.io/cluster/${var.cluster_name}" = "shared"
    "kubernetes.io/role/elb"                    = "1"
Generally, AWS itself suggests using public, private, and database subnets. If you'll use this database subnet, simply uncomment the line below commented in locals.tf.
  network_resources = toset(
    concat(
    #   [for resource in module.vpc.database_subnet_arns : resource],
      [for resource in module.vpc.private_subnet_arns : resource],
      [for resource in module.vpc.public_subnet_arns : resource]
    )
  )
There's a movement to deploy everything only in Kubernetes, including the database in distributed pods, but since I'm not a DBA (Database Administrator) to handle that risk, I prefer using dedicated servers.
If you're going to use the local backend for testing, simply comment out all the content in backend.tf or check the data described there. I particularly tend to use the sequence below in the key, but you could use any unique name for this project. If you don't change this between projects, the tfstates will overwrite each other and you'll have problems.
Project + Region + Environment + terraform.tfstate
key = "network/us-east-1/production/terraform.tfstate"
This is an expensive project that deploys a complete network infrastructure for your business including multi-az. Be careful with the cost $$$$$$$$$$$. Analyze the situation.
Observe what gets deployed with this project.
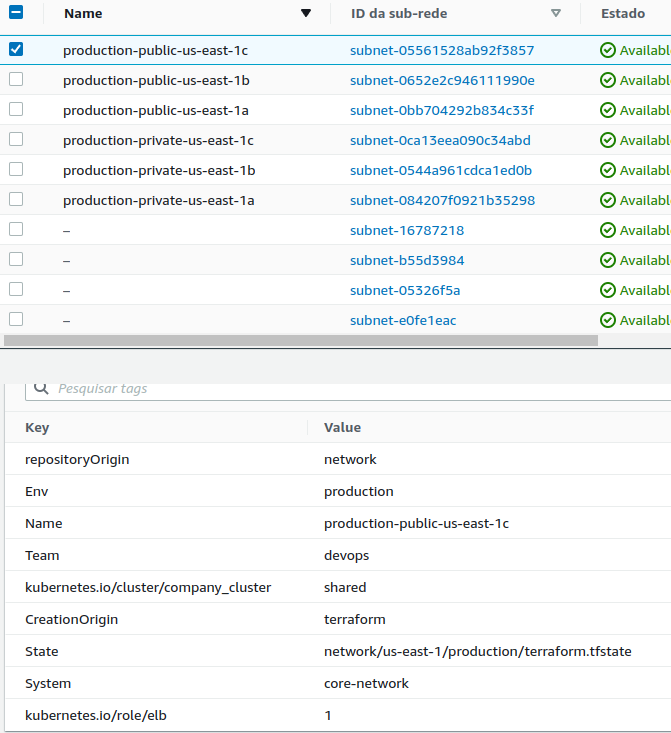
The values of the created resources that we'll expose are in output.tf which can be read by other projects.
The input values are in variables.tf, but terraform.tfvars overrides the values defined there as default.
cluster_name only accepts lowercase letters, numbers, and -because some resources that will use this variable have limitations.
Enter the project folder in the terminal and execute.
terraform init
terraform apply
Image to use in cluster nodes
If we start from a base Ubuntu image on a new machine that will be created when scaling is needed, we'll have to make all the operating system adjustments, install the container runtime and Kubernetes binaries. Every time the machine starts up, it would execute all the steps. To avoid this time-consuming process, we could prepare an image with everything installed and ready to either start the cluster or join one.
The best way to bake, that's the term, an image is using Packer. Once you have this image ready, we can move forward to the final project.
Install Packer on your machine https://learn.hashicorp.com/tutorials/packer/get-started-install-cli
curl -fsSL https://apt.releases.hashicorp.com/gpg | sudo apt-key add -
sudo apt-add-repository "deb [arch=amd64] https://apt.releases.hashicorp.com $(lsb_release -cs) main"
sudo apt-get update && sudo apt-get install packer
Packer basically spins up an EC2 with a base image (in this case we use Ubuntu minimal), executes all the commands you want, creates an image, and saves it. The commands can be through various methods, but generally I end up using either scripts or Ansible with its playbooks. Since there are very few commands, a script here would easily solve the problem. I've provided both ways, just choose yours and proceed.
Keep in mind that the AMI ID changes according to the region and the Ubuntu base changes the ID. Therefore, if you're in a different region than the project's, you need to look up the AMI ID and change it. To locate an AMI use https://cloud-images.ubuntu.com/locator/ec2>
Packer with Shell Script
Already in the folder with Packer files
# To download the plugins
packer init .
# To build the image
packer build .
### ....
#==> Builds finished. The artifacts of successful builds are:
#--> amazon-ebs.node: AMIs were created:
#us-east-1: ami-09e94a872c3b5bc19  << THIS IS WHAT WE WANT
The output will show the ami_id that we'll use in the project below.
Kubernetes_project (not yet successful)
Technical debt. With only one master it works fine, with 2 masters, when one is terminated, when it comes back it's not picking up the init configurations from the master that remained. It starts another cluster. If two enter at the same time it's causing problems, I think it's when getting the IP, maybe the loop is getting the IP from the machine that doesn't have the certificate yet, because when they enter one at a time it worksIdeally, you should have 3 master instances with fixed IPs. In auto scale, if you stop or terminate a machine it spins up another one, increasing the cluster.
We've arrived at the main project. This project reads the data from the network project and calls kubernetes_module passing all the necessary variables for cluster creation. It was done this way so the module can be reused in the future for other installations by simply passing the necessary variables.
Module is not a project. It's like a code library that contains functions.
Another detail of this project is that we'll use a Terraform feature called remote state. When we create a resource in Terraform, it stores everything that was actually created in the .tfstate file that we upload to our backend. We can read a backend from another project to get the resources and leverage them in this project, and that's what we'll do here. We'll read the resources from the network project to have access to subnets, VPC, etc... and call the module passing the parameters.
Note that remote.tf points to the tfstate of the network project. If you're going to do this locally you need to change to the method below. Simply comment out the S3 remote and uncomment the local one.
data "terraform_remote_state" "remote" {
  backend = "local"

  config = {
    path = "../network/terraform.tfstate"
  }
}
The following variables inside locals.tf get the values from the network project:
- vpc_id
- vpc_cidr_blocks
- cluster_name
Other variables are declared in variables.tf and are replaced by the values in terraform.tfvars when declared.
A brief explanation of the module files
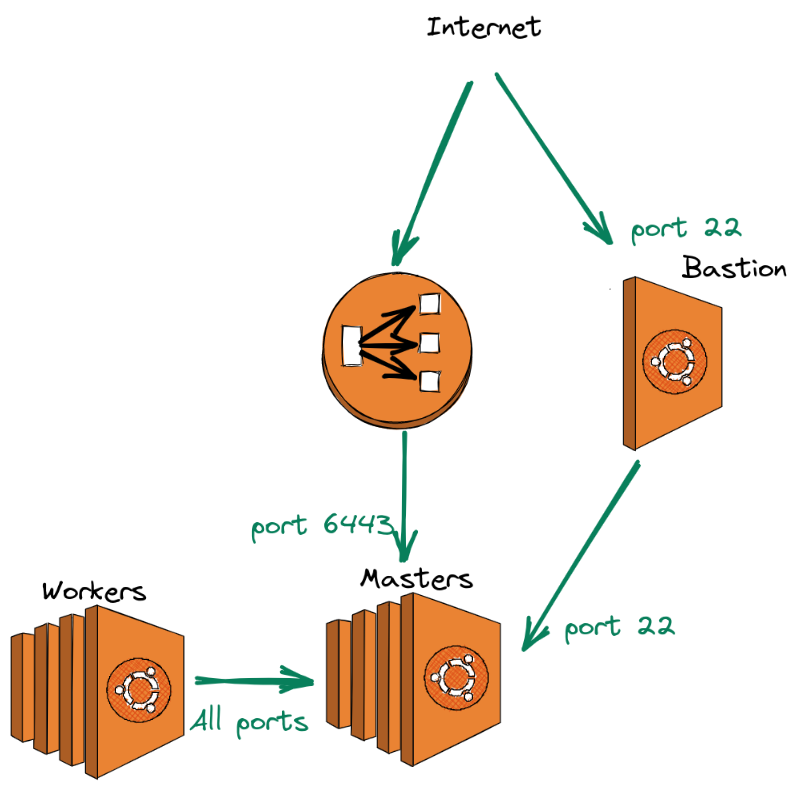
Security Group
The sec-groups.tf contains the necessary communication permissions between masters, nodes, bastion, and load balancer as shown in the figure below.
The iam.tf file creates the necessary permissions for creating nodes that Kubernetes will run. The kops repository permissions were used as a basis https://github.com/kubernetes/kops/tree/master/pkg/model/iam/tests
terraform init
terraform apply
Load Balancer
Masters and Workers
curl -sk https://api-company-cluster-10fbcbc105819c5f.elb.us-east-1.amazonaws.com:6443 | jq -r '.kind'

MASTERS=$(aws ec2 describe-instances --filters Name=tag-key,Values="kubernetes.io/cluster/company-cluster" --region us-east-1 | jq -r '.Reservations[].Instances[] | select (.State.Name == "running") | select(.Tags[].Key == "k8s.io/role/master") | .PrivateIpAddress')

mkdir -p /home/$USER/.kube
sudo cp -i /etc/kubernetes/admin.conf /home/$USER/.kube/config
sudo chown -R $(id -u $USER):$(id -g $USER) /home/$USER/.kube/