EKS - eksctl
https://tf-eks-workshop.workshop.aws/> https://aws.amazon.com/pt/eks/>
Amazon Elastic Kubernetes Service (EKS) is AWS's Kubernetes as a service.
A great place to learn about some features is to do the EKS workshop
Both EKS and kOps use EC2 instances for computing power. For small or temporary clusters, kOps may have advantages, especially regarding costs, as you could use spot instances, but for high-load clusters, using EKS can be more profitable.
Another reminder is that using EKS guarantees support from the AWS team, which is also committed to fixing security vulnerabilities that you would have to handle on your own using kOps.
EKS offers a CLI tool, eksctl, to manage and create clusters on AWS quickly and simply, like kOps.
It's also possible to deploy an EKS cluster using Terraform, as we will do here, but we will also use a sample of eksctl. Additionally, you can use the AWS console and CloudFormation, which isn't very interesting in my opinion.
I recommend learning first via eksctl, as a good study of this CLI will bring knowledge about EKS and everything we can do, and then apply that knowledge in Terraform.
To follow EKS evolution https://github.com/aws/containers-roadmap/issues
Advantages and Disadvantages
One advantage of EKS is that it updates the control plane (masters) without downtime, which is a major differentiator in critical systems. In the case of kOps, you must verify and monitor the update process and manually fix the problems that accompany this operation.
kOps supports many different CNIs, while EKS only supports VPC CNI. This means you can integrate the Kubernetes cluster with existing networks through AWS native networking.
EKS doesn't give access to the masters, meaning we can't control the API Server, Controller Manager, etcd, or Scheduler. This means we can't do several things as shown below, while kOps gives you complete freedom to do what you want. AWS is working to make some things possible, and perhaps in the future we'll see better cluster control.
- Custom OIDC flags
- HPA configuration
- Custom CRI
- etc
Using EKS guarantees high availability for etcd and masters, and you don't need to worry about this, which is the worst case in managing a Kubernetes cluster.
AWS itself applies security patches automatically to the masters.
Integration with other AWS services.
Portability is another factor that should be taken into account. In the case of kOps, it's relatively easier to create a cluster in another cloud. But will you really operate in multi-cloud? AWS offers EKS Distro that can be used to install Kubernetes on bare metal, VMs, or EC2. A disadvantage is that using EKS limits you to AWS-related products.
Depending on your team's Kubernetes expertise, it's really interesting to use EKS since many things are managed for you, making your delivery more reliable and requiring less time for other activities.
An advantage I see is being able to deploy Kubernetes with AWS Fargate support. This means not having worker nodes, and every Kubernetes container will be in Fargate and can be scaled at will without limits, but with some limitations.
eksctl
eksctl is not an AWS CLI, it was created by Weaveworks in golang. Although this tool is not from AWS, it is the official tool recommended by AWS itself for cluster creation. Under the hood, it uses CloudFormation.
Installation
For installations other than Linux, check the page https://docs.aws.amazon.com/eks/latest/userguide/eksctl.html
# Download and install eksctl
curl --silent --location "https://github.com/weaveworks/eksctl/releases/latest/download/eksctl_$(uname -s)_amd64.tar.gz" | tar xz -C /tmp
sudo mv /tmp/eksctl /usr/local/bin
sudo chmod +x /usr/local/bin/eksctl
eksctl version
Requirements
- kubectl installed to access the cluster API
- AWS keys exported with an account that has the following permissions if not admin https://eksctl.io/usage/minimum-iam-policies/.
- EC2
- Cloudformation
- Eks
- IAM
Creating the cluster with eksctl
Read everything before applying... If you execute the command
eksctl create cluster
By default it creates the following according to the documentation:
- An auto-generated name = fabulous-mushroom-XXXXXXX
- 2 m5.large for worker nodes
- Will use EKS AMI as the base for these workers
- In the us-west-2 region
- Will create a dedicated VPC for this.
We can create a YAML configuration file that it will read and automagically fill all the CLI fields. The -f parameter is the file path of the configuration file. Create the file with the YAML below.
The same structure as k8s manifests is followed if you pay attention.
apiVersion: eksctl.io/v1alpha5
kind: ClusterConfig

metadata:
  name: company-cluster
  region: us-east-2

nodeGroups:
  - name: ng-1
    instanceType: m5.large
    desiredCapacity: 1
  - name: ng-2
    instanceType: t3.large
    desiredCapacity: 1
There are several examples here https://github.com/weaveworks/eksctl/tree/main/examples with everything that can be declared. To allow SSH access to worker nodes, eksctl imports ~/.ssh/id_rsa.pub by default. To use a different SSH public key, for example my_eks_node_id.pub, point to the correct key with the flag
--ssh-access --ssh-public-key=my_eks_node_id.pub.
I'll use mine to make it easier
eksctl create cluster -f cluster.yaml
I strongly recommend instead of passing parameters through the CLI, put everything in the YAML file to know what was actually done and if you need to modify it in the future, just change the file.
Observe the output and see what it's creating and see CloudFormation in action.
A disadvantage I see in this YAML is that if we want to use some specific resources already created, we need to point to the ID, and using Terraform we can get these IDs much more easily, as they are stored in states.
Observe at the end of the installation output similar to this.
1H6XYJF5VZCPU" to auth ConfigMap
2022-08-08 11:28:24 [ℹ]  nodegroup "ng-2" has 0 node(s)
2022-08-08 11:28:24 [ℹ]  waiting for at least 1 node(s) to become ready in "ng-2"
2022-08-08 11:29:18 [ℹ]  nodegroup "ng-2" has 1 node(s)
2022-08-08 11:29:18 [ℹ]  node "ip-192-168-55-204.us-east-2.compute.internal" is ready
2022-08-08 11:29:22 [ℹ]  kubectl command should work with "/home/david/.kube/config", try 'kubectl get nodes'
2022-08-08 11:29:22 [✔]  EKS cluster "my-company-lab" in "us-east-2" region is ready
eksctl itself adds the cluster access information to your .kube/config for kubectl usage.
After completion, confirm the cluster with
❯ eksctl get cluster
NAME            REGION          EKSCTL CREATED
my-company-lab  us-east-2       True
Now in kubectl....
If you don't have kubectl, you should start studying Kubernetes again because it's the necessary CLI. Wake up.
Also note that you can switch your kubectl context to point to this cluster when running kubectl on your machine.
kubectl config set-context [email protected]@my-company-lab.us-east-2.eksctl.io

#### See that it only shows the workers
❯ kubectl get nodes
NAME                                           STATUS   ROLES    AGE   VERSION
ip-192-168-48-238.us-east-2.compute.internal   Ready    <none>   29m   v1.22.9-eks-810597c
ip-192-168-55-204.us-east-2.compute.internal   Ready    <none>   29m   v1.22.9-eks-810597c

❯ kubectl get namespaces
NAME              STATUS   AGE
default           Active   48m
kube-node-lease   Active   48m
kube-public       Active   48m
kube-system       Active   48m

❯ kubectl get pods --all-namespaces
NAMESPACE     NAME                       READY   STATUS    RESTARTS   AGE
kube-system   aws-node-gmtgb             1/1     Running   0          26m
kube-system   aws-node-rslfx             1/1     Running   0          26m
kube-system   coredns-5db97b446d-dnnwj   1/1     Running   0          36m
kube-system   coredns-5db97b446d-lcr4p   1/1     Running   0          36m
kube-system   kube-proxy-2sj68           1/1     Running   0          26m
kube-system   kube-proxy-74ftr           1/1     Running   0          26m
Done... now you can start using it! But check the things created in the AWS console.
Now let's update this cluster to also have Fargate support. Use the same cluster.yaml and add the YAML below at the end. To not lose the previous file, I named it clusterfargate.yaml
fargateProfiles:
  - name: fp-default
    selectors:
      # All workloads in the "default" Kubernetes namespace will be
      # scheduled onto Fargate:
      - namespace: default
      # All workloads in the "kube-system" Kubernetes namespace will be
      # scheduled onto Fargate:
      - namespace: kube-system
  - name: fp-dev
    selectors:
      # All workloads in the "dev" Kubernetes namespace matching the following
      # label selectors will be scheduled onto Fargate:
      - namespace: dev
        labels:
          env: dev
          checks: passed
An important detail is that the cluster upgrade is only done based on version if the version tag was declared in metadata: "1.21". For any other resources or addons, a create is done again, which creates the differences. Using Fargate instead of creating nodes is a great idea to reduce costs and not have a closed cluster or wait for a machine to be provisioned to support more pods.
❯ eksctl create fargateprofile -f clusterfargate.yaml
2022-08-08 16:01:45 [ℹ]  creating Fargate profile "fp-default" on EKS cluster "my-company-lab"
2022-08-08 16:03:55 [ℹ]  created Fargate profile "fp-default" on EKS cluster "my-company-lab"
W0808 16:03:56.987291  462617 warnings.go:70] spec.template.spec.affinity.nodeAffinity.requiredDuringSchedulingIgnoredDuringExecution.nodeSelectorTerms[0].matchExpressions[0].key: beta.kubernetes.io/os is deprecated since v1.14; use "kubernetes.io/os" instead
W0808 16:03:56.987317  462617 warnings.go:70] spec.template.spec.affinity.nodeAffinity.requiredDuringSchedulingIgnoredDuringExecution.nodeSelectorTerms[0].matchExpressions[1].key: beta.kubernetes.io/arch is deprecated since v1.14; use "kubernetes.io/arch" instead
2022-08-08 16:03:56 [ℹ]  "coredns" is now schedulable onto Fargate
2022-08-08 16:05:01 [ℹ]  "coredns" is now scheduled onto Fargate
2022-08-08 16:05:02 [ℹ]  "coredns" pods are now scheduled onto Fargate
If you understood this, we can now delete the created nodes.
❯ eksctl delete nodegroup -f clusterfargate.yaml --approve
2022-08-08 16:14:28 [ℹ]  comparing 2 nodegroups defined in the given config ("clusterfargate.yaml") against remote state
2022-08-08 16:14:28 [ℹ]  2 nodegroups (ng-1, ng-2) were included (based on the include/exclude rules)
2022-08-08 16:14:30 [ℹ]  will drain 2 nodegroup(s) in cluster "my-company-lab"
2022-08-08 16:14:30 [ℹ]  starting parallel draining, max in-flight of 1
2022-08-08 16:14:31 [ℹ]  cordon node "ip-192-168-55-204.us-east-2.compute.internal"
2022-08-08 16:14:31 [ℹ]  cordon node "ip-192-168-48-238.us-east-2.compute.internal"
2022-08-08 16:14:32 [✔]  drained all nodes: [ip-192-168-55-204.us-east-2.compute.internal]
2022-08-08 16:14:33 [✔]  drained all nodes: [ip-192-168-48-238.us-east-2.compute.internal]
2022-08-08 16:14:33 [ℹ]  will delete 2 nodegroups from cluster "my-company-lab"
2022-08-08 16:14:33 [ℹ]  1 task: {
2 parallel tasks: { delete nodegroup "ng-1" [async], delete nodegroup "ng-2" [async]
} }2022-08-08 16:14:34 [ℹ]  will delete stack "eksctl-my-company-lab-nodegroup-ng-2"
2022-08-08 16:14:34 [ℹ]  will delete stack "eksctl-my-company-lab-nodegroup-ng-1"
2022-08-08 16:14:34 [ℹ]  will delete 2 nodegroups from auth ConfigMap in cluster "my-company-lab"
2022-08-08 16:14:34 [ℹ]  removing identity "arn:aws:iam::513498712583:role/eksctl-my-company-lab-nodegroup-n-NodeInstanceRole-LY2XR5HQ37N2" from auth ConfigMap (username = "system:node:{{EC2PrivateDNSName}}", groups = ["system:bootstrappers" "system:nodes"])
2022-08-08 16:14:34 [ℹ]  removing identity "arn:aws:iam::513498712583:role/eksctl-my-company-lab-nodegroup-n-NodeInstanceRole-1H6XYJF5VZCPU" from auth ConfigMap (username = "system:node:{{EC2PrivateDNSName}}", groups = ["system:bootstrappers" "system:nodes"])
2022-08-08 16:14:35 [✔]  deleted 2 nodegroup(s) from cluster "my-company-lab"

~/p/p/study-kubernetes/I/EKS develop +43 !1 ?4
❯ kubectl get nodes
NAME                                                    STATUS                     ROLES    AGE     VERSION
fargate-ip-192-168-153-220.us-east-2.compute.internal   Ready                      <none>   10m     v1.22.6-eks-14c7a48
fargate-ip-192-168-173-179.us-east-2.compute.internal   Ready                      <none>   10m     v1.22.6-eks-14c7a48
ip-192-168-48-238.us-east-2.compute.internal            Ready,SchedulingDisabled   <none>   4h46m   v1.22.9-eks-810597c
ip-192-168-55-204.us-east-2.compute.internal            Ready,SchedulingDisabled   <none>   4h46m   v1.22.9-eks-810597c
If you observe carefully, we deleted a resource that was defined in clusterfargate.yaml. In this case, you can delete nodes after deleting the resource.
This is EKS's differentiator, not having worker nodes if you don't want, but there's a sin in this! You lose some other k8s functionalities like DaemonSet which is super important and various things like logs, observability, service mesh, etc. EKS already takes away some powers and you still want to lose this?
To go back to the default, create the nodegroups again and delete Fargate.
eksctl create nodegroup -f clusterfargate.yaml
eksctl delete fargateprofile fp-default -f clusterfargate.yaml
And we have our cluster.yaml being ideal again.
Default Configuration
By default, if nothing extra is declared in your configuration file, eksctl will create:
- Will use the region declared in the AWS_DEFAULT_REGION variable
- 2 m5.large worker nodes managed by EKS
- 1 dedicated VPC with CIDR 192.168.0.0/16 divided into:
- 3 public subnets /19
- 3 private subnets /19
- 2 reserved subnets /19
- Security group allowing access from control planes on ports 1025 to 65535
- Will use Amazon Linux AMI
- Docker as container runtime
- VPC CNI for Kubernetes network creation
- Will not allow SSH
- Will automatically inject the kubeconfig into ~/.kube/config
- Exposes the Kubernetes API for external access 0.0.0.0
If the machine configuration is not passed, it will use m5.large, be careful.
eksctl create cluster
Improvements to Consider in Cluster Configuration
But we can still improve our cluster YAML. We can define more interesting things about our cluster. Just check the file schema at https://eksctl.io/usage/schema/.
Kubelet and System CPU and Memory Reservations
Preventing a host from using all its computational system is a good practice. For example, we can reserve an X value of CPU and Y of memory to ensure good health of daemons running on the node's operating system, such as sshd, or some daemon that runs on the host. An m5 large host, for example, has 4 CPUs and 8GB of RAM. We can guarantee 200m CPU and 200MB of memory. Similarly, if you're going to deploy other Kubernetes system components like daemonsets, you can use resources for kubelet, in this case Istio for service mesh and Prometheus. Let's reserve 300m CPU and 300m memory. What will be available is 3.5 CPU and 7.5 GB of RAM for kubelet to consume with extra pods.
If you deploy machines that are too small, each machine will have this resource reserved in the same node groups, so you need to find the optimal point for your system. This requires time and knowledge if the application uses more CPU, more memory, more disk, etc.
Another situation to think about is having separate node groups for dev and master. Is it a matter of evaluation?
The YAML that defines the cluster gives us the possibility to guarantee a minimum resource for kubelet to run on workers. It's good practice to define this resource.
This is valid for any Kubernetes installation.
nodeGroups:
  - name: ng-prod
    ...
    kubeletExtraConfig:
        kubeReserved: # Reserved for K8s
            cpu: "300m"
            memory: "300Mi"
            ephemeral-storage: "1Gi"
        kubeReservedCgroup: "/kube-reserved"
        systemReserved: # Reserved for OS services
            cpu: "200m"
            memory: "300Mi"
            ephemeral-storage: "1Gi"
        evictionHard: # Will drop something when reaching this safety zone
            memory.available:  "200Mi"
            nodefs.available: "10%"
        featureGates: # Will perform certificate rotation
            RotateKubeletServerCertificate: true
Container runtime
https://eksctl.io/usage/container-runtime/
By default, Docker is used as the container runtime. We can change to containerd, but it's only supported on Amazon Linux for now.
nodeGroups:
 - name: ng-prod
   containerRuntime: containerd
   amiFamily: AmazonLinux2
Using Existing Network
https://eksctl.io/usage/nodegroup-with-custom-subnet/ If you already have subnets in some VPC defined with subnets, for example, you can use them for the nodes. Of course, before that you will need to create your VPC with subnets, route tables, gateways, etc. One of the downsides of using eksctl is that we need to have all the IDs of the resources we're going to use on hand, which in Terraform we could reference as variables.
...
vpc:
  id: "vpc-084b9d7f2268d6efb"
  subnets:
    private:
      us-east-2a:
          id: "subnet-072ecc930bef61184"
      us-east-2b:
          id: "subnet-0b9d4740c3c22e2a9"
      us-east-2c:
          id: "subnet-077f9c28eabd811f4"
    public:
      us-east-2a:
          id: "subnet-0bb20396ea932dab8"
      us-east-2b:
          id: "subnet-0f4a45706812b497d"
      us-east-2c:
          id: "subnet-0c2607e0d4556233b"
nodeGroups:
    ...
Define labels and tags
In Kubernetes we use labels to know where we'll deploy resources. The more labels we have, the more options we'll have to filter. Everything that's necessary to pass for your future knowledge is good to pass. On the other hand, tags are labels for AWS resources to filter resources using Amazon's API.
nodeGroups:
  - name: ng-prod
```...
    tags: # AWS
      team: devops
      enviroment: production
      nodegroup_role: eks-role-worker
      price: on-demand
    labels: # k8s
      # Always use this pattern. api/value
      alpha.eksctl.io/so-type: linux
      alpha.eksctl.io/cloud: aws
      alpha.eksctl.io/environment: production
Auto-scaling and Volume Limits
https://aws.amazon.com/pt/blogs/aws-brasil/boas-praticas-de-utilizacao-de-instancias-spot-no-amazon-eks/ We can set maximum and minimum limits for the cluster to be auto-scaled when resources are lacking. The desired quantity is also interesting.
nodeGroups:
  - name: ng-prod
    containerRuntime: containerd
    amiFamily: AmazonLinux2
    desiredCapacity: 1
    minSize: 1
    maxSize: 2
    ...
Spot Instances
https://eksctl.io/usage/spot-instances/
How does a spot instance work? When you define that you will use spot, you can get machines at a cheaper price, but when AWS needs the machine, it terminates your resources. In other words, it's not convenient to use spot instances in situations where the service can't stop, or it would be interesting to adjust a strategy for this. It's worth reading more about it in the link above. The configuration below allows you to get defined instances and it will choose the one with the lowest price by default.
nodeGroups:
  - name: ng-prod
    containerRuntime: containerd
    amiFamily: AmazonLinux2
    desiredCapacity: 1
    minSize: 1
    maxSize: 2
    volumeSize: 20
    instancesDistribution:
      instanceTypes: ["t3.small", "t3.medium"]
SSH on nodes
To enter the nodes, we can pass the public key to be placed directly in the host's .ssh/authorized_keys. We can also add the IDs of security groups (created previously) that these instances will have if they exist.
nodeGroups:
  - name: ng-prod-v2
    containerRuntime: containerd
    amiFamily: AmazonLinux2
    ....

    ssh:
      allow: true
      publicKeyPath: ~/.ssh/id_rsa.pub # This is the default
      #sourceSecurityGroupIds: ["sg-00241fbb12c607007"]
Cloudwatch
You can get metrics and logs from your cluster using CloudWatch if you want, but there are better ways to do this with other Kubernetes resources.
cloudWatch:
  clusterLogging:
    enableTypes: ["*"] #=all
    # can be api, audit, authenticator, controllerManager or scheduler.
EKS and IAM
https://eksctl.io/usage/iamserviceaccounts/
EKS allows mapping IAM roles to EKS service accounts. This way it's possible to manage permissions through IAM for our cluster. This provides fine-grained permission management for applications running on EKS and using other AWS services. These can be applications that use S3, any other data services (RDS, MQ, STS, DynamoDB), or Kubernetes components like the AWS Load Balancer controller or ExternalDNS. eksctl can create, through OIDC (OpenID Connect Provider), roles and service accounts using pre-established policies. OIDC is not enabled by default.
If the entry below is already present in cluster.yaml, it will be enabled, otherwise add it and apply the cluster configuration again.
iam:
  withOIDC: true
❯ eksctl utils associate-iam-oidc-provider --region=us-east-2 --cluster=my-company-lab --approve
2022-08-08 14:44:20 [ℹ]  will create IAM Open ID Connect provider for cluster "my-company-lab" in "us-east-2"
2022-08-08 14:44:21 [✔]  created IAM Open ID Connect provider for cluster "my-company-lab" in "us-east-2"
Extra
This part doesn't refer to installation documentation, but a resource I saw during the study called external-dns. It's a service that automatically creates DNS for Kubernetes services by associating them with an existing domain.
IAM Domain in EKS with external DNS
https://github.com/kubernetes-sigs/external-dns/blob/master/docs/tutorials/aws.md
The next step would be to have DNS for this cluster. For these steps, you need to have a Route53 with a defined zone. This DNS will be set for all our created services.
Do it through the console, it's easier, or if you want to do it via awscli


or via AWS CLI
aws route53 create-hosted-zone --name "eks.puziol.com.br" --caller-reference "eks test domain"
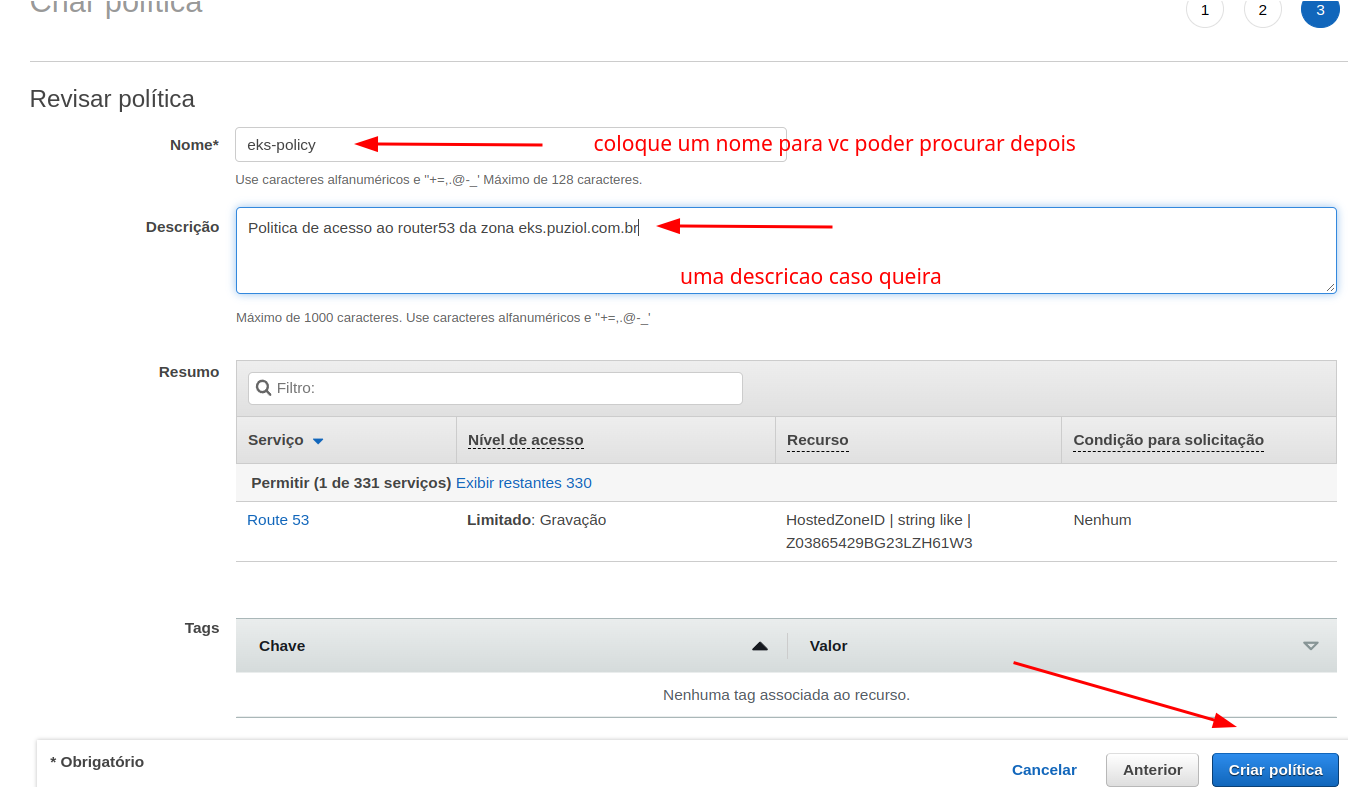
Now let's give our cluster a role and place permissions in it so it can manipulate AWS resources. But first create a policy with the following content. Do it via console, it's easier!
Go to IAM>Policy>Create

Now let's create a serviceAccount. We can also do it through config or direct command. If doing it through config, also add the serviceAccount and the ARN of the policy we created above.
iam:
  withOIDC: true
  serviceAccounts:
  - metadata:
      name: external-dns
      namespace: default
    attachPolicyARNs:
    - "arn:aws:iam::729792403128:policy/external-dns-policy"
Now apply
❯ eksctl create iamserviceaccount -f clusterfinal.yaml --approve
2022-08-12 04:17:48 [ℹ]  1 existing iamserviceaccount(s) (kube-system/aws-node) will be excluded
2022-08-12 04:17:48 [ℹ]  1 iamserviceaccount (default/external-dns) was included (based on the include/exclude rules)
2022-08-12 04:17:48 [!]  serviceaccounts that exist in Kubernetes will be excluded, use --override-existing-serviceaccounts to override
2022-08-12 04:17:48 [ℹ]  1 task: {
    2 sequential sub-tasks: {
        create IAM role for serviceaccount "default/external-dns",
        create serviceaccount "default/external-dns",
    } }2022-08-12 04:17:48 [ℹ]  building iamserviceaccount stack "eksctl-eks-cluster-addon-iamserviceaccount-default-external-dns"
2022-08-12 04:17:49 [ℹ]  deploying stack "eksctl-eks-cluster-addon-iamserviceaccount-default-external-dns"
2022-08-12 04:17:49 [ℹ]  waiting for CloudFormation stack "eksctl-eks-cluster-addon-iamserviceaccount-default-external-dns"
2022-08-12 04:18:20 [ℹ]  waiting for CloudFormation stack "eksctl-eks-cluster-addon-iamserviceaccount-default-external-dns"
2022-08-12 04:18:20 [ℹ]  created serviceaccount "default/external-dns"


❯ eksctl get iamserviceaccount --cluster eks-cluster
NAMESPACE       NAME            ROLE ARN
default         external-dns    arn:aws:iam::729792403128:role/eksctl-eks-cluster-addon-iamserviceaccount-d-Role1-1AJN0ML7N8R9M
kube-system     aws-node        arn:aws:iam::729792403128:role/eksctl-eks-cluster-addon-iamserviceaccount-k-Role1-Q3JUX8WCJ94H
or it could also be done directly with the command.
❯ eksctl create iamserviceaccount --name external-dns --namespace default --cluster my-company-lab --attach-policy-arn arn:aws:iam::729792403128:policy/external-dns-policy --approve
Observe the output and see that through CloudFormation it created a role with the defined policy. Exercise finding in AWS IAM what it created.
A service account is also created inside k8s and in its annotations the role it will get from our IAM is passed.
❯ kubectl get serviceaccounts
NAME           SECRETS   AGE
default        1         38h
external-dns   1         12m

❯ k describe sa external-dns
Name:                external-dns
Namespace:           default
Labels:              app.kubernetes.io/managed-by=eksctl
# below the role it will get
Annotations:         eks.amazonaws.com/role-arn: arn:aws:iam::729792403128:role/eksctl-eks-cluster-addon-iamserviceaccount-d-Role1-1AJN0ML7N8R9M
Image pull secrets:  <none>
Mountable secrets:   external-dns-token-4tlkh
Tokens:              external-dns-token-4tlkh
Events:              <none>
We can now deploy external DNS. Check all the external-dns documentation in the repository.
In this case, use the external-dns.yaml to deploy. You need to fix some values in this file to yours. You need to change the values below to your cluster and hosted zone configuration.
- name: external-dns
  image: k8s.gcr.io/external-dns/external-dns:v0.11.0
  args:
    - --source=service
    - --source=ingress
    - --domain-filter=eks.puziol.com.br #<put yours>
    - --provider=aws
    - --policy=upsert-only # would prevent ExternalDNS from deleting any records, omit to enable full synchronization
    - --aws-zone-type=public # only look at public hosted zones (valid values are public, private or no value for both)
    - --registry=txt
    - --txt-owner-id=Z05850441MQF8SO0CIDDV # <put your hosted zone here>
  env:
    - name: AWS_DEFAULT_REGION
      value: us-east-2 # <change to your region>
❯ kubectl create -f external-dns.yaml
clusterrole.rbac.authorization.k8s.io/external-dns created
clusterrolebinding.rbac.authorization.k8s.io/external-dns-viewer created
deployment.apps/external-dns created
Error from server (AlreadyExists): error when creating "external-dns.yaml": serviceaccounts "external-dns" already exists

❯ kubectl get pods
NAME                            READY   STATUS    RESTARTS   AGE
external-dns-6bdcb445cc-jc5x9   1/1     Running   0          28s

❯ kubectl logs -f external-dns-6bdcb445cc-jc5x9
...
time="2022-08-12T08:34:57Z" level=info msg="All records are already up to date"
If you see the message above at the end of the log, it means everything worked.
Note that the service account had already been created, so it didn't create it again.
GitLab With Helm
GitLab already comes with cert manager integrated, so deploying cert manager would interfere initially and require making larger configurations in GitLab.
Let's install GitLab directly via Helm to test.
❯ helm repo add gitlab https://charts.gitlab.io/
❯ helm repo update
❯ helm upgrade --install gitlab gitlab/gitlab --timeout 600s --set global.hosts.domain=eks.puziol.com.br --set certmanager-issuer.email=[email protected]
Just wait and check the gitlab.eks.puziol.com.br machine
Final Considerations
The experience with eksctl is good and functional, but at the same time we lose control of what is actually provisioned. Often we see something declared in our configuration file that isn't actually deployed.
Another thing that bothered me is that just one command eksctl delete cluster <cluster name> brings everything down at once without any type of protection, only the account that has the permission.
Another detail is having to search the console for all the IDs of the resources you already have or even having to manually create resources like the policies we used. It's necessary to use the console or use the AWS CLI. This way it would be much more interesting to deploy using good community modules using Terraform.