Review
The idea here is just to cover a review of the different Kubernetes resources.
Pods
They are the smallest unit in Kubernetes. A pod should not run more than one instance of the same container. It's possible for a pod to have more than one container, but these are usually sidecars that support the main container. You don't scale an application by creating more containers of the application within the same pod.
These containers can communicate directly (localhost) since they're sharing the same network space. Containers in a pod also share the same storage space.
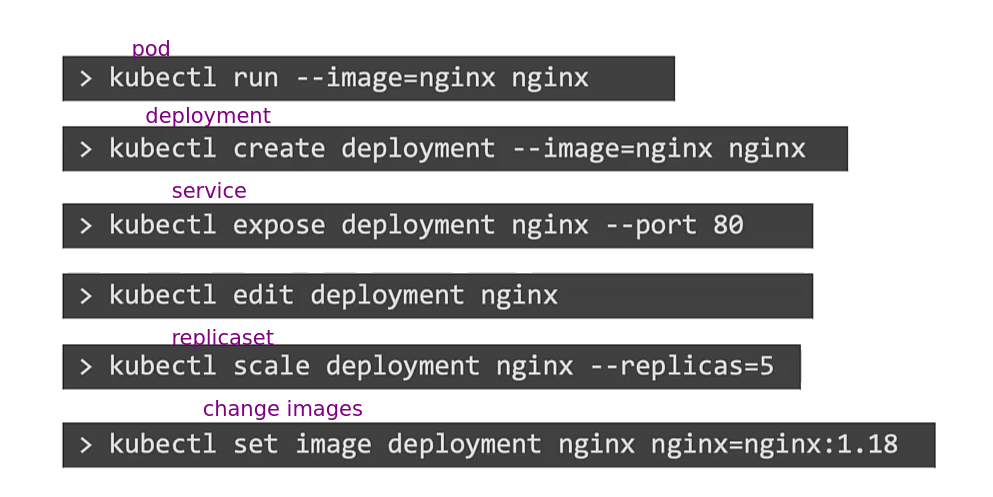
kubectl run nginx --image nginx
pod/nginx created

kubectl get pods
NAME    READY   STATUS    RESTARTS   AGE
nginx   1/1     Running   0          41s
kubectl describe pod nginx
Name:             nginx
Namespace:        default
Priority:         0
Service Account:  default
Node:             k3d-k3d-cluster-agent-1/172.18.0.4
Start Time:       Sat, 23 Dec 2023 10:21:05 -0300
Labels:           run=nginx
Annotations:      <none>
Status:           Running
IP:               10.42.1.25
IPs:
  IP:  10.42.1.25
Containers:
  nginx:
    Container ID:   containerd://70ebdd2cc5ebf9ce43d69d323a17c8db53022221d2bc813b4b2f3838d30b6d9d
    Image:          nginx
    Image ID:       docker.io/library/nginx@sha256:2bdc49f2f8ae8d8dc50ed00f2ee56d00385c6f8bc8a8b320d0a294d9e3b49026
    Port:           <none>
    Host Port:      <none>
    State:          Running
      Started:      Sat, 23 Dec 2023 10:21:13 -0300
    Ready:          True
    Restart Count:  0
    Environment:    <none>
    Mounts:
      /var/run/secrets/kubernetes.io/serviceaccount from kube-api-access-rswr7 (ro)
Conditions:
  Type              Status
  Initialized       True
  Ready             True
  ContainersReady   True
  PodScheduled      True
Volumes:
  kube-api-access-rswr7:
    Type:                    Projected (a volume that contains injected data from multiple sources)
    TokenExpirationSeconds:  3607
    ConfigMapName:           kube-root-ca.crt
    ConfigMapOptional:       <nil>
    DownwardAPI:             true
QoS Class:                   BestEffort
Node-Selectors:              <none>
Tolerations:                 node.kubernetes.io/not-ready:NoExecute op=Exists for 300s
                             node.kubernetes.io/unreachable:NoExecute op=Exists for 300s
Events:
  Type    Reason     Age   From               Message
  ----    ------     ----  ----               -------
  Normal  Scheduled  75s   default-scheduler  Successfully assigned default/nginx to k3d-k3d-cluster-agent-1
  Normal  Pulling    76s   kubelet            Pulling image "nginx"
  Normal  Pulled     68s   kubelet            Successfully pulled image "nginx" in 7.355673083s (7.355680823s including waiting)
  Normal  Created    68s   kubelet            Created container nginx
  Normal  Started    68s   kubelet            Started container nginx
Creating with a file we can execute with apply.
kubectl apply -f pod.yaml
#OR
kubectl create -f pod.yaml
Any YAML manifest in Kubernetes has the keys below.
apiVersion:
kind:
metadata:
spec:
For pod the kind is Pod.
Create a pod with this file. kubectl apply -f pod.yaml.
apiVersion: v1
kind: Pod
metadata:
  name: nginx
  labels:
    app: nginx
spec:
  containers:
  - name: nginx
    image: nginx
  - name: redis
    image: redis
Some essential initial commands.
kubectl get nodes
kubectl get pods
kubectl get pods -o wide
kubectl get pods -n default
kubectl describe pods nginx -n default
kubectl edit pods pod_name
kubectl get pods -o wide
kubectl run nginx-1 --image nginx
kubectl run nginx-2 --image nginx --dry-run=client -o yaml
kubectl delete pods nginx nginx-1
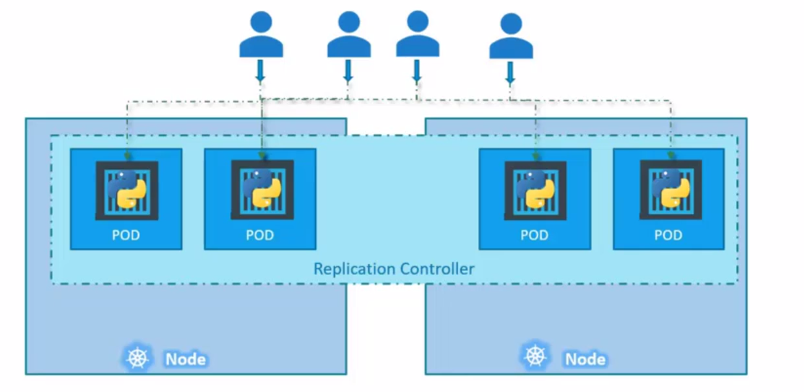
Replica Set
This is a special controller that ensures an identical quantity of the same pod is running in the cluster, ensuring high availability. It supervises to ensure that if a pod stops, it's automatically restarted to meet the desired quantity. Launching isolated pods, without a ReplicaSet, doesn't guarantee they will be automatically restarted in case of failure.
Pods can extend across multiple nodes to balance the load between nodes.
ReplicationController is the old kind, the new one to be used is ReplicaSet
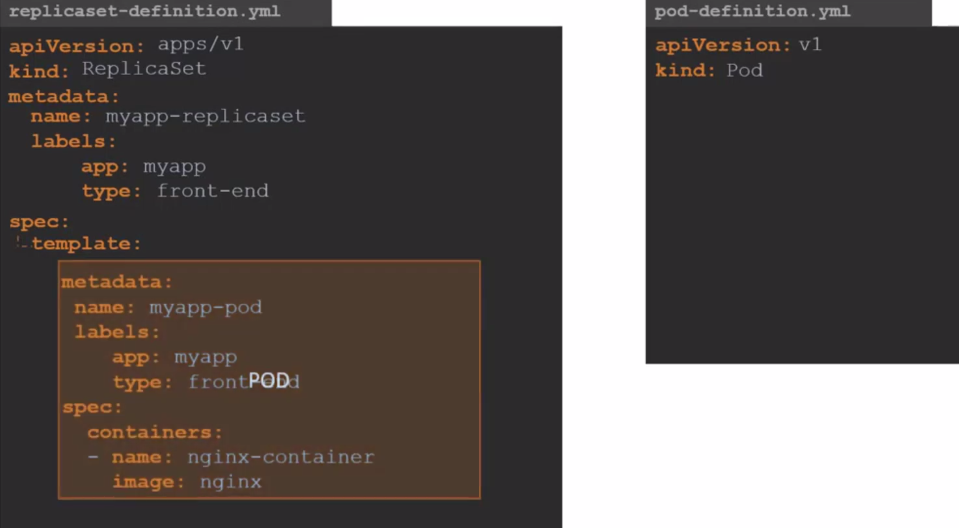
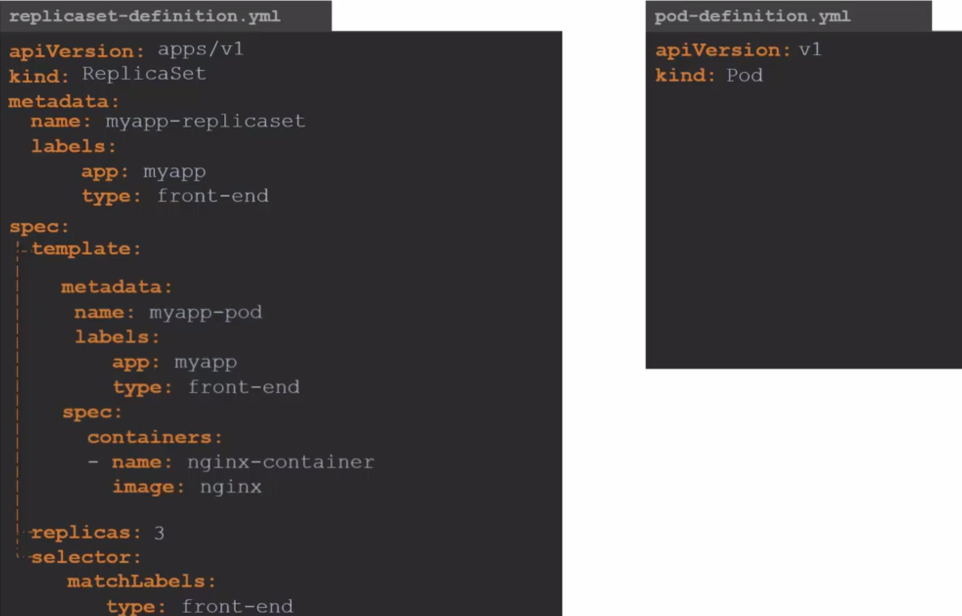
Note that we need the selector so the ReplicaSet knows which pod it will control and monitor. The selector is necessary because it's possible to create a pod before the ReplicaSet and then create a ReplicaSet for that pod without defining it in the template.
apiVersion: apps/v1
kind: ReplicaSet
metadata:
  name: myapp-rs
  labels:
    app: myapp
spec:
  template:
    metadata:
      name: nginx
      labels:
        app: nginx
    spec:
      containers:
        - name: nginx
          image: nginx
  selector:
    matchLabels:
      app: nginx
  replicas: 3
kubectl get replicaset
NAME       DESIRED   CURRENT   READY   AGE
myapp-rs   3         3         3       29s

## rs = replicaset
kubectl get rs
NAME       DESIRED   CURRENT   READY   AGE
myapp-rs   3         3         3       39s

kubectl describe rs myapp-rs
NAME             READY   STATUS    RESTARTS   AGE
myapp-rs-prnh7   1/1     Running   0          4h12m
myapp-rs-7l8z6   1/1     Running   0          4h12m
myapp-rs-z8vzw   1/1     Running   0          4h12m
Name:         myapp-rs
Namespace:    default
Selector:     app=nginx
Labels:       app=myapp
Annotations:  <none>
Replicas:     3 current / 3 desired
Pods Status:  3 Running / 0 Waiting / 0 Succeeded / 0 Failed
Pod Template:
  Labels:  app=nginx
  Containers:
   nginx:
    Image:        nginx
    Port:         <none>
    Host Port:    <none>
    Environment:  <none>
    Mounts:       <none>
  Volumes:        <none>
Events:           <none>
Note that the ReplicaSet created the pods and added some numbers and characters after.
An important detail is that the template is always necessary. If the pods defined in the selector already exist, it won't create them, but if any of them fail and the ReplicaSet needs to launch a new one, it's in its own template that it will check the requirements to launch a new pod to replace the missing one.
To scale more replicas we have some methods.
kubectl scale --replicas 6 rs myapp-rs

kubectl get pods
NAME             READY   STATUS    RESTARTS   AGE
myapp-rs-prnh7   1/1     Running   0          4h25m
myapp-rs-7l8z6   1/1     Running   0          4h25m
myapp-rs-z8vzw   1/1     Running   0          4h25m
myapp-rs-jwxf5   1/1     Running   0          47s
myapp-rs-79hps   1/1     Running   0          47s
myapp-rs-8qp6p   1/1     Running   0          47s

# another method using the file
kubectl scale --replicas 6 -f ./files/replicaset.yaml
replicaset.apps/myapp-rs scaled

# in this method if we had edited the replicaset.yaml file with 6 it would replace, but it ended up going back because it was with 3
kubectl replace -f ./files/replicaset.yaml
replicaset.apps/myapp-rs replaced

kubectl get pods
NAME             READY   STATUS    RESTARTS   AGE
myapp-rs-prnh7   1/1     Running   0          4h27m
myapp-rs-7l8z6   1/1     Running   0          4h27m
myapp-rs-z8vzw   1/1     Running   0          4h27m

# delete all pods and see what happens
kubectl delete pods --selector app=nginx
pod "myapp-rs-w7fwh" deleted
pod "myapp-rs-thfbw" deleted
pod "myapp-rs-szr6m" deleted

# see that it recreated again with 4s
kubectl get pods
NAME             READY   STATUS    RESTARTS   AGE
myapp-rs-5j77g   1/1     Running   0          4s
myapp-rs-hm9nz   1/1     Running   0          4s
myapp-rs-dmh29   1/1     Running   0          4s

# or using the edit command.. I edited from 3 to 6 again
kubectl edit replicasets myapp-rs
replicaset.apps/myapp-rs edited
kubectl get pods
NAME             READY   STATUS    RESTARTS   AGE
myapp-rs-prnh7   1/1     Running   0          4h30m
myapp-rs-7l8z6   1/1     Running   0          4h30m
myapp-rs-z8vzw   1/1     Running   0          4h30m
myapp-rs-b9bzj   1/1     Running   0          8s
myapp-rs-2x426   1/1     Running   0          8s
myapp-rs-l2jvq   1/1     Running   0          8s

kubectl delete rs myapp-rs
replicaset.apps "myapp-rs" deleted

kubectl get pods
No resources found in default namespace.

kubectl create -f ./files/replicaset.yaml
replicaset.apps/myapp-rs created

kubectl get pods
NAME             READY   STATUS    RESTARTS   AGE
myapp-rs-crfns   1/1     Running   0          12s
myapp-rs-9pqhh   1/1     Running   0          12s
myapp-rs-p4bks   1/1     Running   0          12s

kubectl delete -f ./files/replicaset.yaml
replicaset.apps "myapp-rs" deleted

kubectl get pods
No resources found in default namespace.
A command to check about manifests is kubectl explain replicaset.
Apply a replicaset for a pod created previously as a study. There's no kubectl create replicaset command.
DaemonSet
They're identical to ReplicaSet, but you don't need to pass the number of replicas because it's a single pod per node. This is a special type widely used for log collection, node monitoring and networking.
For example, Kube-Proxy would be a great example.
apiVersion: apps/v1
kind: DaemonSet
metadata:
  name: myapp-ds
  labels:
    app: myapp
spec:
  template:
    metadata:
      name: nginx
      labels:
        app: nginx
    spec:
      containers:
        - name: nginx
          image: nginx
  selector:
    matchLabels:
      app: nginx
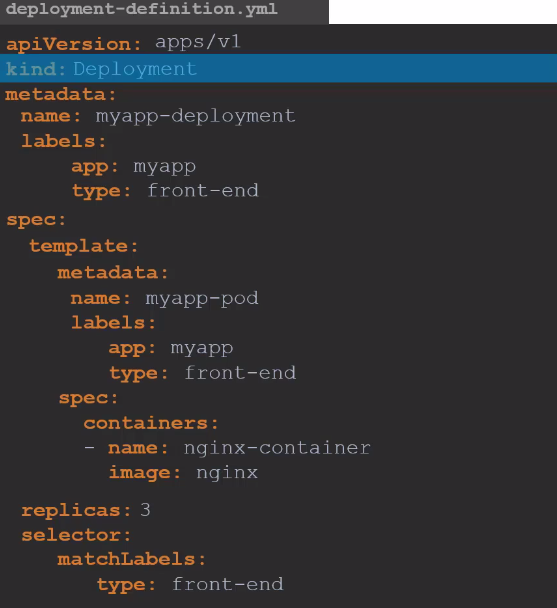
Deployments
They're capable of executing rolling updates, where pods are replaced one by one instead of all being destroyed and replaced at once. This ensures your application remains operational during the update to a new image, for example. If the update fails, it's possible to revert to the previous version through a rollback. Additionally, Deployments manage different versions of ReplicaSet, providing an efficient way to control infrastructure changes.
Note that just by changing the kind ReplicaSet to Deployment is what's necessary for everything to work while maintaining the same structure.
deployment.apps/myapp created
 kubectl get all
NAME                        READY   STATUS    RESTARTS   AGE
pod/myapp-98d49bcf5-s6kmm   1/1     Running   0          4s
pod/myapp-98d49bcf5-tjm4j   1/1     Running   0          4s
pod/myapp-98d49bcf5-pzjsm   1/1     Running   0          4s

NAME                    READY   UP-TO-DATE   AVAILABLE   AGE
deployment.apps/myapp   3/3     3            3           4s

NAME                              DESIRED   CURRENT   READY   AGE
replicaset.apps/myapp-98d49bcf5   3         3         3       4s

kubectl describe deployment myapp
Name:                   myapp
Namespace:              default
CreationTimestamp:      Sun, 24 Dec 2023 16:39:40 -0300
Labels:                 app=myapp
Annotations:            deployment.kubernetes.io/revision: 1
Selector:               app=nginx
Replicas:               3 desired | 3 updated | 3 total | 3 available | 0 unavailable
StrategyType:           RollingUpdate
MinReadySeconds:        0
RollingUpdateStrategy:  25% max unavailable, 25% max surge # SEE THIS
Pod Template:
  Labels:  app=nginx
  Containers:
   nginx:
    Image:        nginx
    Port:         <none>
    Host Port:    <none>
    Environment:  <none>
    Mounts:       <none>
  Volumes:        <none>
Conditions:
  Type           Status  Reason
  ----           ------  ------
  Available      True    MinimumReplicasAvailable
  Progressing    True    NewReplicaSetAvailable
OldReplicaSets:  <none>
NewReplicaSet:   myapp-98d49bcf5 (3/3 replicas created)
Events:
  Type    Reason             Age    From                   Message
  ----    ------             ----   ----                   -------
  Normal  ScalingReplicaSet  2m39s  deployment-controller  Scaled up replica set myapp-98d49bcf5 to 3
It's important to note that the Deployment creates both the ReplicaSet and the pods. Additionally, the Deployment object includes a key that defines the fault tolerance of pods during an update, as well as the strategy used to perform that update.
Tip: The command below creates a manifest in the console and if you prefer you can redirect to a file.
kubectl create deployment --image=nginx nginx --dry-run=client -o yaml

apiVersion: apps/v1
kind: Deployment
metadata:
  creationTimestamp: null
  labels:
    app: nginx
  name: nginx
spec:
  replicas: 1
  selector:
    matchLabels:
      app: nginx
  strategy: {}
  template:
    metadata:
      creationTimestamp: null
      labels:
        app: nginx
    spec:
      containers:
      - image: nginx
        name: nginx
        resources: {}
status: {}

kubectl create deployment --image=nginx nginx --replicas 5 --dry-run=client -o yaml > deployment-dry-run.yaml

cat deployment-dry-run.yaml
apiVersion: apps/v1
kind: Deployment
metadata:
  creationTimestamp: null
  labels:
    app: nginx
  name: nginx
spec:
  replicas: 5
  selector:
    matchLabels:
      app: nginx
  strategy: {}
  template:
    metadata:
      creationTimestamp: null
      labels:
        app: nginx
    spec:
      containers:
      - image: nginx
        name: nginx
        resources: {}
status: {}
A Deployment cannot be modeled as a DaemonSet, meaning it always needs to have a number of replicas, even if it's 1.
Services
Services help connect applications with other applications or users.
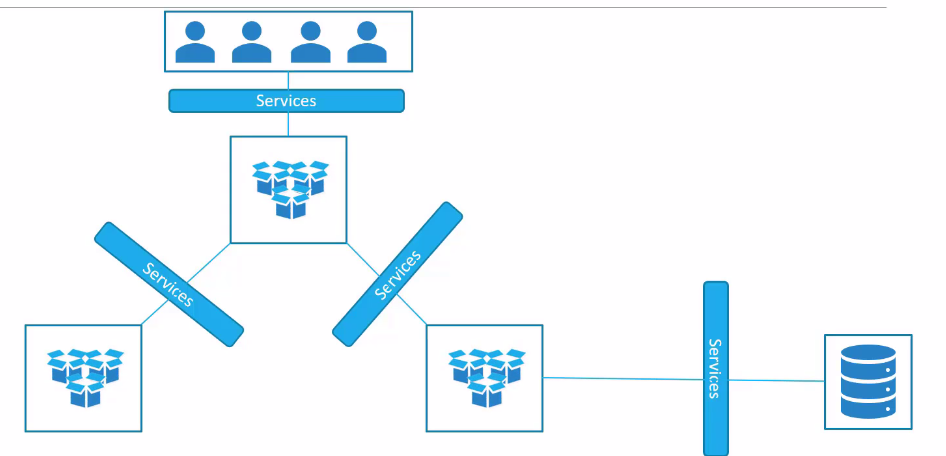
There are some different ways to do this and it's through Kube-Proxy that manipulates the routing table inside nodes to ensure connectivity.
- Each node has an IP.
- Each pod also has an IP and they're usually on a different network than the node.
- Pods inside each node have a virtual network interface that uses the same network interface as the node, but they're on another network.
- Kube-Proxy creates a connection between the network the node is on and the pod network, which is why if we try to ping a pod through the node's shell we can.
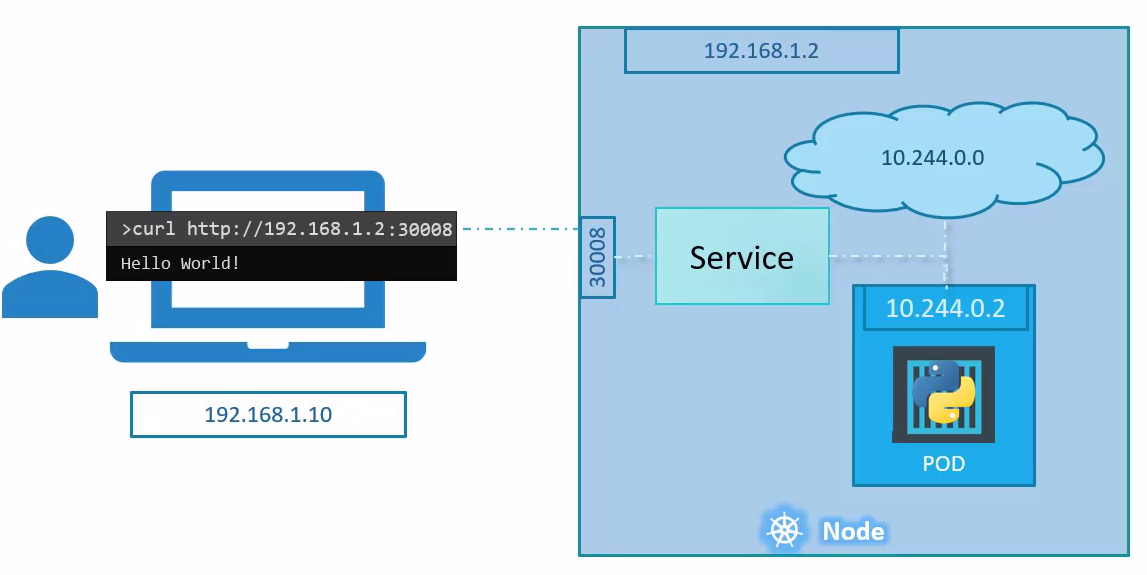
NodePort
The function is to tell all nodes to listen on a port between 30000 and 32767 and forward the request from this port to a pod that is offering the service on another port. For this, all nodes need to have this specific port forwarding to the specific pod group, because this pod can be running on any node.
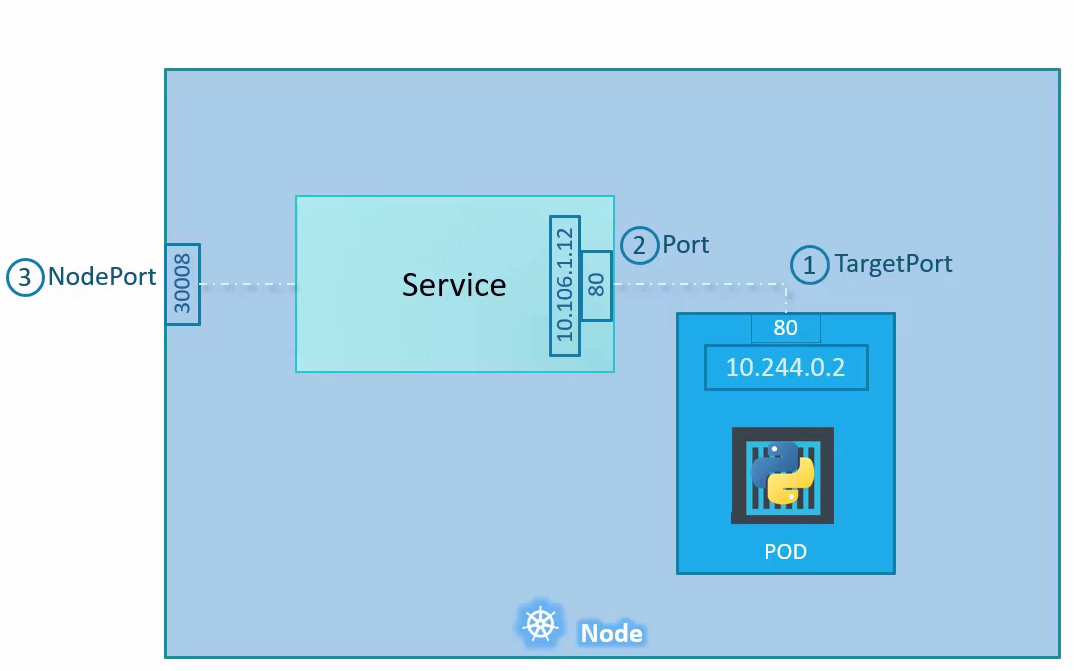

apiVersion: v1
kind: Service
metadata:
  name: myapp-service
spec:
  type: NodePort
  ports:
  - targetPort: 80
    port: 80
    nodePort: 30008
  # You need to filter the pod labels and not the Deployment or ReplicaSet labels
  selector:
    app: nginx
kubectl apply -f ./files/nodeport.yaml
service/myapp-service created

kubectl get services
NAME            TYPE        CLUSTER-IP      EXTERNAL-IP   PORT(S)        AGE
myapp-service   NodePort    10.43.164.162   <none>        80:30008/TCP   77s

# using an alias. Note also that it has a clusterIP which we'll discuss later
kubectl get svc
NAME            TYPE        CLUSTER-IP      EXTERNAL-IP   PORT(S)        AGE
myapp-service   NodePort    10.43.164.162   <none>        80:30008/TCP   3m15s

kubectl describe service myapp-service
Name:                     myapp-service
Namespace:                default
Labels:                   <none>
Annotations:              <none>
Selector:                 app=nginx
Type:                     NodePort
IP Family Policy:         SingleStack
IP Families:              IPv4
IP:                       10.43.164.162
IPs:                      10.43.164.162
Port:                     <unset>  80/TCP
TargetPort:               80/TCP
NodePort:                 <unset>  30008/TCP
# SEE THE ENDPOINTS
Endpoints:                10.42.0.11:80,10.42.2.39:80,10.42.3.251:80
Session Affinity:         None
External Traffic Policy:  Cluster
Events:                   <none>

# Checking
kubectl get pods -o wide
NAME                    READY   STATUS    RESTARTS   AGE   IP            NODE                       NOMINATED NODE   READINESS GATES
myapp-98d49bcf5-s6kmm   1/1     Running   0          17h   10.42.2.39    k3d-k3d-cluster-agent-2    <none>           <none>
myapp-98d49bcf5-tjm4j   1/1     Running   0          17h   10.42.0.11    k3d-k3d-cluster-agent-0    <none>           <none>
myapp-98d49bcf5-pzjsm   1/1     Running   0          17h   10.42.3.251   k3d-k3d-cluster-server-0   <none>           <none>

# A slightly more advanced command to print only pod IPs
kubectl get pods -o custom-columns=IP:.status.podIP
IP
10.42.2.39
10.42.0.11
10.42.3.251

# A slightly more advanced command to print only the IP of each pod's host
kubectl get pods -o custom-columns=IP:.status.hostIP
IP
172.18.0.5
172.18.0.2
172.18.0.3
See now that on any node I ping on port 30008 it will respond.
curl http://172.18.0.5:30008
# <!DOCTYPE html>
# <html>
# <head>
# <title>Welcome to nginx!</title>
# <style>
# html { color-scheme: light dark; }
# body { width: 35em; margin: 0 auto;
# font-family: Tahoma, Verdana, Arial, sans-serif; }
# </style>
# </head>
# <body>
# <h1>Welcome to nginx!</h1>
# <p>If you see this page, the nginx web server is successfully installed and
# working. Further configuration is required.</p>

# <p>For online documentation and support please refer to
# <a href="http://nginx.org/">nginx.org</a>.<br/>
# Commercial support is available at
# <a href="http://nginx.com/">nginx.com</a>.</p>

# <p><em>Thank you for using nginx.</em></p>
# </body>
# </html>

curl http://172.18.0.2:30008
# <!DOCTYPE html>
# <html>
# <head>
# <title>Welcome to nginx!</title>
# <style>
...

curl http://172.18.0.3:30008
# <!DOCTYPE html>
# <html>
# <head>
# <title>Welcome to nginx!</title>
# <style>
...
ClusterIP
Whatever service is created will have ClusterIP. This will define an IP that will represent a group of pods. A ClusterIP has multiple endpoints that can respond to the request. A random algorithm is used to choose the node.
ClusterIP only works within the cluster and is used for communication between the applications themselves.
Scaling a Deployment, for example, causes new endpoints to appear.
apiVersion: v1
kind: Service
metadata:
  name: myapp-service
spec:
  type: ClusterIP
  ports:
  - targetPort: 80 # Pod port
    port: 80 # Service port
    # nodePort is not necessary
  selector:
    app: nginx
As seen earlier, NodePort automatically creates a ClusterIP.
LoadBalancer
This type creates a load balancer for the application in cloud providers so that your application is offered through a URL.
We'll see about this later, but the only difference is changing the type from NodePort to LoadBalancer, but we still keep the nodePort key:
apiVersion: v1
kind: Service
metadata:
  name: myapp-service
spec:
  type: LoadBalancer # <<<<<
  ports:
  - targetPort: 80
    port: 80
    nodePort: 30008 # keeps
  selector:
    app: nginx
Namespaces
It's how Kubernetes divides things and isolates resources in the cluster. Two Deployments can have the same name, but they need to be in different namespaces.
Some namespaces are standard:
- default:
- kube-system: Used to deploy objects that keep Kubernetes running. It's isolated to prevent the user from deleting important things.
- kube-public: Used to deploy resources that are used by all users.
For example, a namespace use is to have a production environment and another development in the same cluster. If it's a production-only cluster, we can separate different applications or tools.
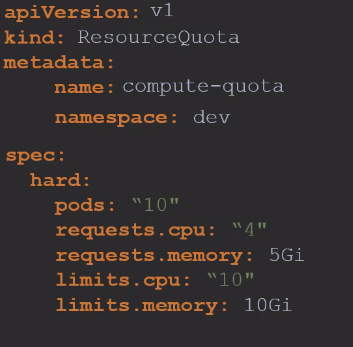
We can apply different policies in each namespace as well as network rules or even quotas.
For a pod to talk to another in the same namespace we can just use the service name that points to the pod in case of many pods, or in case of a single pod, we can use the pod name itself.
To reference a service in another namespace we use
service_name.namespace_name.svc.cluster.local
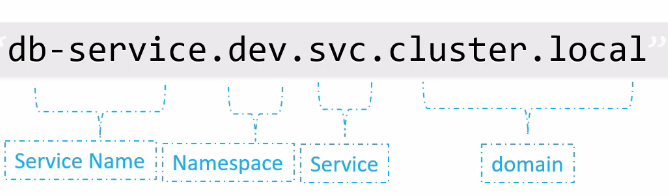
When a service is created, CoreDNS already creates this name resolution system.
To create a namespace:
apiVersion: v1
kind: Namespace
metadata:
  name: dev
kubectl get namespaces
NAME                STATUS   AGE
default             Active   68d
kube-system         Active   68d
kube-public         Active   68d
kube-node-lease     Active   68d
crossplane-system   Active   62d

# We're asking to filter pods from this specific namespace, if not passed it will get the current namespace which would be default
kubectl get pods --namespace kube-system
NAME                                     READY   STATUS      RESTARTS         AGE
helm-install-traefik-crd-mntff           0/1     Completed   0                68d
helm-install-traefik-hknb2               0/1     Completed   1                68d
svclb-traefik-fe102d0a-pdrkf             2/2     Running     92 (2d11h ago)   68d
svclb-traefik-fe102d0a-5h7hh             2/2     Running     92 (2d11h ago)   68d
metrics-server-648b5df564-n8xp7          1/1     Running     92 (2d11h ago)   68d
local-path-provisioner-957fdf8bc-r9t55   1/1     Running     78 (2d11h ago)   68d
svclb-traefik-fe102d0a-85546             2/2     Running     92 (2d11h ago)   68d
svclb-traefik-fe102d0a-qhgk9             2/2     Running     92 (2d11h ago)   68d
traefik-64f55bb67d-q9wv9                 1/1     Running     46 (2d11h ago)   68d
coredns-77ccd57875-v49sl                 1/1     Running     46 (2d11h ago)   68d

kubectl describe ns dev
Name:         dev
Labels:       kubernetes.io/metadata.name=dev
Annotations:  <none>
Status:       Active

No resource quota.

No LimitRange resource.

kubectl create ns prod
namespace/prod created

kubectl get ns
NAME                STATUS   AGE
default             Active   68d
kube-system         Active   68d
kube-public         Active   68d
kube-node-lease     Active   68d
crossplane-system   Active   62d
cert-manager        Active   37d
controller-plane    Active   21d
dev                 Active   2m55s
prod                Active   3s

kubectl delete ns dev prod
namespace "dev" deleted
namespace "prod" deleted
In metadata we can define that a resource is always created by passing the name of the namespace we want.
apiVersion: apps/v1
kind: Deployment
metadata:
  namespace: dev ## <<<<<
  labels:
    app: nginx
  name: nginx
...
There are resources that are at namespace level and others at cluster level. In cluster-level resources we can't define a specific namespace as demonstrated above.
kubectl config set-context --current --namespace=dev
Context "k3d-k3d-cluster" modified.
kubectl get pods
No resources found in dev namespace.

# To see pods in all namespaces
kubectl get pods --all-namespace
kubectl get pod -A
kubectl get pods -A --selector name=pod_name
To create quotas we can use the ResourceQuota resource.