CKS Study Environment
Instead of setting up a local environment, we'll use any cloud provider. We want our cluster exposed to the Internet.
Create a new Google account to get $300 in free credits. You can delete the account when you finish studying; you have 90 days. Set a reminder in your calendar and you're done.
What matters is having 2 virtual machines: one for the master and one for the worker.
The entire cluster will be built on these two machines from scratch. Obviously, we won't use any Kubernetes cloud solution because we want to develop our study and work on all points. Generally, cloud providers don't give us access to master nodes that run our control plane.
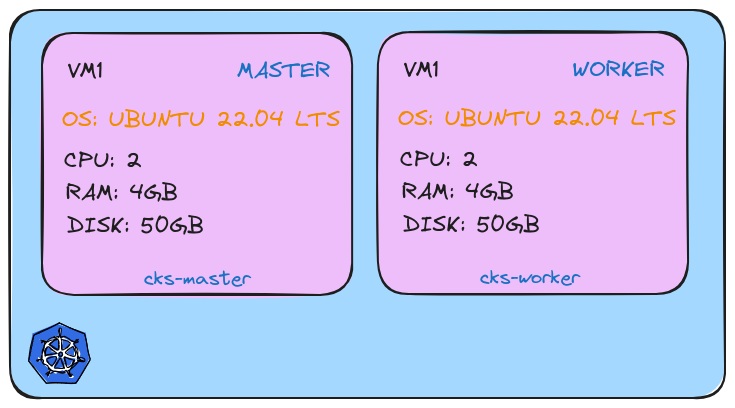
The exam environment is exactly as proposed above.
Google Cloud
If you've created your account, verify that the $300 credit is there.
You can go to Billing then to credits and check.

Before creating our machine, let's install the gcloud cli.
sudo apt-get update
sudo apt-get install apt-transport-https ca-certificates gnupg curl
curl https://packages.cloud.google.com/apt/doc/apt-key.gpg | sudo gpg --dearmor -o /usr/share/keyrings/cloud.google.gpg
curl https://packages.cloud.google.com/apt/doc/apt-key.gpg | sudo apt-key --keyring /usr/share/keyrings/cloud.google.gpg add -
curl https://packages.cloud.google.com/apt/doc/apt-key.gpg | sudo apt-key add -
echo "deb [signed-by=/usr/share/keyrings/cloud.google.gpg] https://packages.cloud.google.com/apt cloud-sdk main" | sudo tee -a /etc/apt/sources.list.d/google-cloud-sdk.list
sudo apt-get update && sudo apt-get install google-cloud-cli

gcloud --version
Google Cloud SDK 488.0.0
alpha 2024.08.09
beta 2024.08.09
bq 2.1.8
bundled-python3-unix 3.11.9
core 2024.08.09
gcloud-crc32c 1.0.0
gsutil 5.30

# To get the CLI working with the correct account, let's log in
# If the browser doesn't open, copy the link and paste it into your browser
gcloud auth login

# Then let's set our project ID
gcloud projects list
PROJECT_ID              NAME              PROJECT_NUMBER
refined-byte-432619-k6  My First Project  750256581768

gcloud config set project refined-byte-432619-k6
Updated property [core/project].

gcloud compute instances list
Listed 0 items.
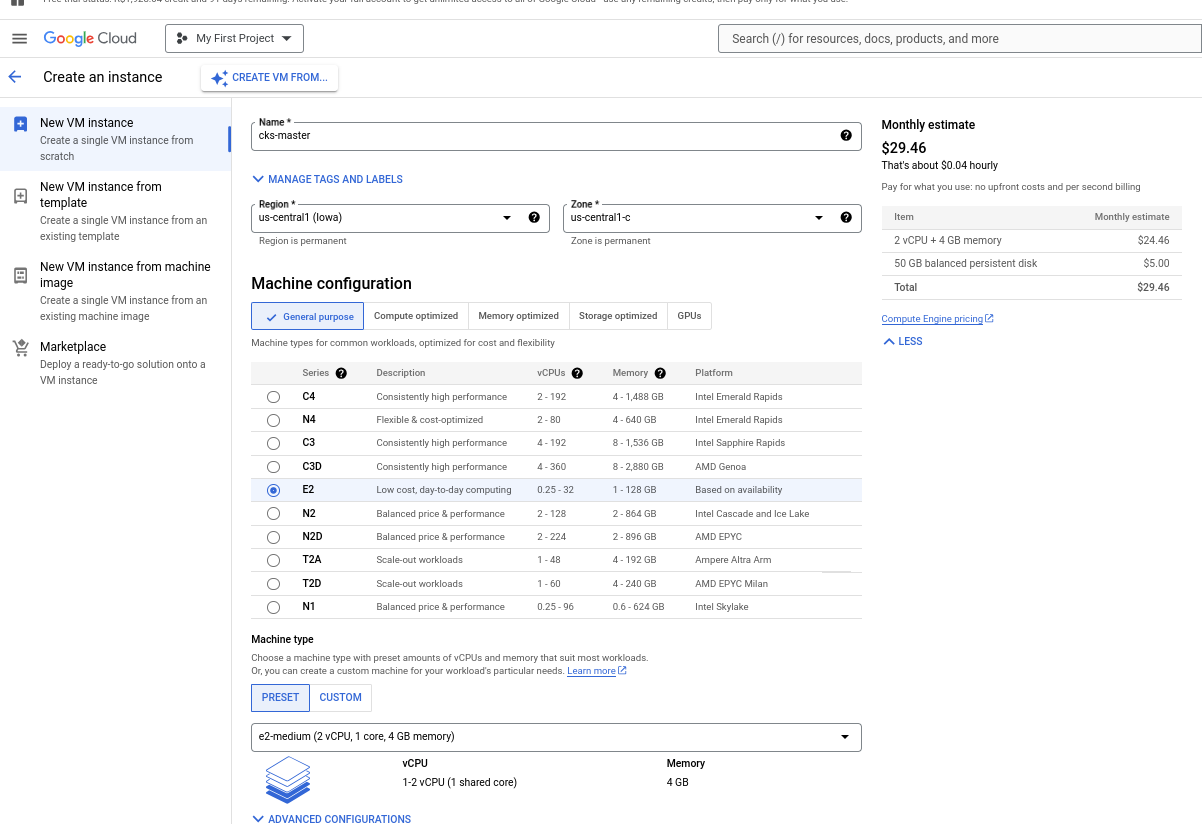
The next step is to create the VM. Repeat this step twice since one VM will be cks-master and the other cks-worker.
You'll go to Compute Engine then to VM Instances. Since it's the first time, it will appear to activate, so activate it. About two minutes later when you go again, it will go directly to the VM creation screen.
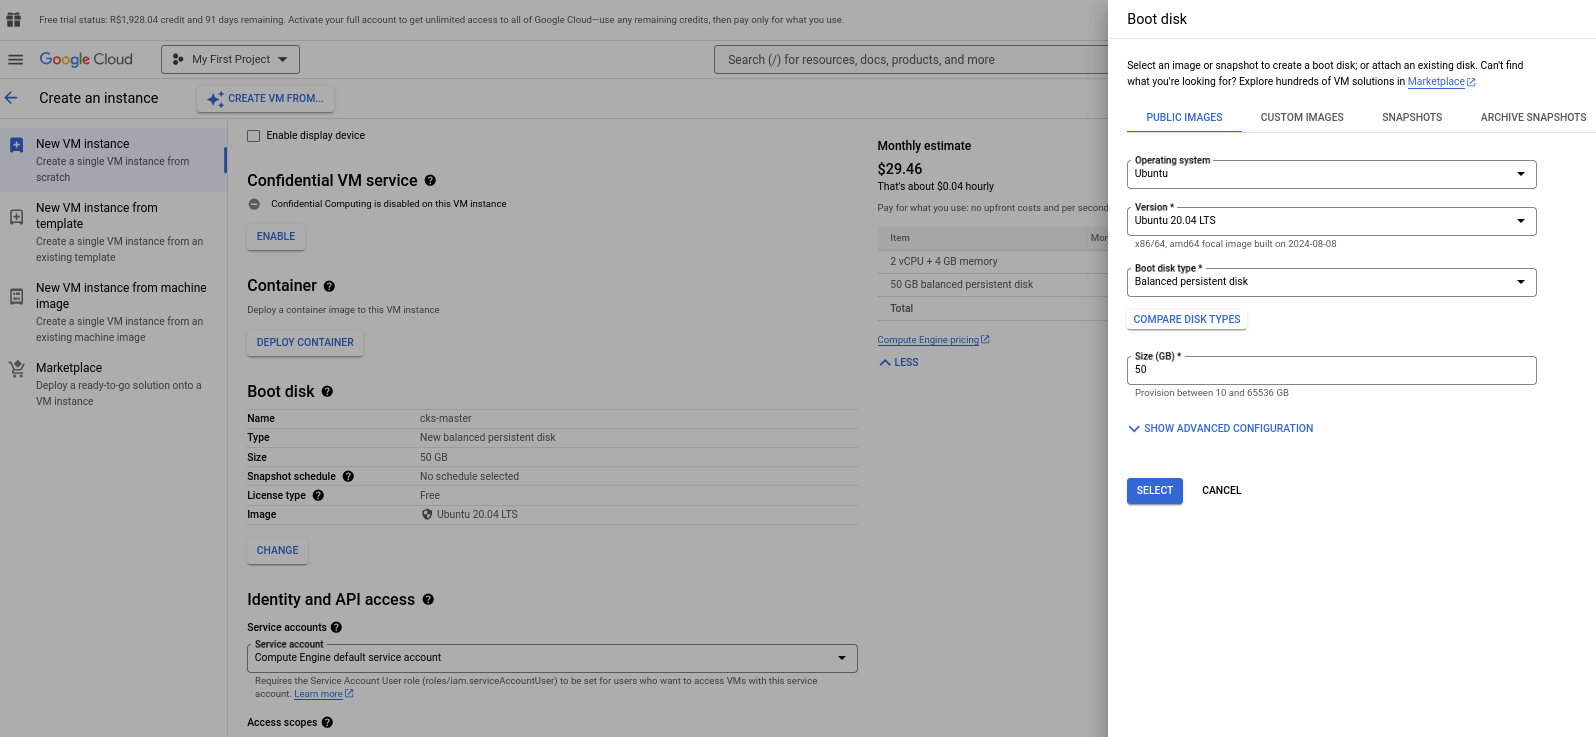
Follow the steps and remember to change the machine name, create both in the same region, change the operating system to Ubuntu 20.04 LTS with 50GB and the machine is an E2 medium. Then just create.
gcloud compute instances list
NAME        ZONE           MACHINE_TYPE  PREEMPTIBLE  INTERNAL_IP  EXTERNAL_IP   STATUS
cks-master  us-central1-c  e2-medium                  10.128.0.5   34.46.7.233   RUNNING
cks-worker  us-central1-c  e2-medium                  10.128.0.4   34.27.56.155  RUNNING

# To enter via ssh into the instance
gcloud compute ssh cks-master
gcloud compute ssh cks-worker
Setup Master
We'll divide it into 2 scripts. One common script that will be used on both machines, master and worker, and a second part that will only be for the master. I'll comment on the entire script, but most of what we have here was learned during CKA.
This command will be on both machines.
# Let's run as sudo
sudo -i
vi common.sh # Copy the script below
bash common.sh
We won't use Docker, we'll use containerd. So, to interact with containers, we'll use
crictl.
Common Script common.sh
#!/bin/sh

# Source: http://kubernetes.io/docs/getting-started-guides/kubeadm

set -e

# Checking the OS
source /etc/lsb-release
if [ "$DISTRIB_RELEASE" != "20.04" ]; then
    echo "################################# "
    echo "############ WARNING ############ "
    echo "################################# "
    echo
    echo "This script only works on Ubuntu 20.04!"
    echo "You're using: ${DISTRIB_DESCRIPTION}"
    echo "Better ABORT with Ctrl+C. Or press any key to continue the install"
    read
fi

KUBE_VERSION=1.30.3

# get platform
PLATFORM=`uname -p`

if [ "${PLATFORM}" == "aarch64" ]; then
  PLATFORM="arm64"
elif [ "${PLATFORM}" == "x86_64" ]; then
  PLATFORM="amd64"
else
  echo "${PLATFORM} has to be either amd64 or arm64/aarch64. Check containerd supported binaries page"
  echo "https://github.com/containerd/containerd/blob/main/docs/getting-started.md#option-1-from-the-official-binaries"
  exit 1
fi

### setup terminal
apt-get --allow-unauthenticated update
apt-get --allow-unauthenticated install -y bash-completion binutils
echo 'colorscheme ron' >> ~/.vimrc
echo 'set tabstop=2' >> ~/.vimrc
echo 'set shiftwidth=2' >> ~/.vimrc
echo 'set expandtab' >> ~/.vimrc
echo 'source <(kubectl completion bash)' >> ~/.bashrc
echo 'alias k=kubectl' >> ~/.bashrc
echo 'alias c=clear' >> ~/.bashrc
echo 'complete -F __start_kubectl k' >> ~/.bashrc
sed -i '1s/^/force_color_prompt=yes\n/' ~/.bashrc


### disable linux swap and remove any existing swap partitions
swapoff -a
sed -i '/\sswap\s/ s/^\(.*\)$/#\1/g' /etc/fstab


### remove packages
kubeadm reset -f || true
crictl rm --force $(crictl ps -a -q) || true
apt-mark unhold kubelet kubeadm kubectl kubernetes-cni || true
apt-get remove -y docker.io containerd kubelet kubeadm kubectl kubernetes-cni || true
apt-get autoremove -y
systemctl daemon-reload

### install podman
. /etc/os-release
echo "deb http://download.opensuse.org/repositories/devel:/kubic:/libcontainers:/stable/xUbuntu_${VERSION_ID}/ /" | sudo tee /etc/apt/sources.list.d/devel:kubic:libcontainers:testing.list
curl -L "http://download.opensuse.org/repositories/devel:/kubic:/libcontainers:/stable/xUbuntu_${VERSION_ID}/Release.key" | sudo apt-key add -
apt-get update -qq
apt-get -qq -y install podman cri-tools containers-common
rm /etc/apt/sources.list.d/devel:kubic:libcontainers:testing.list
cat <<EOF | sudo tee /etc/containers/registries.conf
[registries.search]
registries = ['docker.io']
EOF

### install packages
apt-get install -y apt-transport-https ca-certificates
mkdir -p /etc/apt/keyrings
rm /etc/apt/keyrings/kubernetes-1-28-apt-keyring.gpg || true
rm /etc/apt/keyrings/kubernetes-1-29-apt-keyring.gpg || true
rm /etc/apt/keyrings/kubernetes-1-30-apt-keyring.gpg || true
curl -fsSL https://pkgs.k8s.io/core:/stable:/v1.28/deb/Release.key | sudo gpg --dearmor -o /etc/apt/keyrings/kubernetes-1-28-apt-keyring.gpg
curl -fsSL https://pkgs.k8s.io/core:/stable:/v1.29/deb/Release.key | sudo gpg --dearmor -o /etc/apt/keyrings/kubernetes-1-29-apt-keyring.gpg
curl -fsSL https://pkgs.k8s.io/core:/stable:/v1.30/deb/Release.key | sudo gpg --dearmor -o /etc/apt/keyrings/kubernetes-1-30-apt-keyring.gpg
echo > /etc/apt/sources.list.d/kubernetes.list
echo "deb [signed-by=/etc/apt/keyrings/kubernetes-1-28-apt-keyring.gpg] https://pkgs.k8s.io/core:/stable:/v1.28/deb/ /" | sudo tee -a /etc/apt/sources.list.d/kubernetes.list
echo "deb [signed-by=/etc/apt/keyrings/kubernetes-1-29-apt-keyring.gpg] https://pkgs.k8s.io/core:/stable:/v1.29/deb/ /" | sudo tee -a /etc/apt/sources.list.d/kubernetes.list
echo "deb [signed-by=/etc/apt/keyrings/kubernetes-1-30-apt-keyring.gpg] https://pkgs.k8s.io/core:/stable:/v1.30/deb/ /" | sudo tee -a /etc/apt/sources.list.d/kubernetes.list
apt-get --allow-unauthenticated update
apt-get --allow-unauthenticated install -y docker.io containerd kubelet=${KUBE_VERSION}-1.1 kubeadm=${KUBE_VERSION}-1.1 kubectl=${KUBE_VERSION}-1.1 kubernetes-cni
apt-mark hold kubelet kubeadm kubectl kubernetes-cni

### install containerd 1.6 over apt-installed-version
wget https://github.com/containerd/containerd/releases/download/v1.6.12/containerd-1.6.12-linux-${PLATFORM}.tar.gz
tar xvf containerd-1.6.12-linux-${PLATFORM}.tar.gz
systemctl stop containerd
mv bin/* /usr/bin
rm -rf bin containerd-1.6.12-linux-${PLATFORM}.tar.gz
systemctl unmask containerd
systemctl start containerd

### containerd
cat <<EOF | sudo tee /etc/modules-load.d/containerd.conf
overlay
br_netfilter
EOF
sudo modprobe overlay
sudo modprobe br_netfilter
cat <<EOF | sudo tee /etc/sysctl.d/99-kubernetes-cri.conf
net.bridge.bridge-nf-call-iptables  = 1
net.ipv4.ip_forward                 = 1
net.bridge.bridge-nf-call-ip6tables = 1
EOF
sudo sysctl --system
sudo mkdir -p /etc/containerd

### containerd config
cat > /etc/containerd/config.toml <<EOF
disabled_plugins = []
imports = []
oom_score = 0
plugin_dir = ""
required_plugins = []
root = "/var/lib/containerd"
state = "/run/containerd"
version = 2

[plugins]

  [plugins."io.containerd.grpc.v1.cri".containerd.runtimes]
    [plugins."io.containerd.grpc.v1.cri".containerd.runtimes.runc]
      base_runtime_spec = ""
      container_annotations = []
      pod_annotations = []
      privileged_without_host_devices = false
      runtime_engine = ""
      runtime_root = ""
      runtime_type = "io.containerd.runc.v2"

      [plugins."io.containerd.grpc.v1.cri".containerd.runtimes.runc.options]
        BinaryName = ""
        CriuImagePath = ""
        CriuPath = ""
        CriuWorkPath = ""
        IoGid = 0
        IoUid = 0
        NoNewKeyring = false
        NoPivotRoot = false
        Root = ""
        ShimCgroup = ""
        SystemdCgroup = true
EOF

### crictl uses containerd as default
{
cat <<EOF | sudo tee /etc/crictl.yaml
runtime-endpoint: unix:///run/containerd/containerd.sock
EOF
}

### kubelet should use containerd
{
cat <<EOF | sudo tee /etc/default/kubelet
KUBELET_EXTRA_ARGS="--container-runtime-endpoint unix:///run/containerd/containerd.sock"
EOF
}

### start services
systemctl daemon-reload
systemctl enable containerd
systemctl restart containerd
systemctl enable kubelet && systemctl start kubelet
Specific script for the master to initialize the cluster.
# Remaining as sudo
vi initcluster.sh # copy the script below and :wq to exit and save
bash initcluster.sh
#!/bin/sh
# Source: http://kubernetes.io/docs/getting-started-guides/kubeadm
set -e
KUBE_VERSION=1.30.3
### init k8s
rm /root/.kube/config || true
kubeadm init --kubernetes-version=${KUBE_VERSION} --ignore-preflight-errors=NumCPU --skip-token-print --pod-network-cidr 192.168.0.0/16
mkdir -p ~/.kube
sudo cp -i /etc/kubernetes/admin.conf ~/.kube/config
### CNI
kubectl apply -f https://raw.githubusercontent.com/killer-sh/cks-course-environment/master/cluster-setup/calico.yaml
# etcdctl
ETCDCTL_VERSION=v3.5.1
ETCDCTL_ARCH=$(dpkg --print-architecture)
ETCDCTL_VERSION_FULL=etcd-${ETCDCTL_VERSION}-linux-${ETCDCTL_ARCH}
wget https://github.com/etcd-io/etcd/releases/download/${ETCDCTL_VERSION}/${ETCDCTL_VERSION_FULL}.tar.gz
tar xzf ${ETCDCTL_VERSION_FULL}.tar.gz ${ETCDCTL_VERSION_FULL}/etcdctl
mv ${ETCDCTL_VERSION_FULL}/etcdctl /usr/bin/
rm -rf ${ETCDCTL_VERSION_FULL} ${ETCDCTL_VERSION_FULL}.tar.gz
echo
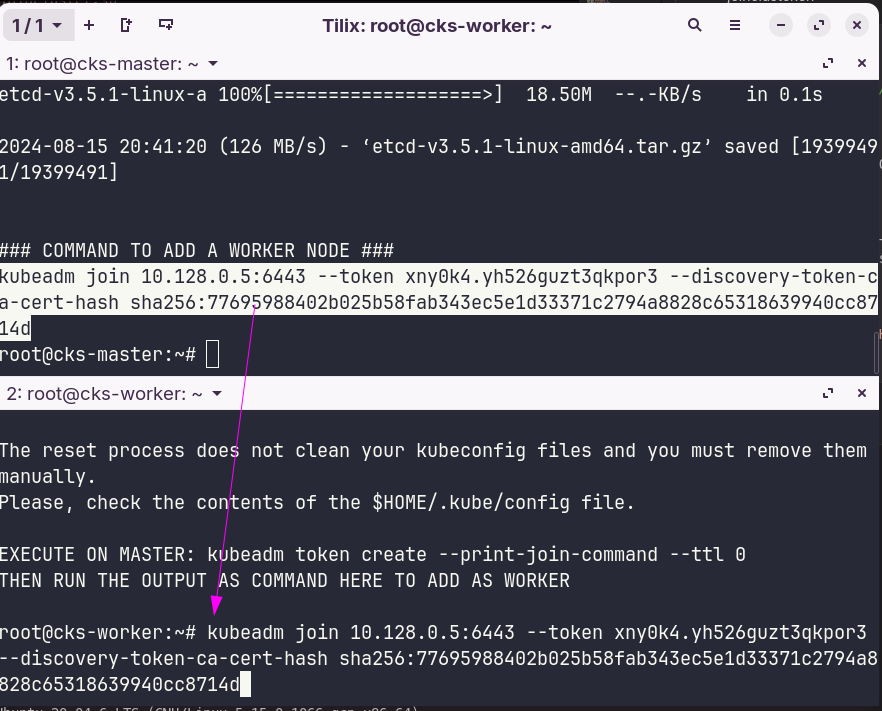
echo "### COMMAND TO ADD A WORKER NODE ###"
kubeadm token create --print-join-command --ttl 0
Setup Worker Node
Let's run this script on the worker node and finally the command above to join this node to the cluster. If you want, you can paste the output generated by the command on the master kubeadm token create --print-join-command --ttl 0.
# Remaining as sudo
vi joincluster.sh # copy the script below
bash joincluster.sh
joincluster.sh
#!/bin/sh

# Source: http://kubernetes.io/docs/getting-started-guides/kubeadm

set -e

KUBE_VERSION=1.30.3

### init k8s
kubeadm reset -f
systemctl daemon-reload
service kubelet start

echo
echo "EXECUTE ON MASTER: kubeadm token create --print-join-command --ttl 0"
echo "THEN RUN THE OUTPUT AS COMMAND HERE TO ADD AS WORKER"
echo
On the master, which is where we have the kubeconfig configured, we can now check the cluster.
root@cks-master:~# kubectl get nodes
NAME         STATUS   ROLES           AGE     VERSION
cks-master   Ready    control-plane   4m22s   v1.30.3
cks-worker   Ready    <none>          2m12s   v1.30.3

root@cks-master:~# kubectl get pods -A
NAMESPACE     NAME                                       READY   STATUS    RESTARTS   AGE
kube-system   calico-kube-controllers-75bdb5b75d-d2tl9   1/1     Running   0          6m1s
kube-system   canal-665nh                                2/2     Running   0          4m10s
kube-system   canal-8nn2f                                2/2     Running   0          6m1s
kube-system   coredns-7db6d8ff4d-cmcff                   1/1     Running   0          6m1s
kube-system   coredns-7db6d8ff4d-kdb4t                   1/1     Running   0          6m1s
kube-system   etcd-cks-master                            1/1     Running   0          6m16s
kube-system   kube-apiserver-cks-master                  1/1     Running   0          6m16s
kube-system   kube-controller-manager-cks-master         1/1     Running   0          6m19s
kube-system   kube-proxy-c2qx6                           1/1     Running   0          6m1s
kube-system   kube-proxy-gb77r                           1/1     Running   0          4m10s
kube-system   kube-scheduler-cks-master                  1/1     Running   0          6m16s
root@cks-master:~#
[!CAUTION] Remember to stop the machines when not studying. Stop, not destroy.

External Access
Kubernetes needs to offer services on ports between 30000 and 32767, so we need to open these ports on the machines.
gcloud compute firewall-rules create nodeports  --allow tcp:30000-32767
Creating firewall...⠹Created [https://www.googleapis.com/compute/v1/projects/refined-byte-432619-k6/global/firewalls/nodeports].
Creating firewall...done.
NAME       NETWORK  DIRECTION  PRIORITY  ALLOW            DENY  DISABLED
nodeports  default  INGRESS    1000      tcp:30000-32767        False