OAuth2
Have you ever stopped to think about how the login system works with Google, GitHub, Facebook, LinkedIn, etc. accounts? How do these applications access your data without needing your password?
If you work in IT, understanding how API security and authentication work is essential. We live in a world where everything is interconnected — and the foundation of this secure integration is called OAuth2 and OpenID Connect (OIDC).
Nowadays, when you log in with your account from another service, most of the time you're using OAuth2 without even realizing it. It's the protocol that allows apps to access your data without ever seeing your password. OIDC comes in as a layer on top of OAuth2 to enable real login, with user identity.
This documentation was made to help you understand, in a simple way, how all this works behind the scenes. We won't dive into all the technical details, but you'll leave here with a solid foundation to deepen your studies when you want.
Basic Concepts
Let's simplify with a little story:
A user, using a browser (client), wants to access an application — the so-called Service Provider (SP). This app needs to know who the user is. But, instead of storing credentials locally, it asks for help from an Identity Provider (IdP), like Google or Azure AD.
The IdP authenticates the user and sends a signal to the app saying: "this person is who they claim to be". It can include extra information: name, email, photo, groups... All this without sharing the password.
By the way, most companies today use some type of LDAP-based Identity Provider — usually Microsoft's Active Directory. You've probably heard this name, even without knowing exactly what it was. The IdP concentrates all user information: name, email, phone, photo, biometrics (fingerprint, iris), access groups and, of course, the password. Its role is to guarantee: "this person is who they claim to be" — and notify the Service Provider: "you can proceed, it's really them".
The great advantage of having an IdP is to centralize everything in a single system, accessible by multiple applications at the same time. If you update something in the IdP, this change reflects across the entire ecosystem.
Authentication ≠ Authorization
- The IdP authenticates: verifies who you are.
- The application authorizes: decides what you can do.
How does the IdP prove who you are?
Based on authentication factors. It can be one or a combination:
- Something only you know: password, security questions.
- Something only you have: token, certificate, mobile phone.
- Something unique to you: fingerprint, iris.
What you can do (authorization) is another story. This is a responsibility of the application or service to know whether you can do something or not, but it can also use information from the IdP, mainly about groups. If the user is a member of the admin group, then display other types of information. Note that the IdP didn't authorize anything, it only informed the group, but who allowed it was the application.
Basic LDAP
Studying LDAP still makes sense, but with strategic focus. It's not dead, but it's also no longer the protagonist.
When is it worth diving deeper?
- Legacy Corporate Infrastructure
- Corporate Linux environments: Centralized authentication with OpenLDAP, SSSD, FreeIPA and ideal for DevSecOps/Platform Eng. working with servers and IAM. Let's break this down:
- Authentication integrations with services that require LDAP. Sometimes it's easier to connect directly via LDAP than to do SSO via SAML
- When Azure AD Domain Services comes into play, especially in hybrid on-prem + Azure + AWS scenarios.
You don't need to become a hardcore specialist, but understanding the history and technical foundations is essential.
Before the modern IdP:
- Each app stored its own user database
- Passwords and sensitive data in the same application database
- Devs had access to personal data
- No standardization between apps
- Removing or changing permissions was manual chaos
- Audit and compliance? Almost impossible
That's when LDAP came in, and later Active Directory, to organize the house. It became the "central bank" of identities.
Traditional LDAP wasn't made for the Internet. Even with LDAPS (secure version), opening it to the world is dangerous even if we use VPN, Direct Connect, VPC peering, etc.
- Simple LDAP transmits passwords in plain text (without LDAPS)
- Kerberos doesn't handle NAT/firewalls well — depends on synchronized time and real-time tickets
- High latency can break authentication — causes timeouts, login failures
- Attack surface increases — exposing AD is opening a door to attacks, even with firewalls and ACLs
Technically, AD and the application can reside in different datacenters, but in terms of security it's not a good scenario. Exposing AD is out of the question and it should only be accessible on the intranet.
Because of this scenario, it was necessary to change the architecture and move to SAML. This reading is worthwhile to basically understand how it solved this scenario and what limitations still exist.
OAuth2 Protocol
It allows third-party applications to access resources on behalf of a user, without the user needing to share their password with these applications. It's like a notarized power of attorney for the third-party application to access a user's resource somewhere on behalf of that user.
Key Concepts
Resource Owner (User): Who owns the data (e.g., you).Client (Application): Who wants to access the data (e.g., a calendar app wanting to access your Google Calendar events). Can be any type of application, frontend, backend, mobile, etc.Authorization Server: Who authenticates the user and issues tokens (e.g., accounts.google.com).Resource Server: API that protects the data (e.g., api.google.com/calendar).
To present the concepts, we present the following scenario:
- An application wants to access the user's Google calendar data.
- The data, which are the resources, are stored in the database.
- To protect access to this data we have an API. In Google's case it's
api.google.com/calendar. - The application needs to have access only to the user's data, but with limited permission only to what it needs to do.
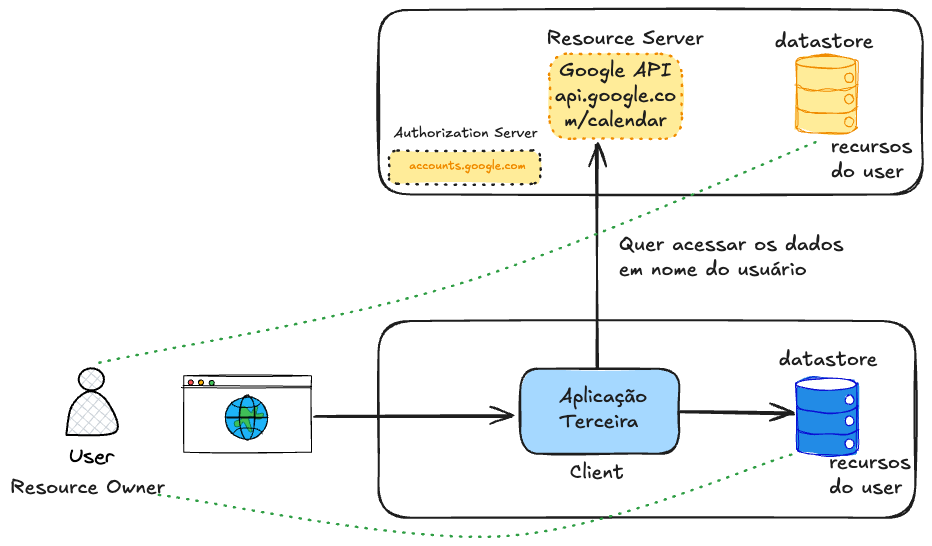
Making an analogy, this application needs to go to the notary and get a power of attorney to speak on behalf of the user. The user needs to give this permission notifying that they allow such resources to be available to this application for a specific time.
Note that the Authorization Server protects the API. In Google's case we have Google's Authorization Server, but if we wanted to access Microsoft's calendar, it would be necessary to access another API with a different Authorization Server, dedicated to Microsoft's resources. Another token would be generated to access Microsoft's API.
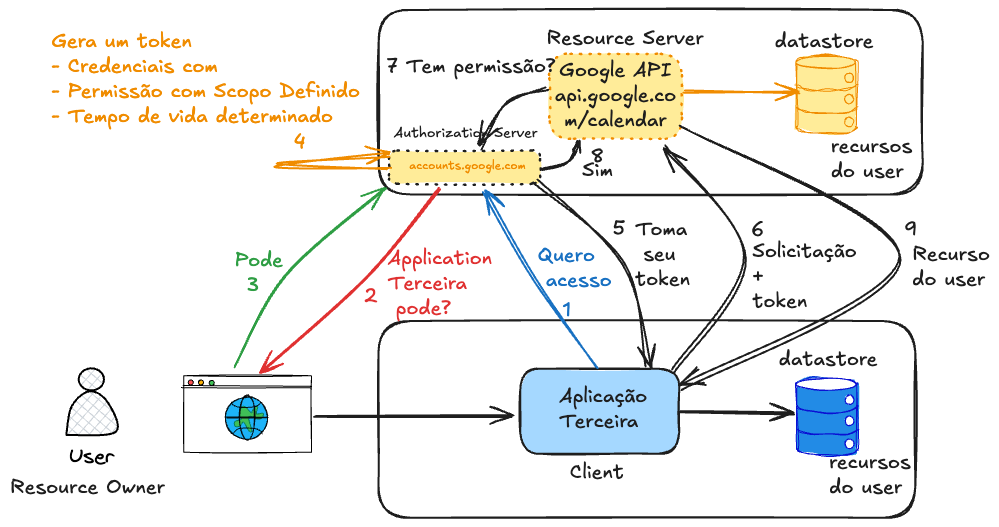
Permission is given through scopes (Scopes), which are the policies.
This power of attorney is nothing more than a token, that is, a credential, in the user's account but with access limits. In most cases this token has a lifetime. This token will have a specific scope, for example, scope=calendar.read calendar.write.
You've certainly had an experience of a pop-up appearing for you to log into your account to grant some type of access. When granting this type of access, what's actually happening is the creation of a specific token just for that account.
Comparing this scenario with what happens in SAML, we can already observe that one application talks directly to another without the need to redirect via browser.
| Resource | OAuth2 | SAML |
|---|---|---|
| Purpose | Authorization (with OIDC: login) | Authentication and Authorization |
| Token type | JSON (usually JWT) | XML (SAML Assertions) |
| Transport | HTTP (usually via REST) | XML via POST/Redirect |
| Format | Lightweight, modern, easy to read | Verbose, XML |
| Used in | APIs, SPAs, mobile, web apps | Enterprise (corporate SSO) |
| Complexity | Simple/modern | More complex |
| Mobile Support | Yes | Weak |
| JSON Compatibility | Yes | No |
| Extensible standard? | Yes | Limited |
Another concept to mention is token lifetime (Lifetime and Expiration). There are two types of tokens:
- Access token has a short life (~1h).
- Refresh token can last days/weeks (but can be revoked).
Authorization Server
Actually, before making the request to the desired API, it's necessary to get the access token with the proper permissions. Let's create an initial flow to explain the theory, but it's not the complete flow yet, just an initial sketch.
When getting access for the first time, the application should store this token for a period of time in its database so that the second time it doesn't need to re-request from the user if the token still has valid lifetime.
Speaking about the security of these transactions.
How does an Authorization Server know that the access request is coming from a valid client? How to be sure someone isn't trying to create a request and sending it in place of the real application?
We previously have to register the client with the Authorization Server we want to access. There's no secure way to use OAuth2 without prior client registration with the Authorization Server. This registration is what authorizes the client to participate in the flow. Without it, the Authorization Server has no way to validate anything.
This can be done in two ways:
- Manual (most common):
- Admins register clients via the Authorization Server's web panel (e.g., Keycloak, Auth0, Okta, Google, Facebook, GitHub, LinkedIn, Apple...)
- Ideal for apps you control or when the environment is more closed.
- Automatic (dynamic):
-
Via Dynamic Client Registration (RFC 7591)
-
The client self-registers via API.
-
Example: the client sends its data to an Authorization Server endpoint, like:
POST /register
Content-Type: application/json

{
  "client_name": "my_app",
  "redirect_uris": ["https://myapp.com/callback"],
  "grant_types": ["authorization_code"],
  "token_endpoint_auth_method": "none"
}
And we would have a response similar to this.
{
  "client_id": "automatically_generated",
  "client_secret": "if_confidential"
}
-
Some IdPs support this, but usually need to enable/configure carefully (control of who can register). This is more used in dynamic environments, like federated login or SaaS that accepts third-party apps.
Google and Facebook themselves don't support this. Although some Authorization Servers are capable of doing this, it's always good to keep this step manual when possible to avoid possible attacks.
The Authorization Server (AS) records a record with the client's data in its database.
| Field | What it is |
|---|---|
client_id | Client's unique identifier (generated or defined) |
client_secret (optional) | Password used to authenticate (only in confidential apps) |
redirect_uris | Allowed URLs for redirection (prevents phishing) |
grant_types | Authorized flows (e.g., authorization_code, client_credentials) |
allowed scopes | Which permissions the client can request (e.g., email, profile) |
token_endpoint_auth_method | How the client authenticates at the token endpoint (e.g., client_secret_post, none, etc) |
client_name | Friendly name (shown to user on consent screen) |
logo_uri (optional) | App logo, for consent screen |
contacts (optional) | Responsible persons' emails |
jwks_uri or jwks | (For apps that sign tokens or use mTLS) |
The AS generates a unique client_id and stores this data somewhere, usually some software like Vault, Cyberark or even a relational database. If it's confidential (backend, etc), it also generates a client_secret. These two values are like the client's username/password. One of the most important pieces of information is the redirect URLs.
When the client makes any request, the AS consults this record, verifies if the flow (grant_type), redirect URI, scopes, etc. are allowed and if something is outside the record it rejects the request. There are several types of flows, but we'll talk about this later in Grant Types.
The exact registration process depends on the Authorization Server, it's not the same for all.
Opaque Token
When making the request, the Authorization Server will know the permissions according to the token passed. This is the famous Bearer Token which is a token that looks like a random string, like:
d7f1b5b6-8a9c-4e33-98de-44c6f7ad0f4e
The thing is it doesn't carry readable info (unlike a JWT) so it's called opaque. It's just a reference to a valid token, which only the Authorization Server can interpret. Bearer tokens are used as Access Token, especially when:
- Security is a priority (less risk of info leakage)
- You want to centralize validation in the Authorization Server
- The Resource Server needs to always call the Auth Server to validate the token
-
The client requests a token from the Authorization Server
-
The Authorization Server returns the opaque token if the user allows.
-
The client uses the token to access an API
-
The API sends this token back to the Authorization Server (or introspects it) to see if:
- It's valid
- It hasn't expired
- It's associated with user X
- It has the correct scopes
-
The authorization server returns the response to the API, the most important being the scope of this token.
-
The API with the correct scope and information can authorize or reject the request.
It's important to mention the token has a validity time that can be configured depending on the Authorization Server. In Google's case it's 60 minutes. Generally IdP servers have this type of configuration, like Keycloak for example.
The bottleneck of Opaque Token is that every request to the API requires a trip to the Authorization Server to validate the token.
Imagine 100k requests per minute to your API. If each one does introspection:
- You saturate the Auth Server
- The API becomes slower (latency increases)
- Possible timeouts, 5xx errors and crashes
- It can become a SPOF (Single Point of Failure)
JWT Token
If the token carried all the necessary information, this call to the Authorization Server to fetch scopes and validate the token wouldn't be necessary.
JWT (JSON Web Token) is a self-contained token, which carries information inside itself, securely and compactly, in JSON format, encoded with base64.
A JWT is divided into 3 parts, separated by .. We'll see a huge string, but if you look closely there are some dots in the middle. The header, payload and signature contain much more fields than we'll demonstrate, but let's walk before we run.
The string below was divided to demonstrate the dots.
eyJhbGciOiJIUzI1NiIsInR5cCI6IkpXVCJ9.      --> Header
eyJzdWIiOiIxMjM0NTY3ODkwIiwibmFtZSI6IkpvZSIsImlhdCI6MTYwOTAwMDAwMH0.  --> Payload
SflKxwRJSMeKKF2QT4fwpMeJf36POk6yJV_adQssw5c   --> Signature
-
Header - Says which algorithm was used in the signature (e.g., HS256, RS256)
❯ echo "eyJhbGciOiJIUzI1NiIsInR5cCI6IkpXVCJ9" | base64 --decode
{"alg":"HS256","typ":"JWT"}% -
Payload - Carries the data (claims)
❯ echo "eyJzdWIiOiIxMjM0NTY3ODkwIiwibmFtZSI6IkpvZSIsImlhdCI6MTYwOTAwMDAwMH0" | base64 --decode
{"sub":"1234567890","name":"Joe","iat":160900000} -
Signature - Serves to verify if the token hasn't been altered. Signature = HMAC_SHA256(base64url(header) + "." + base64url(payload), secret_key).
Advantages:
- Local validation (without calling the Auth Server)
- High performance in large systems
- Easy to pass between systems
- Supports signatures with public/private key
Let's analyze a more elaborate JWT Token, but still fake.
eyJhbGciOiJSUzI1NiIsInR5cCI6IkpXVCIsImtpZCI6IjEyMzQ1NiJ9.eyJpc3MiOiJodHRwczovL2FjY291bnRzLmdvb2dsZS5jb20iLCJhdWQiOiJ5b3VyLWNsaWVudC1pZC5hcHBzLmdvb2dsZXVzZXJjb250ZW50LmNvbSIsInN1YiI6IjExMjIzMzQ0NTU1NjY3NyIsImVtYWlsIjoiam9hb0BleGFtcGxlLmNvbSIsImVtYWlsX3ZlcmlmaWVkIjp0cnVlLCJzY29wZSI6InJlYWRfdXNlciB3cml0ZV9jb250ZW50IiwiaWF0IjoxNzE2ODAwMDAwLCJleHAiOjE3MTY4MDM2MDB9.Lj9sOH4ZyNzKxjEf1mGZdYeEQZleJqmb5Mg5k1nhFA8i9ZK6u2nCwZWzdk0rY6bCehgNfCvE9SLs9FSG9A
Checking the central part (payload) we have this.
{
  "iss": "https://accounts.google.com",
  "aud": "your-client-id.apps.googleusercontent.com",
  "sub": "112233445556677",
  "email": "[email protected]",
  "email_verified": true,
  "scope": "read_user write_content",
  "iat": 1716800000,
  "exp": 1716803600
}
| Claim | Description |
|---|---|
iss | Who issued the token (issuer) |
aud | Who should accept this token (client_id) |
sub | User's unique ID (Subject) |
email | User's email |
scope | Permissions given by the user |
iat | Issued at (issued at - timestamp) |
exp | Expires at (expiration time - timestamp) |
The shorter the access token lifetime, the lower the impact if it leaks. And since the access token gives direct access to protected resources, it's highly sensitive.
Authorization Code Flow
So what would the complete flow look like?
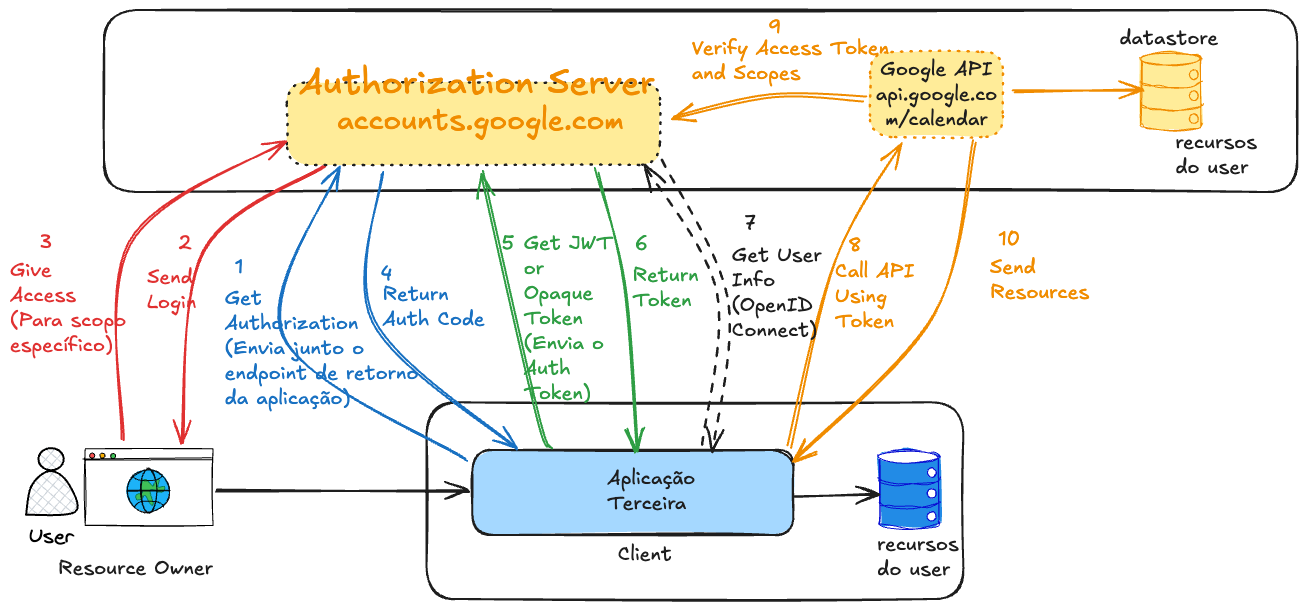
If you noticed, there are two different stages.
-
Get the Authorization Code: This step serves to authenticate the user and request consent. It's not a step that already delivers access. This code is temporary and useless alone.
-
Exchange the Authorization Code for an Access Token. This is the step where the application gains real permission.
Why are they separate? For security. This protects the real Access Token from exposure.
- The first step goes through the browser, where everything can leak.
- The second step is server-to-server, with client_secret or PKCE.
An optional step was added for OpenID Connect just so you understand when it will act. It's not mandatory to use, but it's good to understand the moment it's used for future studies.
In the last step, the Google Calendar API will extract the access token and verify it with the Authorization Server. This step only happens if the Opaque token type is used, because if it's JWT it will already be signed not requiring this verification with the Authorization Server. However, if it's JWT, the API needs to have the Authorization Server's public key available to do local verification. Every Authorization Server has its public endpoint so everyone has access to this key and it's up to the developer to store it somewhere.
There's also an endpoint in the Authorization Server just to invalidate a token.
This entire process is standardized in the RFC so that various libraries of different languages can follow the same flow.
Grant Types
There are several types of applications where the client can be implemented. It could be in the frontend, backend, mobile, a browser extension, in desktop software, etc.
When a client is in the application's backend (on the server) we call it a confidential client, because they run in a secure environment where Auth Code has less chance of being exposed. Public clients run in insecure environments like a browser, Android and iOS apps, browser extension, etc., where the risk is much higher.
Ideally, the token exchanged using the auth code should be stored as much as possible in the application's backend, but there are cases where this isn't possible. We showed a flow where the client is on the server (backend), but there are scenarios where this isn't possible. The Auth Code is valid for a short time to be exchanged for the Access Token and requires user login. The Access token on the other hand is already the token that allows access to the resource.
There's an extension for this type of auth code grant called PKCE (Proof Key for Code Exchange) where a code verifier parameter is dynamically generated by the client. A code challenge is created and sent when calling the Authorization Server endpoint. It's like a counter password dynamically generated by the client that will be stored in the Authorization server and when the Access token is exchanged this password will be used for confirmation. It's a kind of automatic 2FA! This serves so the Authorization Server knows it's the same client who made the request.
The grant_type is a mandatory parameter of the request made to the token endpoint, that is, when the client is requesting an access token from the Authorization Server. Here are some examples of main grant types.
-
Authorization Code (with PKCE)→ Frontend or public apps- User logs in and gives consent
- App gets an authorization code
- Backend exchanges this code for an access token
- Considered very secure
- It's the same flow, but with one more parameter.
-
Client Credentials→ Machine-to-machine- No user involved (everything in the system)
- Only the client (app) authenticates with client_id + client_secret
- Receives a token to act on its own behalf
- Used in microservices, jobs, internal APIs
-
Resource Owner Password Credentials(Deprecated)- App collects username and password directly from the user. This is not the Authorization Server login screen.
- Sends to Auth Server and receives the token
- Discouraged nowadays, due to security risks, because somehow we collect the user's password.
- Only used in very controlled systems (like internal CLI) and first client application, but it's still discouraged
-
Refresh Token- Not for login, but to renew the access token
- After the token expires, the refresh token is used to get a new one
- No need to log in again
- Used to keep the user's session alive
- Requires a previous flow (authorization code or password)
- When we get the access token we can also get the refresh token (which has a much longer expiration time, sometimes never expires). However, the refresh token only works to generate a new token and doesn't give access to resources.
grant_type | Name / Flow | Requires user login? | Used when? |
|---|---|---|---|
authorization_code | Authorization Code | Yes | Exchange code for token after login |
authorization_code + PKCE | Authorization Code (with PKCE) | Yes | Secure version for SPAs and mobile |
client_credentials | Client Credentials | No | Machine → machine auth |
password (obsolete) | Resource Owner Password Credentials | Yes | Legacy apps (not recommended) |
refresh_token | Refresh Token | No | Renew access_token without reauth |
urn:ietf:params:oauth:grant-type:device_code | Device Authorization Flow | Yes (outside device) | TVs, consoles, IoT |
urn:ietf:params:oauth:grant-type:jwt-bearer | JWT Bearer (RFC 7523) | No (token already signed) | Federated login between services with JWT |
urn:ietf:params:oauth:grant-type:token-exchange | Token Exchange (RFC 8693) | Depends | Exchange one token for another (e.g., delegation) |
The grant_type value defines how the Authorization Server should process the token request, according to the type of flow used.
You, as DevSecOps or aspiring Platform Engineer, should know:
| What to know | Why? |
|---|---|
| How grant types work | To understand secure integrations and flows between apps and services |
How to protect client_secrets and tokens | Because leakage = security breach |
| Configure IdPs (Keycloak, Auth0, etc) | Because often DevOps manages the Authorization Server |
| Expiration and revocation policies | To maintain security and session control |
| Monitor and log authentications | To respond to incidents and audit access |
Developer implements the flows so needs to know in depth. DevOps / DevSecOps / Platform Engineer ensures they are secure, scalable and well configured.