Network Namespaces
Network namespaces are used by containers to implement network isolation.
This is a very important study to understand how networking works in containers. It's the foundation for understanding many things in Docker and Kubernetes.
Speaking of processes, containers are separated from the host through namespaces.
If we think of a house, each child has their own room. This ensures that each one has privacy in their own room and can only mess up their own space. It would be like a house within a house, but the parents can check the rooms.
When we create a container, we ensure that the processes of that container cannot see the processes of the host and other containers. The container thinks it's alone. The host can see the processes of all containers.
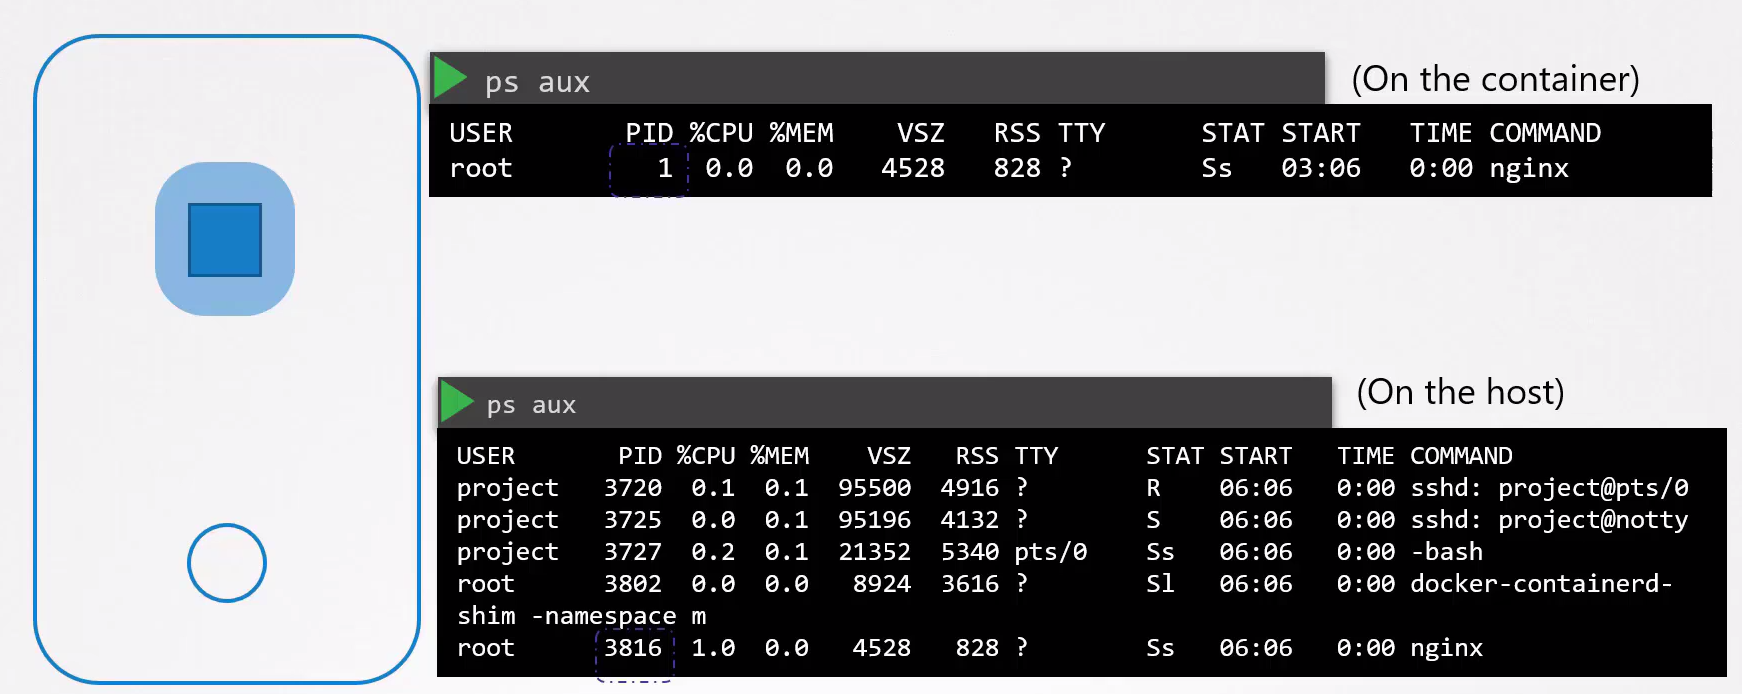
If you noticed in the image above, the container sees the process that keeps the container alive as PID 1, but the host sees this process as PID 3816.
Namespaces are an isolation created by Linux to "fool" the container.
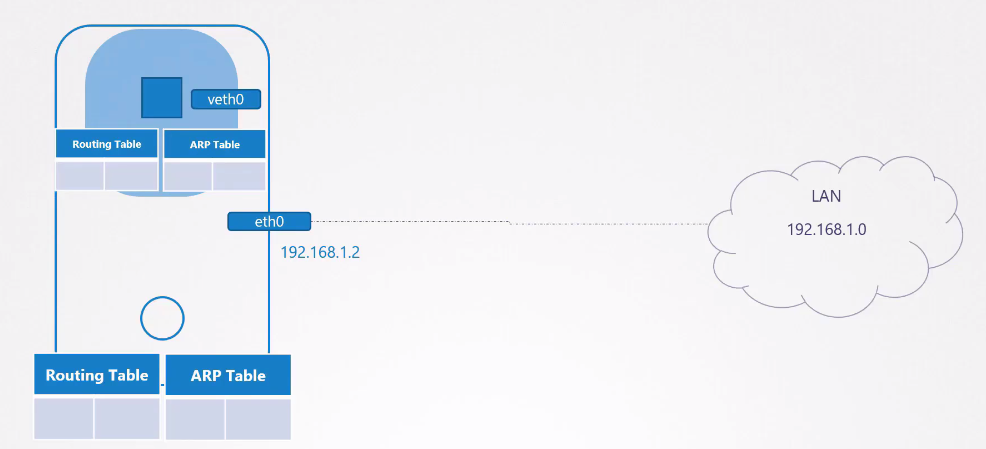
When a container is created, a network namespace is created on the host to isolate the network information of the host and the container. Who does this work? The container runtime. Let's try to do it ourselves and put this into practice.
Creating Network Namespaces
On an Ubuntu virtual machine, let's play around. Install the net-tools package. Let's create 4 namespaces to follow the study example.
# Creating the network namespace
ubuntu@ubuntu:~$ sudo ip netns add red
ubuntu@ubuntu:~$ sudo ip netns add blue
ubuntu@ubuntu:~$ sudo ip netns add orange
ubuntu@ubuntu:~$ sudo ip netns add gray
ubuntu@ubuntu:~$ sudo ip netns
gray
orange
blue
red

# Testing the interfaces that appear in each namespace
# HOST
ubuntu@ubuntu:~$ ip link
1: lo: <LOOPBACK,UP,LOWER_UP> mtu 65536 qdisc noqueue state UNKNOWN mode DEFAULT group default qlen 1000
    link/loopback 00:00:00:00:00:00 brd 00:00:00:00:00:00
2: enp1s0: <BROADCAST,MULTICAST,UP,LOWER_UP> mtu 1500 qdisc pfifo_fast state UP mode DEFAULT group default qlen 1000
    link/ether 52:54:00:bd:d2:80 brd ff:ff:ff:ff:ff:ff

# NAMESPACES
# In the red namespace we have the loopback interface with no access to the host's interfaces
ubuntu@ubuntu:~$ sudo ip -n red link
1: lo: <LOOPBACK> mtu 65536 qdisc noop state DOWN mode DEFAULT group default qlen 1000
    link/loopback 00:00:00:00:00:00 brd 00:00:00:00:00:00
ubuntu@ubuntu:~$ sudo ip -n blue link
1: lo: <LOOPBACK> mtu 65536 qdisc noop state DOWN mode DEFAULT group default qlen 1000
    link/loopback 00:00:00:00:00:00 brd 00:00:00:00:00:00
ubuntu@ubuntu:~$ sudo ip -n orange link
1: lo: <LOOPBACK> mtu 65536 qdisc noop state DOWN mode DEFAULT group default qlen 1000
    link/loopback 00:00:00:00:00:00 brd 00:00:00:00:00:00
ubuntu@ubuntu:~$ sudo ip -n gray link
1: lo: <LOOPBACK> mtu 65536 qdisc noop state DOWN mode DEFAULT group default qlen 1000
    link/loopback 00:00:00:00:00:00 brd 00:00:00:00:00:00


# The same applies to the arp table
# HOST
ubuntu@ubuntu:~$ arp
Address                  HWtype  HWaddress           Flags Mask            Iface
_gateway                 ether   52:55:0a:00:02:02   C                     enp1s0
10.0.2.3                 ether   52:55:0a:00:02:03   C                     enp1s0

# NAMESPACES
# No output for the namespaces
ubuntu@ubuntu:~$ sudo ip netns exec red arp
ubuntu@ubuntu:~$ sudo ip netns exec blue arp
ubuntu@ubuntu:~$ sudo ip netns exec orange arp
ubuntu@ubuntu:~$ sudo ip netns exec gray arp

# The same for routing tables
# HOST
ubuntu@ubuntu:~$ route
Kernel IP routing table
Destination     Gateway         Genmask         Flags Metric Ref    Use Iface
default         _gateway        0.0.0.0         UG    100    0        0 enp1s0
10.0.2.0        0.0.0.0         255.255.255.0   U     100    0        0 enp1s0
link-local      0.0.0.0         255.255.0.0     U     1000   0        0 enp1s0

# NAMESPACES
ubuntu@ubuntu:~$ sudo ip netns exec red route
Kernel IP routing table
Destination     Gateway         Genmask         Flags Metric Ref    Use Iface
ubuntu@ubuntu:~$ sudo ip netns exec blue route
Kernel IP routing table
Destination     Gateway         Genmask         Flags Metric Ref    Use Iface
ubuntu@ubuntu:~$ sudo ip netns exec orange route
Kernel IP routing table
Destination     Gateway         Genmask         Flags Metric Ref    Use Iface
ubuntu@ubuntu:~$ sudo ip netns exec gray route
Kernel IP routing table
Destination     Gateway         Genmask         Flags Metric Ref    Use Iface
So we've already seen a bit of namespace usage and the idea behind it, both in processes and networking. Now let's get our hands dirty.
Connecting Two Namespaces
With 4 namespaces we can then try to connect two namespaces red and blue to test. Now we're going to enter the virtual world.
The proposal will be this.

Just as we can connect two machines with cables, we can create our virtual cables between namespaces. A cable is linked to an interface, so we need to create the interfaces.
Let's create the virtual interfaces on the host and then make them available in the namespaces.
# Creating our virtual cable between one interface and another
ubuntu@ubuntu:~$ sudo ip link add veth-red type veth peer name veth-blue

ubuntu@ubuntu:~$ ip link
1: lo: <LOOPBACK,UP,LOWER_UP> mtu 65536 qdisc noqueue state UNKNOWN mode DEFAULT group default qlen 1000
    link/loopback 00:00:00:00:00:00 brd 00:00:00:00:00:00
2: enp1s0: <BROADCAST,MULTICAST,UP,LOWER_UP> mtu 1500 qdisc pfifo_fast state UP mode DEFAULT group default qlen 1000
    link/ether 52:54:00:bd:d2:80 brd ff:ff:ff:ff:ff:ff
5: veth-blue@veth-red: <BROADCAST,MULTICAST,M-DOWN> mtu 1500 qdisc noop state DOWN mode DEFAULT group default qlen 1000
    link/ether be:5c:26:df:91:c2 brd ff:ff:ff:ff:ff:ff
6: veth-red@veth-blue: <BROADCAST,MULTICAST,M-DOWN> mtu 1500 qdisc noop state DOWN mode DEFAULT group default qlen 1000
    link/ether f6:2e:b7:78:83:d0 brd ff:ff:ff:ff:ff:ff

# Now let's put these interfaces in each ns, because at the moment they're still on the host
ubuntu@ubuntu:~$ sudo ip link set veth-red netns red
ubuntu@ubuntu:~$ sudo ip link set veth-blue netns blue

# CHECKING... Notice that the interfaces are in the namespaces
sudo ip -n red link
1: lo: <LOOPBACK> mtu 65536 qdisc noop state DOWN mode DEFAULT group default qlen 1000
    link/loopback 00:00:00:00:00:00 brd 00:00:00:00:00:00
4: veth-red@if3: <BROADCAST,MULTICAST> mtu 1500 qdisc noqueue state DOWN mode DEFAULT group default qlen 1000
    link/ether f6:2e:b7:78:83:d0 brd ff:ff:ff:ff:ff:ff link-netns blue

ubuntu@ubuntu:~$ sudo ip -n blue link
1: lo: <LOOPBACK> mtu 65536 qdisc noop state DOWN mode DEFAULT group default qlen 1000
    link/loopback 00:00:00:00:00:00 brd 00:00:00:00:00:00
3: veth-blue@if4: <BROADCAST,MULTICAST> mtu 1500 qdisc noqueue state DOWN mode DEFAULT group default qlen 1000
    link/ether be:5c:26:df:91:c2 brd ff:ff:ff:ff:ff:ff link-netns red

# CHECKING... Can we see them on the host? No.
ip link
1: lo: <LOOPBACK,UP,LOWER_UP> mtu 65536 qdisc noqueue state UNKNOWN mode DEFAULT group default qlen 1000
    link/loopback 00:00:00:00:00:00 brd 00:00:00:00:00:00
2: enp1s0: <BROADCAST,MULTICAST,UP,LOWER_UP> mtu 1500 qdisc pfifo_fast state UP mode DEFAULT group default qlen 1000
    link/ether 52:54:00:bd:d2:80 brd ff:ff:ff:ff:ff:ff

# These interfaces don't have IPs, so let's add IPs to them so they're on the same network
ubuntu@ubuntu:~$ sudo ip -n red addr add 192.168.15.1/24 dev veth-red
ubuntu@ubuntu:~$ sudo ip -n blue addr add 192.168.15.2/24 dev veth-blue

# CHECKING
sudo ip netns exec red ip addr show dev veth-red
4: veth-red@if3: <BROADCAST,MULTICAST,UP,LOWER_UP> mtu 1500 qdisc noqueue state UP group default qlen 1000
    link/ether f6:2e:b7:78:83:d0 brd ff:ff:ff:ff:ff:ff link-netns blue
    inet 192.168.15.1/24 scope global veth-red
       valid_lft forever preferred_lft forever
    inet6 fe80::f42e:b7ff:fe78:83d0/64 scope link
       valid_lft forever preferred_lft forever
sudo ip netns exec blue ip addr show dev veth-blue
3: veth-blue@if4: <BROADCAST,MULTICAST,UP,LOWER_UP> mtu 1500 qdisc noqueue state UP group default qlen 1000
    link/ether be:5c:26:df:91:c2 brd ff:ff:ff:ff:ff:ff link-netns red
    inet 192.168.15.2/24 scope global veth-blue
       valid_lft forever preferred_lft forever
    inet6 fe80::bc5c:26ff:fedf:91c2/64 scope link
       valid_lft forever preferred_lft forever


# Let's bring up these interfaces because they were down.
ubuntu@ubuntu:~$ sudo ip -n red link set veth-red up
ubuntu@ubuntu:~$ sudo ip -n blue link set veth-blue up

# And ping to see if it works

ubuntu@ubuntu:~$ sudo ip netns exec red ping 192.168.15.2
PING 192.168.15.2 (192.168.15.2) 56(84) bytes of data.
64 bytes from 192.168.15.2: icmp_seq=1 ttl=64 time=0.065 ms
...
ubuntu@ubuntu:~$ sudo ip netns exec blue ping 192.168.15.1
64 bytes from 192.168.15.1: icmp_seq=1 ttl=64 time=0.027 ms
...
Now let's check the arp tables and routes
ubuntu@ubuntu:~$ sudo ip netns exec red arp
Address                  HWtype  HWaddress           Flags Mask            Iface
192.168.15.2             ether   be:5c:26:df:91:c2   C                     veth-red
ubuntu@ubuntu:~$ sudo ip netns exec blue arp
Address                  HWtype  HWaddress           Flags Mask            Iface
192.168.15.1             ether   f6:2e:b7:78:83:d0   C                     veth-blue
# THE HOST DOESN'T KNOW, SO COMPLETELY ISOLATED
ubuntu@ubuntu:~$ arp
Address                  HWtype  HWaddress           Flags Mask            Iface
_gateway                 ether   52:55:0a:00:02:02   C                     enp1s0
10.0.2.3                 ether   52:55:0a:00:02:03   C                     enp1s0

# THE SAME GOES FOR ROUTES
ubuntu@ubuntu:~$ sudo ip netns exec red route
Kernel IP routing table
Destination     Gateway         Genmask         Flags Metric Ref    Use Iface
192.168.15.0    0.0.0.0         255.255.255.0   U     0      0        0 veth-red
ubuntu@ubuntu:~$ sudo ip netns exec blue route
Kernel IP routing table
Destination     Gateway         Genmask         Flags Metric Ref    Use Iface
192.168.15.0    0.0.0.0         255.255.255.0   U     0      0        0 veth-blue
When you delete a namespace you delete all the resources that are in it.
Just to restart for the next example.
ubuntu@ubuntu:~$ sudo ip netns delete red
ubuntu@ubuntu:~$ sudo ip netns delete blue
ubuntu@ubuntu:~$ sudo ip netns add red
ubuntu@ubuntu:~$ sudo ip netns add blue
Connecting Multiple Namespaces
For two namespaces it's easy, but what about when we want to have multiple namespaces as we will do in Kubernetes.
Just as we created virtual cables, we can create virtual switches and connect the entire namespace to that switch. Creating a switch is the same as creating a virtual network inside the host since switches connect devices on the same network.
There are several solutions available to create this network inside the host. We have for example Linux Bridge and OvS (Open vSwitch). Let's use Linux Bridge.
The first thing we should do is create a network interface on the host, like any other, but being of type bridge.
ubuntu@ubuntu:~$ sudo ip link add v-net-0 type bridge
ubuntu@ubuntu:~$ ip link
1: lo: <LOOPBACK,UP,LOWER_UP> mtu 65536 qdisc noqueue state UNKNOWN mode DEFAULT group default qlen 1000
    link/loopback 00:00:00:00:00:00 brd 00:00:00:00:00:00
2: enp1s0: <BROADCAST,MULTICAST,UP,LOWER_UP> mtu 1500 qdisc pfifo_fast state UP mode DEFAULT group default qlen 1000
    link/ether 52:54:00:bd:d2:80 brd ff:ff:ff:ff:ff:ff
7: v-net-0: <BROADCAST,MULTICAST> mtu 1500 qdisc noop state DOWN mode DEFAULT group default qlen 1000
    link/ether 6e:33:35:a2:97:5c brd ff:ff:ff:ff:ff:ff
sudo ip link set dev v-net-0 up
Let's now create a pair of virtual cables for each namespace where one end will be inside the namespace and its other end inside the host that will act as a switch.
# Creating the pairs
ubuntu@ubuntu:~$ sudo ip link add veth-red type veth peer name veth-red-br
ubuntu@ubuntu:~$ sudo ip link add veth-blue type veth peer name veth-blue-br
ubuntu@ubuntu:~$ sudo ip link add veth-orange type veth peer name veth-orange-br
ubuntu@ubuntu:~$ sudo ip link add veth-gray type veth peer name veth-gray-br

# Moving the end of a pair inside each namespace
ubuntu@ubuntu:~$ sudo ip link set veth-red netns red
ubuntu@ubuntu:~$ sudo ip link set veth-blue netns blue
ubuntu@ubuntu:~$ sudo ip link set veth-orange netns orange
ubuntu@ubuntu:~$ sudo ip link set veth-gray netns gray

# Activating all interfaces that went to the namespaces and setting the IPs and masks
# Those that went to the namespaces and setting the IPs
ubuntu@ubuntu:~$ sudo ip -n red link set veth-red up
ubuntu@ubuntu:~$ sudo ip -n blue link set veth-blue up
ubuntu@ubuntu:~$ sudo ip -n orange link set veth-orange up
ubuntu@ubuntu:~$ sudo ip -n gray link set veth-gray up

# Setting the IPs of the interfaces inside the namespaces
ubuntu@ubuntu:~$ sudo ip -n red addr add 192.168.15.1/24 dev veth-red
ubuntu@ubuntu:~$ sudo ip -n blue addr add 192.168.15.2/24 dev veth-blue
ubuntu@ubuntu:~$ sudo ip -n orange addr add 192.168.15.3/24 dev veth-orange
ubuntu@ubuntu:~$ sudo ip -n gray addr add 192.168.15.4/24 dev veth-gray

# Those that remain on the host
ubuntu@ubuntu:~$ sudo ip link set veth-red-br up
ubuntu@ubuntu:~$ sudo ip link set veth-blue-br up
ubuntu@ubuntu:~$ sudo ip link set veth-orange-br up
ubuntu@ubuntu:~$ sudo ip link set veth-gray-br up

# This is where the magic happens - joining everyone together.
ubuntu@ubuntu:~$ sudo ip link set veth-red-br master v-net-0
ubuntu@ubuntu:~$ sudo ip link set veth-blue-br master v-net-0
ubuntu@ubuntu:~$ sudo ip link set veth-orange-br master v-net-0
ubuntu@ubuntu:~$ sudo ip link set veth-gray-br master v-net-0

# And finally we need v-net-0 to have an IP from the network on the host itself
ubuntu@ubuntu:~$ sudo ip addr add 192.168.15.5/24 dev v-net-0
This network is still private and has no access outside the host. The red namespace will never be able to connect with other interfaces outside its network. For this it's necessary to define a gateway.
Our host has access to both networks so it would serve as our router.
Connecting Namespaces with the Host
Although the namespace networks communicate with each other, they don't communicate with the host network if you don't define a gateway
ubuntu@ubuntu:~$ ip addr show
1: lo: <LOOPBACK,UP,LOWER_UP> mtu 65536 qdisc noqueue state UNKNOWN group default qlen 1000
    link/loopback 00:00:00:00:00:00 brd 00:00:00:00:00:00
    inet 127.0.0.1/8 scope host lo
       valid_lft forever preferred_lft forever
    inet6 ::1/128 scope host
       valid_lft forever preferred_lft forever
2: enp1s0: <BROADCAST,MULTICAST,UP,LOWER_UP> mtu 1500 qdisc pfifo_fast state UP group default qlen 1000
    link/ether 52:54:00:bd:d2:80 brd ff:ff:ff:ff:ff:ff`
        #HOST IP
    inet 10.0.2.15/24 brd 10.0.2.255 scope global dynamic noprefixroute enp1s0
       valid_lft 71671sec preferred_lft 71671sec
    inet6 fec0::4b95:b6e6:2660:9d70/64 scope site temporary dynamic
       valid_lft 86341sec preferred_lft 14341sec
    inet6 fec0::5054:ff:febd:d280/64 scope site dynamic mngtmpaddr
       valid_lft 86341sec preferred_lft 14341sec
    inet6 fe80::5054:ff:febd:d280/64 scope link
       valid_lft forever preferred_lft forever
7: v-net-0: <BROADCAST,MULTICAST,UP,LOWER_UP> mtu 1500 qdisc noqueue state UP group default qlen 1000
    link/ether 6e:33:35:a2:97:5c brd ff:ff:ff:ff:ff:ff
    inet 192.168.15.5/24 scope global v-net-0
       valid_lft forever preferred_lft forever
    inet6 fe80::6c33:35ff:fea2:975c/64 scope link
       valid_lft forever preferred_lft forever
8: veth-red-br@if9: <BROADCAST,MULTICAST,UP,LOWER_UP> mtu 1500 qdisc noqueue master v-net-0 state UP group default qlen 1000
    link/ether da:96:b7:3f:34:43 brd ff:ff:ff:ff:ff:ff link-netns red
    inet6 fe80::d896:b7ff:fe3f:3443/64 scope link
       valid_lft forever preferred_lft forever
10: veth-blue-br@if11: <BROADCAST,MULTICAST,UP,LOWER_UP> mtu 1500 qdisc noqueue master v-net-0 state UP group default qlen 1000
    link/ether 4a:cb:ef:ec:9b:26 brd ff:ff:ff:ff:ff:ff link-netns blue
    inet6 fe80::48cb:efff:feec:9b26/64 scope link
       valid_lft forever preferred_lft forever
12: veth-orange-br@if13: <BROADCAST,MULTICAST,UP,LOWER_UP> mtu 1500 qdisc noqueue master v-net-0 state UP group default qlen 1000
    link/ether e6:d6:7a:e9:14:82 brd ff:ff:ff:ff:ff:ff link-netns orange
    inet6 fe80::e4d6:7aff:fee9:1482/64 scope link
       valid_lft forever preferred_lft forever
14: veth-gray-br@if15: <BROADCAST,MULTICAST,UP,LOWER_UP> mtu 1500 qdisc noqueue master v-net-0 state UP group default qlen 1000
    link/ether b6:e8:a4:01:63:d7 brd ff:ff:ff:ff:ff:ff link-netns gray
    inet6 fe80::b4e8:a4ff:fe01:63d7/64 scope link
       valid_lft forever preferred_lft forever

#ATTEMPT TO PING THE HOST
ubuntu@ubuntu:~$ sudo ip netns exec red ping 10.0.2.15
ping: connect: Network is unreachable
Let's then define routes so that the host is reachable.
# We define that if we want to go to the 10.0.2.0/24 network we will have to go through the v-net-0 IP
ubuntu@ubuntu:~$ sudo ip netns exec red ip route add 10.0.2.0/24 via 192.168.15.5
ubuntu@ubuntu:~$ sudo ip netns exec red ping 10.0.2.15
PING 10.0.2.15 (10.0.2.15) 56(84) bytes of data.
64 bytes from 10.0.2.15: icmp_seq=1 ttl=64 time=0.130 ms
64 bytes from 10.0.2.15: icmp_seq=2 ttl=64 time=0.035 ms

#So let's continue and do this for everyone
ubuntu@ubuntu:~$ sudo ip netns exec blue ip route add 10.0.2.0/24 via 192.168.15.5
ubuntu@ubuntu:~$ sudo ip netns exec orange ip route add 10.0.2.0/24 via 192.168.15.5
ubuntu@ubuntu:~$ sudo ip netns exec gray ip route add 10.0.2.0/24 via 192.168.15.5

# Let's also add routes to go out to the internet
ubuntu@ubuntu:~$ sudo ip netns exec red ip route add default via 192.168.15.5
ubuntu@ubuntu:~$ sudo ip netns exec blue ip route add default via 192.168.15.5
ubuntu@ubuntu:~$ sudo ip netns exec orange ip route add default via 192.168.15.5
ubuntu@ubuntu:~$ sudo ip netns exec gray ip route add default via 192.168.15.5
Using the Host as NAT
But would it be possible to go out to the Internet and ping Google since the host has access to the Internet? No, it still wouldn't be possible. It also wouldn't be possible to access other machines on the same host network.
The packets will leave the namespace with a header with the source IP and we need to transform them as if they had come from the host and not from a network inside the host. For this we need to mask these packets using iptables.
iptables -t nat -A POSTROUTING -s 192.168.15.0*24 -j MASQUERADE
Connecting from Outside into a Namespace
If we had some service running in a namespace how would it be reachable? Let's imagine a service that is using port 80 of the container. Actually it is reachable through the host, but mapped into the namespace.
iptables -t nat -A PREROUTING --dport 80 --to-destination 192.168.15.1:80 -j DNAT
If you noticed well, it's exactly how cluster IP works in Kubernetes.
If we wanted to map port 8080 of the host to send to port 80 of the container it would be.
iptables -t nat -A PREROUTING --dport 8080 --to-destination 192.168.15.1:80 -j DNAT