Using Terraform in Backstage
Since Terraform is the most widely used IaC tool, it's important to create an example about it. In the future, we will create a complete demo using Crossplane.
If someone needs a cloud infrastructure resource, we can offer it through a template that creates the inputs for Terraform.
I will create a repository that will contain this template. I will use the template generator I created previously just to generate the repository and then work on the code. If you prefer, create a repository that will be imported.
git clone [email protected]:davidpuziol/backstage-template-aws-vm.git

cd backstage-template-aws-vm

tree
.
├── catalog-info.yaml
├── docs
│   └── index.md
└── template
    └── main

2 directories, 3 files
So we already have our skeleton and what we need to do is work on the template and place the Terraform files there to undergo the scaffolder process.
An important detail is that in this template we will do it in the simplest way possible, passing everything needed for execution. This is not the best way to do it, it's just for practice.
After working on the template, let's register some details.
tree -a -I '.git'
.
├── catalog-info.yaml # Template definitions
├── docs
│   └── index.md # Documentation
└── template
    ├── catalog-info.yaml # This will be our resource
    ├── .github
    │   └── workflows
    │       └── instance.yml # GitHub Action that will run Terraform
    ├── main.tf # Terraform files
    ├── provider.tf
    ├── variables.tf
    └── versions.tf
The required variables are in variables.tf. They will be defined during the apply command using the -var flag. We will see this later.
variable "access_key" {
  type = string
}

variable "secret_key" {
  type = string
}

variable "awsRegion" {
  type = string
}

variable "instanceName" {
  type = string
}

variable "instanceType" {
  type = string
}
The AWS cloud provider needs the credentials that must be in the environment variables.
provider "aws" {
  region     = var.awsRegion
  access_key = var.access_key
  secret_key = var.secret_key
}
The catalog-info.yaml inside the template will represent the VM as a Resource within the system. An important thing to mention is that if you use a custom type, you need to change the settings in Backstage to show the CI/CD tab.
apiVersion: backstage.io/v1alpha1
kind: Resource
metadata:
  name: ${{ values.name }}
  description: ${{ values.description }} Virtual Machine EC2
  annotations:
    # The URL needs to be in the owner/project format and is already being corrected during parameter passing.
    # We will see this later.
    github.com/project-slug: ${{ values.urlRepo }}
  tags: # Try to use tags to filter resources
    - ${{ values.principalTag }}
    {%- for tag in values.otherTags %}
    - ${{ tag }}
    {%- endfor %}
spec:
  type: service
  owner: ${{ values.owner }}
Now let's look at the template. Part of this template was created from the template generator and modified for this scenario.
apiVersion: scaffolder.backstage.io/v1beta3
kind: Template

metadata:
  name: aws-vm
  title: aws-vm Template
  description: Base template for creating aws-vm-based projects
  annotations:
    backstage.io/techdocs-ref: dir:.

  tags: # Template tags
    - infra
    - terraform

spec:

  owner: group:default/team-idp
  type: resource
  lifecycle: production

  parameters:

    - title: General Inputs
      required:
        - owner
        - principalTag
      properties:
        owner:
          title: Owner
          type: string
          description: Owner of the component
          ui:field: OwnerPicker
          ui:options:
            allowArbitraryValues: false
            catalogFilter:
              kind: Group
              spec.type: team
        principalTag: # No tag is mandatory, we add it to force filtering later.
          title: General Tag
          type: string
          description: Principal Tag
          default: infra
          enum:
            - infra
            - general
          ui:help: 'Used to categorize the template'
        otherTags:
          description: List of other tags (only lowercase letters and hyphen allowed)
          type: array
          items:
            type: string
            pattern: "^[a-z]+$"
          ui:field: MultiTagInputField
          # Both tags will be injected later into the resource that maps the VM into Backstage.

    ### THE DATA WE NEED TO CREATE THE VM
    - title: EC2 Instance Creation
      required:
        - InstanceName
        - Region
        - InstanceType
      properties:
        InstanceName:
          title: Instance Name will be the same name as the resource created in Backstage.
          type: string
          description: Instance name that will be created
          ui:autofocus: true

        Region:
          title:  AWS Region
          type: string
          description: Name of the region where you want to create your create-ec2-instance eg:- us-east-1, ap-south-1 etc.
        InstanceType:
          title: Type of Instance.
          type: string
          description: Type of the instance that you want to deploy, for eg:- t2.medium, t3.medium etc.
          enum:
            - t2.medium
            - t2.small
            - t2.micro
            - t3.medium

        Action: # The pipeline can run apply or destroy
          title: Actions
          type: string
          description: What action do you want to perform? Create or delete?
          enum:
            - apply
            - destroy
          ui:help: 'Pipeline will run this'

    # As mentioned earlier, this method requires passing credentials to be stored in the repository. I don't like this, but for a simple explanation it works.
    - title: AWS Credentials
      required:
        - AWSKey
        - AWSSecret
      properties:
        AWSKey:
          title: AWS Access Key
          type: string
          description: Your AWS Access Key to be a Secret in Repo.
          ui:autofocus: true
          ui:field: Secret
        AWSSecret:
          title: AWS Secret Key
          type: string
          description: Yout AWS Secret Key to be a Secret in Repo.
          ui:autofocus: true
          ui:field: Secret

    - title: Choose a Repository Location
      required:
        - repoUrl
      properties:
        repoUrl:
          title: Location of the repository
          type: string
          ui:field: RepoUrlPicker
          ui:options:
            allowedHosts:
              - github.com

  steps:
    # Filling in the variables
    - id: fetch-base
      name: Fetch Base
      action: fetch:template
      input:
        url: ./template
        values:
          name: ${{ parameters.InstanceName }}
          owner: ${{ parameters.owner }}
          principalTag: ${{ parameters.principalTag }}
          otherTags: ${{ parameters.otherTags }}
          description: This is ${{ parameters.InstanceName }}

    # Creating the repository
    - id: publish
      name: Publish
      action: publish:github
      input:
        allowedHosts: ['github.com']
        description: This is ${{ parameters.InstanceName }}
        repoUrl: ${{ parameters.repoUrl }}
        repoVisibility: private
        defaultBranch: main
        secrets:
          awsAccessKey: ${{ parameters.AWSKey }}
          awsSecretKey: ${{ parameters.AWSSecret }}

    # Running the pipeline.
    # At this point we are passing the input values expected by the pipeline to define the variables and the AWS credentials will be retrieved from the secret.
    - id: github-action
      name: Starting GitHub action
      action: github:actions:dispatch
      input:
        workflowId: instance.yml
        repoUrl: ${{ parameters.repoUrl }}
        branchOrTagName: main
        workflowInputs:
          instanceName: ${{ parameters.InstanceName }}
          awsRegion: ${{ parameters.Region }}
          instanceType: ${{ parameters.InstanceType }}
          action: ${{ parameters.Action }}

    # Registering in Backstage
    - id: register
      name: Register
      action: catalog:register
      input:
        repoContentsUrl: ${{ steps['publish'].output.repoContentsUrl }}
        catalogInfoPath: '/catalog-info.yaml'

  # Output.
  output:
    links:
      - title: Repository
        url: ${{ steps['publish'].output.remoteUrl }}
      - title: Open in catalog
        icon: catalog
        entityRef: ${{ steps['register'].output.entityRef }}
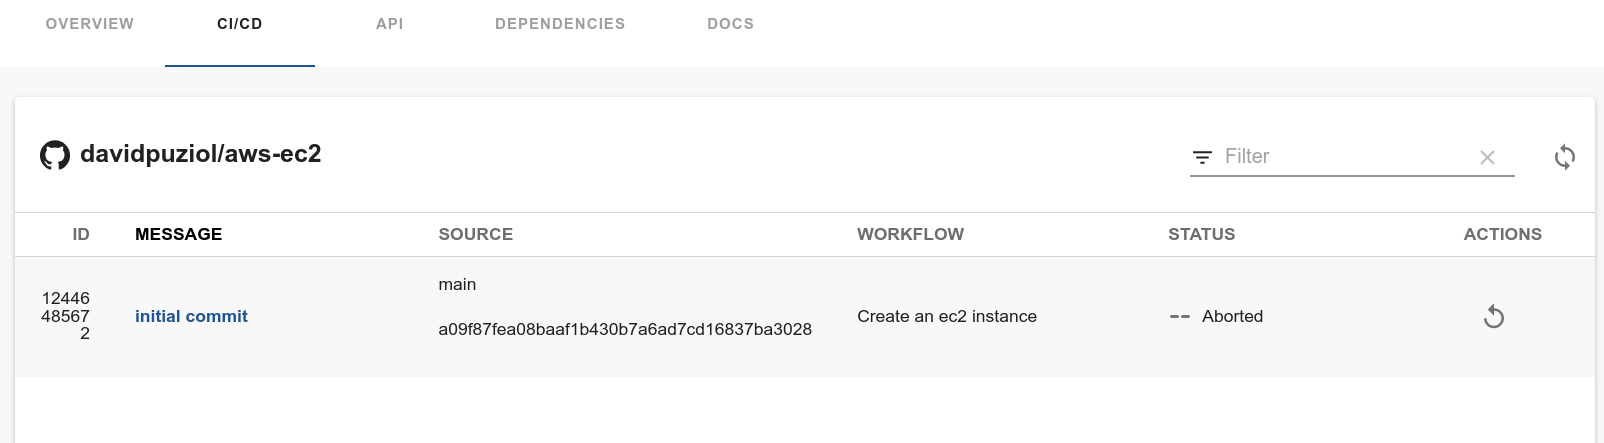
I will repeat code in the jobs to make understanding easier at this point. The .github/workflows/instance.yml file will be triggered after the repository is published. Let's check it out.
This workflow can be triggered manually within the CI/CD tab in the resource.
name: Create an ec2 instance
# This workflow is to be triggered manually
on:
  workflow_dispatch:
  # Variable inputs
    inputs:
      instanceName:
        description: 'Name of the AWS Instance'
        required: true
      awsRegion:
        description: 'AWS Region for the instance'
        required: true
      instanceType:
        description: 'AWS instance type'
        required: true
      action:
        description: 'Action to perform (apply/destroy)'
        required: true
jobs:
  apply_ec2: # Will only run if action is apply
    runs-on: ubuntu-latest

    if: ${{ github.event.inputs.action == 'apply' }}
    steps:
    # Get the code
    - name: Checkout code
      uses: actions/checkout@v2

    # Configuring environment variables for credentials
    - name: Configure AWS credentials
      uses: aws-actions/configure-aws-credentials@v2
      with:
        aws-access-key-id: ${{ secrets.AWSACCESSKEY }}
        aws-secret-access-key: ${{ secrets.AWSSECRETKEY }}
    # Running some checks.
    - name: Terraform Init
      run: terraform init
      working-directory: .

    - name: Terraform Format
      run: terraform fmt
      working-directory: .

    - name: Terraform Validate
      run: terraform validate
      working-directory: .

    # This is where we apply by passing the variable values.
    - name: terraform apply
      run: terraform apply -var instanceName=${{ github.event.inputs.instanceName }} -var awsRegion=${{ github.event.inputs.awsRegion }} -var instanceType=${{ github.event.inputs.instanceType }} -auto-approve
      working-directory: .

  destroy_instance: # Will only run if action is destroy
    runs-on: ubuntu-latest

    if: ${{ github.event.inputs.action == 'destroy' }}

    steps:
    - name: Checkout code
      uses: actions/checkout@v2

    - name: Configure AWS credentials
      uses: aws-actions/configure-aws-credentials@v2
      with:
        aws-access-key-id: ${{ secrets.AWSACCESSKEY }}
        aws-secret-access-key: ${{ secrets.AWSSECRETKEY }}

    - name: Terraform Init
      run: terraform init
      working-directory: .

    - name: Terraform FMT
      run: terraform fmt
      working-directory: .

      # The only difference is that here we will destroy everything
    - name: Terraform Destroy
      run: terraform destroy -var instanceName=${{ github.event.inputs.instanceName }} -var awsRegion=${{ github.event.inputs.awsRegion }} -auto-approve
      working-directory: .
Other Strategies
The strategy above uses GitHub Actions to apply and involves having the secrets configured in the repository. The solution would be to inject these secrets using a vault to eliminate them from the repository.
Another solution would be to use an action that creates a pull request to a repository that Atlantis manages, and only after the pull request is accepted would the runner activated by Atlantis apply the Terraform.
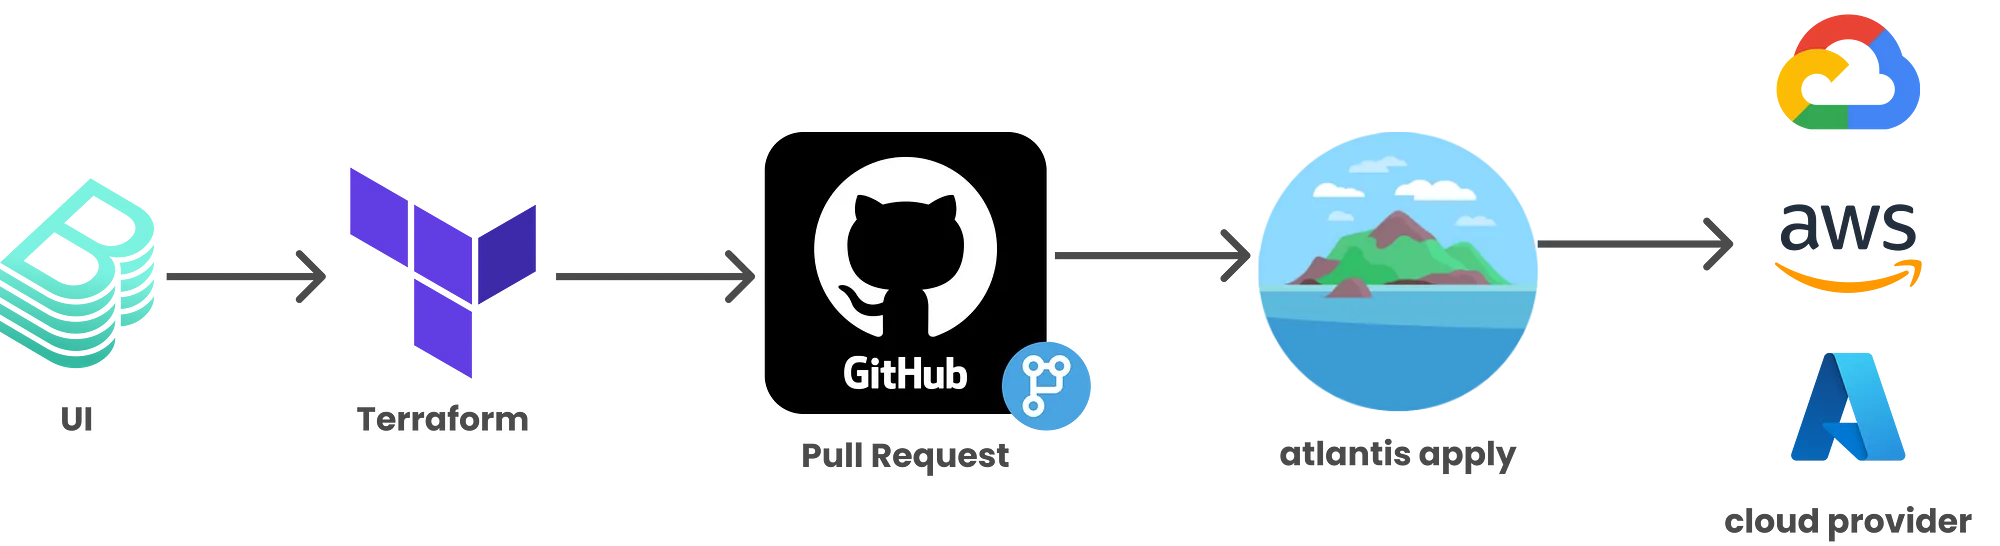
The first approach is more self-service, but needs to be better designed for secret management. The second approach maintains more control since someone needs to accept the pull request for Atlantis to do its job.
The idea I like most is using Crossplane together with ArgoCD. All credentials stay in Kubernetes and we don't need pipelines or Atlantis. I will create a better example of this in the near future.